

The Grand Library holdsmany secrets. Here’s how to solve the Grand Library puzzle and find all missable chests in Wuthering Waves.
How to Solve the Grand Library Puzzle and Find All Missable Chests in Wuthering Waves
As you move through the Wuthering Waves campaign, you’ll eventually be given a map to the Grand Library and informed you’ll have to unravel its secrets. Take the elevator in Jizhou City to the Grand Library (it may take a moment for the elevator to descend) and enter.
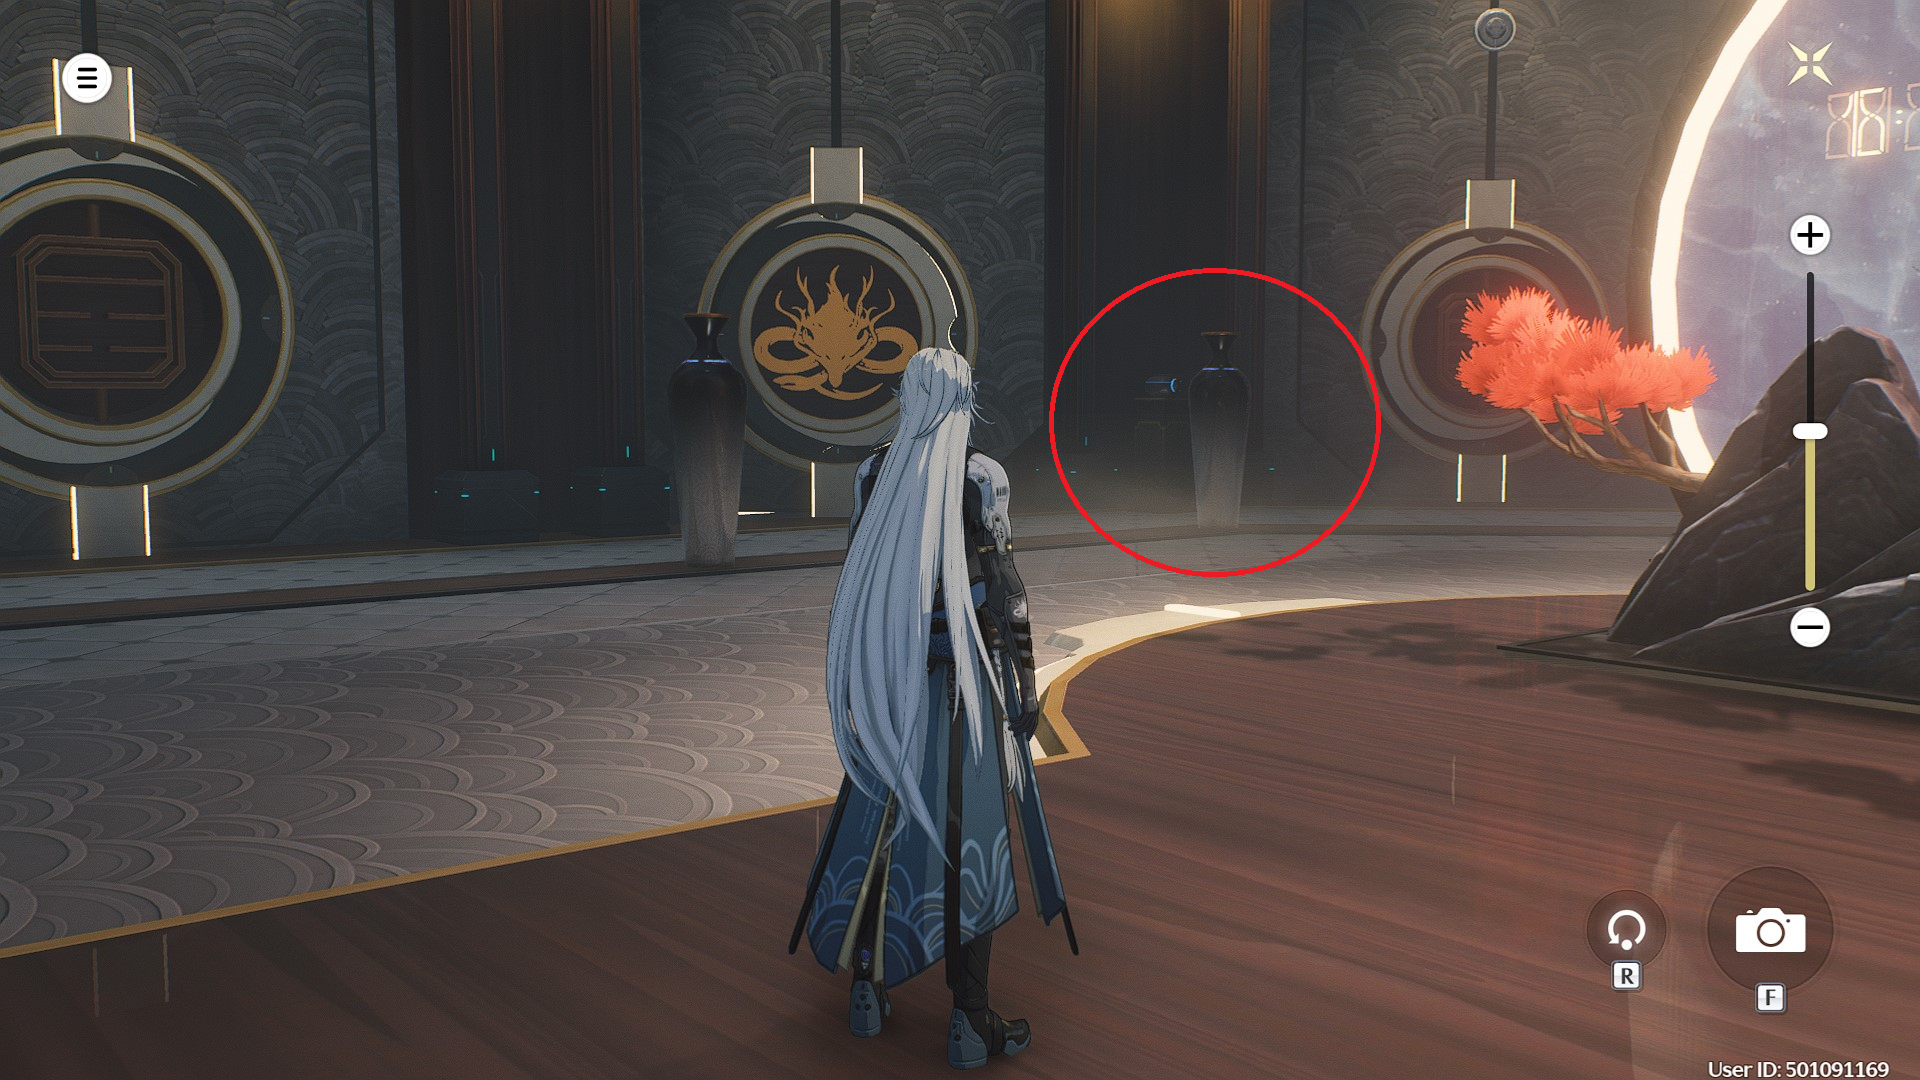
The first puzzle will be determining how to enter the Grand Library. We can reference our map and see that there’s a circle to the far left. If you’re facing the giant glowing circle in the center of the room, look to the left and slightly behind the glowing circle. Interact with the tall standing vase and it will open a hidden door. This is the entrance to the Grand Library.
Now that we’re inside, we’ll have to work our way down. But beware! There are five possible missable chests in the Grand Library and it currently doesn’t seem like there will be any way to claim them in the future. If you feel like you’ve missed a chest, you can always start the Grand Library over by pressing escape. However, you must be in the midst of the challenge to do this.
For the first step, approach the circular mechanism in the center. You’ll be brought through a tutorial on how to solve the puzzle. Claim the first tone behind the circular mechanism, then interact with the DJ booth in front of the circle again. Then, interact with the dragon statue to the right of the DJ booth. This will summon a pathway that will allow you to approach a new island in the middle of the water.

Once you’re on the island, hit the pillar at the center. The pillar will turn and, along with it, the gossamer pathway it creates. The pathway will then extend to the next level, allowing you to enter the next room. Two Tacet Discords will attack you from either side of the door once you enter the room. They’ll be level 22.

Kill them, then claim the clue which will state, “… Multiply fifty-four with four thirds for the Frequency you seek. Find this note in the West, while the prophet is beyond reach.” By this clue will also be the first missable chest. The chest will give you:
- Union Exp x 20
- Astrite x10
- Shell Credit x 3000
- Medium Energy Core x 1
- Wood-textured Shard x 2
- Tyro Gauntlets x 1
When you’ve claimed the chest and clue, turn left and head down the corridor in this room to find the next note. This is note Shang. Bring this note back to the DJ booth in the center and insert it.

Now, here’s another missable chest! As the water sinks, you’ll be able to jump down onto a variety of balconies and eventually the water below. But before you do so, look carefully! To the left of the bridge that leads from the Grand Library entrance to the DJ booth is a balcony with a dragon pillar and a chest tucked behind it. Glide down to this balcony and claim the chest. To glide press the jump button and hold it.

This second missable chest will give you the following items:
- Union Exp x 20
- Astrite x 10
- Shell Credits x 3000
- Medium Resonance Tube x 1
- Wood-textured Shard x 2
- Medium Sealed Tube x 1
- Training Pistol x 1
Now, before you drop this balcony, there’s one more chest that you’ll need to grab. Look towards the water and then turn slightly right. You should be able to see the glowing yellow lights of the third missable chest on a ledge sitting on top of the water. You’ll need to jump and glide to it. But if you fail to make this jump, you can walk around the outer walkway near the chest and on the water to get close to it, then jump to the chest’s ledge. But gliding from here is the easiest way to grab it.

This third missable chest will give you the following items:
- Union Exp x 10
- Astrite x 5
- Shell Credits x 2000
- Basic Energy Core x 1
- Wood-textured Shard x 1
- Training Rectifier x 1
Now, we can focus on the actual puzzle! After you’ve claimed the third chest, head over to the glowing yellow dragon pillar near the water. Interact with it to activate it, and a new island will appear with a translucent pathway to approach it. Hit the pillar in the center of the island three times to connect it to the next walkway.

You can opt to use the elevator to move on with the puzzle, or you can stick around and get that fourth chest. To get the fourth chest, follow the walkway to the end and hit the yellow dragon statue to summon another island. However, the pillar on this island is locked. Head back to the first island and hit it until it links to the locked pillar and its island. You’ll need to hit the pillar twice for it to connect.

Cross over the pathway to the now unlocked pillar island. Then, hit the pillar three times. This will connect the pillar island to the walkway you were just on. But there is one change! Now, the red locked door will open, revealing the final chest.

The fourth missable chest will give you the following items:
- Union Exp x 20
- Astrite x 10
- Shell Credit x 3000
- Medium Energy Core x 1
- Wood-textured Shard x 2
- Basic Energy Core x 1
- Training Item x 1
With that done, you can now enter the adjacent room and take the elevator. This will take you up one floor, and you’ll find the next tone in the room. Examine it, and you’ll be attacked by two Tacet Discords. The same ones as before, with the same level and everything else. Kill them and claim the Sonodisk. Then, approach the door and interact with it to open it.

Once you open the door, you’ll find yourself on the second-floor walkway. Hit the dragon pillar immediately to your right that’s overlooking the drop. This will create a new pathway to the DJ booth, where you can insert the Shang Sonodisk. Deposit the disk and a new island will appear to the right of the DJ booth.
Walk onto the island and hit the pillar three times to reach the highest level. You’ll find that here’s an elevator shaft. Jump down it to reach the next Sonodisk. Open the door and examine the pillar to the right to create a new pathway that connects to the DJ booth island. Deposit Sonodisk Zhi.

This will cause the water to fall once more, and we’re almost there. Jump down to the platform far below to claim the last Sonodisk. But be prepared to fight three enemies, including one large boss enemy.
Related: Is Scar Playable in Wuthering Waves? Answered


Once they’re dead, grab the final Sonodosk, Sonodisk Gong. Interact with the dragon pillar on the far side of the arena, then gross the pathway it creates into a walkway and into the only available room. There’s an elevator here that will take you to the topmost outer walkway. But don’t go to the DJ booth yet. Instead, follow the walkway all the way right, where you’ll find a door that opens to the fifth and final chest.

The fifth chest contains the following items:
- Union Exo x 20
- Astrite x 20
- Shell Credit x 3000
- Basic Energy Core x 1
- Wood-textured Shard x 2
- Tyro Pistols x 1
- Tyro Gauntlets x 1
Once you have the fifth chest, cross over to the DJ booth and deposit Sonodisk Gong. Depositing Sonodisk Gong is also the point of no return. So, if you’ve missed any of the missable chests up to this point, you won’t be able to get them by exiting out of this domain.
When you’ve inserted Sonodisk Gong, you’ll be able to approach the Data Bank, and it’s here that you’ll get a cut scene and a two phase boss battle. I won’t spoil it, but don’t waste your ‘R’s cleaning up the boss’s first phase. Hold on for the second, when he’s significantly tankier and harder hitting. Both bosses will be level 40, so make sure your Resonators are appropriately leveled for the fight.
Related: How to Find Pecok Flowers in Wuthering Waves
Once the fight is done, you’ll get a long cutscene (and I mean long). But after you’ve endured that, you’ll get an entire host of loot, including a Mysterious Code and Rover’s Waveband, allowing you to activate Rover’s Resonator’s sequence and Ascend her, assuming you’ve reached SOL3 Phase 3. If you have, you may find that you also need Pecok Flowers as well.
Wuthering Waves is available now.


Published: May 31, 2024 06:19 pm