
The Hieroglitch Pyramid finally gives you the ability to turn into a steel ball instead of balancing on one in Astro Bot. In our guide, we will cover where you can find all the hidden Bots around this level and how you can grab all the puzzle pieces for your collection.
Jump To:
- Hieroglitch Pyramid Walkthrough in Astro Bot
- Hieroglitch Pyramid Area 1 (Bot 1)
- Hieroglitch Pyramid Area 2
- Hieroglitch Pyramid Area 3 (Bot 2)
- Hieroglitch Pyramid Area 4
- Hieroglitch Pyramid Area 5 (Bot 3)
- Hieroglitch Pyramid Area 6 (Puzzle Piece 1, Puzzle Piece 2, Bot 4, Bot 5)
- Hieroglitch Pyramid Area 7 (Puzzle Piece 3)
- Hieroglitch Pyramid Area 8 (Bot 6, Bot 7)
- Hieroglitch Pyramid Area 9 (Lost Galaxy)
Hieroglitch Pyramid Walkthrough in Astro Bot

Most of this level revolves around utilizing a steel ball transformation to roll around the map with full invulnerability. You will certainly recognize the transformation from similar variations in previous levels. Below you can find all the possible Bot and puzzle piece locations as you make your way to the top of the pyramid.
Hieroglitch Pyramid Area 1 (Bot 1)

After landing in the sand, run ahead and feel free to explore the area to collect some easy coins. Once those are collected, keep looking forward and move toward the right side of the bridge. There is a Bot that is disguised as a pot to avoid three enemies below. Take these out and then punch the pot to free the first Bot in this level.
Start traveling on the main bridge and punch some enemies along the way. When you reach the halfway mark, the bridge will collapse and you will fall into a canyon below. The true level starts here.
Hieroglitch Pyramid Area 2
Out of the gate, there will be a glass ball enemy swinging a spike that litters levels like the Slo-Mo Casino. Punch the glass ball twice to beat the enemy and then look over the edge on the right. A small platform with a gold chest can be seen on the edge below. Smash it for some easy coins and then head back to the surface.
Continue to the left along the broken path and jump across the gaps with your boosters per usual.
Hieroglitch Pyramid Area 3 (Bot 2)

Take out the enemies in the center of the circular platform. One of them is a new wheel-based enemy that can easily take you out if you aren’t careful. Dodge the initial burst and give it a small punch. From there, you can go to the center of the platform where there is a blue glowing cross. Hold “Square” to spin to reach the room below. The second Bot in the level can be smacked and added to your ship.
Use the trampoline to go back up and continue forward. Watch out for the spikes on the ground that will become a recurrent theme and rush the melon enemy to clear the area. That should give you an easy route to the next checkpoint.
Hieroglitch Pyramid Area 4
This section is one of the shortest in the whole level. It really only consists of destroying another glass ball enemy in the center platform before taking on some smaller grunts as well. Then you can move to the next platform where another Astro Bot checkpoint begins.
Hieroglitch Pyramid Area 5 (Bot 3)

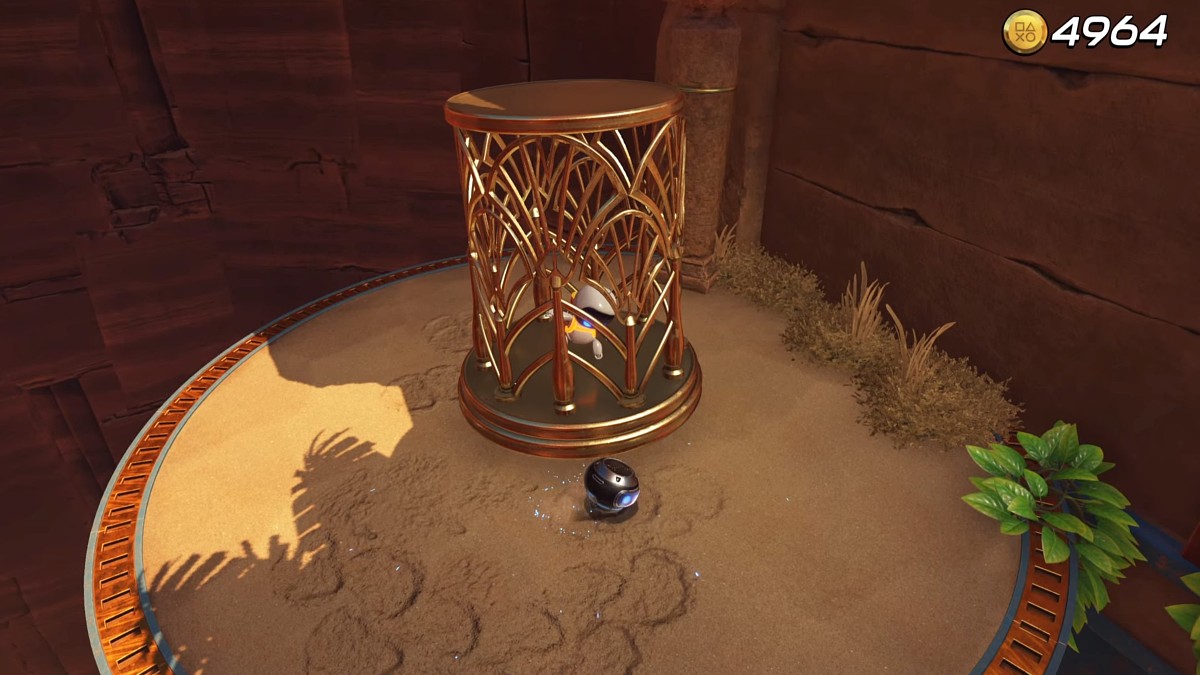
Slow-moving blocks will keep smashing on the small path ahead. Take your time and move in between each block to avoid getting hit. Behind the third block with an open panel is a few breakable pots. Punch them and look at the blue glowing cross on the ground. Spin to fall below where you will find the Lara Croft Bot. Slowly move forward to make use of the sneak. As long as you move slot, the blocks won’t fall and you’re safe. Smack Lara Croft at the chest and hit the chest as well to get the third Bot and some coins.
Sneak back to the other side and bounce on the trampoline to go through the previous blocks all over again. Use the block on the end to get some height and glide left to the platforms above. Some small enemies will be waiting that you can quickly break to mark the next section.
Hieroglitch Pyramid Area 6 (Puzzle Piece 1, Puzzle Piece 2, Bot 4, Bot 5)

Run inside the small tunnel to the right so you can grab the chest in the small room. Now you can hold “R2” to turn into a steel ball. This allows you to slam down from a jump or roll on any surface in the level. In this case, you need to roll around on the steel spikes to escape the trap. Before you head back out, though, roll all the way to the right to claim the first puzzle piece.
Roll outside and then head to the left from the entrance. There is another small opening that you can enter with the ball form that has a chest inside. The second puzzle piece happens to be inside, which will catch you up on the collectibles.

Then you can roll back out and move to the right to find four steel boxes. Jump above them and quickly smash with the steel ball to reveal a bounce pad. Smash down again to gain some height. Another Bot will be grabbing onto a rope in front of a cactus. Save the Bot from the enemies and then bring it back into the fold.
Finally, you can head back down and roll into the small blue volcano that will launch you across the chasm. You’ll land in front of another spiky bridge that is guarded by a new enemy type. Roll as the ball form until the vacuum grabs you and hold “R2” to destroy the enemy. The same enemy will be waiting ahead which leads to a bounce point. But look to the left side of the ledge to find a set of green blocks. A roo will open and you can smash the pot to grab one more Bot.
Hieroglitch Pyramid Area 7 (Puzzle Piece 3)

In the next area, you need to roll around as the steel ball and dodge the small openings. Get to the other side, beyond the slamming blocks, and use the bounce pad to get on top of them. Roll to the right side to enter a small room with a third puzzle piece. Then you can roll back out and reach the major circle platform on the other side. Take out the enemies and launch yourself with the blue volcano.
Hieroglitch Pyramid Area 8 (Bot 6, Bot 7)
Jump out of the golf hole to destroy all the enemy robots around you. Next to them is another blue volcano, but this one rotates. Wait for it to aim at the left platform first and roll into it to destroy the cage across the way. The sixth Bot will be freed and then you can head back to the blue volcano. This time wait for it to aim at the giant door with a blue glowing symbol.
Blue arrows will appear at the bottom, which indicates you can sprint up the wall. Take down the enemies at the top and smash the crates to reveal a wire. Pull it to open a door and take the trampoline to a hidden area with numerous trampolines. Bot number seven is being pulled by a floating robot that you need to hit as you bounce.
Go back down and jump into the volcano to launch across the chasm on a new statue. Climb up until you find a false end platform.
Hieroglitch Pyramid Area 9 (Lost Galaxy)

Fall down the shaft and use the steel sphere to bypass all the spikes on the ground. At the bottom of the shaft is a room full of jewels. Move to the right side of the room first and move some of the jewels on a separate platform to find a breakable floor. Smash through with the steel ball to reach a new section that leads to a Lost Galaxy. But keep in mind that this will take you out of the level.
Move back to the surface and jump on the end platform to finish the level and move to the next section of the system.
Astro Bot is available now on PlayStation.

Published: Sep 11, 2024 02:29 am