
For those who love a good escape room but don’t want to leave the house, Trace on Cool Math Games offers a virtual option. The game puts players into a virtual escape room, where they must use logic to find their way through.
If you’re looking for a little help making your way out of the virtual escape room, our full Trace walkthrough has all the tips and tricks you need.
Table of contents
- How to Get Out of the Bathroom in Trace
- Unlock Your First Clue with the Pentagram Arrows Under the Toilet
- Complete the Scissors & Get the Red Key
- Use the Strange Illustration to Get Another Clue
- Draw the Fish Using the Pentagram Arrows Under the Toilet
- Put Together the Combination to Open the Lock
- Shed Some Light on the Pumpkin
- Solve the Door Puzzle
- How to Get Out of the Hallway / Living Room in Trace
How to Get Out of the Bathroom in Trace
The Trace journey begins in a strange bathroom, and players will need to explore and locate clues to find their way out. Take a moment to review the tools available to you, including the Notes and Camera on the lefthand side. Then, begin exploring the room to find your first clues.

To begin, get your bearings by looking around the room using the arrows. You will notice that the door is locked and requires a key to open. It’s time to search the room to find it.

Behind the painting on the wall, you will also notice a combination lock that you’ll surely need to open to escape.

Now that we have some sense of next steps, let’s begin our search for clues!
Unlock Your First Clue with the Pentagram Arrows Under the Toilet
Below the toilet, find a Pentagram pattern with several arrows. Line up the arrows so that following the path will light up the entire Pentagram. When done correctly, clicking the button will unlock the cabinet to the left.
Click on the cabinet to open it, and you will find a few important clues. On the wall, zoom in to view the number written there. On the floor of the cabinet, click on the object to find half of a pair of scissors.

You can click on the magnifying glass to examine the item, noting that you need to find the other half of the scissors. Thankfully, they’re nearby.
Complete the Scissors & Get the Red Key
From the toilet area, hit the right arrow to face the sink. Then, click to zoom in on the area. From there, click on the sink to inspect it. Click on the item lodged inside the sink to acquire the other half of the pair of scissors.

Now that you have both halves of the scissors, drag one of them onto the other in your inventory to combine and create a functional set of scissors. Now, use the scissors to cut the rope on the red key hanging to the left of the sink.

Use the key on the metal box sitting behind the toilet.

Inside, you will see another number – .35 in the third slot. There is also a crumpled-up piece of paper inside – grab it, then use the magnifying glass to read it. You will need to click on it again to uncrumple it.
Use the Strange Illustration to Get Another Clue
LIne the illustration up with the scene of the sink to find a secret tile.

Click on it for a clue about another pattern to draw on the Pentagram below the toilet.

Draw the Fish Using the Pentagram Arrows Under the Toilet
Line up the arrows to create this shape to unlock the cabinet on the right side of the toilet.
Click on the right cabinet and zoom in on the plate to read the clue written on it. This is undoubtedly another hint to the combination for the lock behind the painting.

Put Together the Combination to Open the Lock
To get another piece of the number puzzle, click on toilet paper roll to find the number 5. Notice that the 5 is above the line, whereas the numbers on the plate are below. This suggests they may be fractions. 5 divided by 1 is 5, so this is the first number for the combination lock.
The number from the metal box was .35, which would be divided by .05., giving us 7.
Meanwhile, the number inside the first cabinet was 16 in the fourth slot, which divided by 8 gives us 2. So, we have 5_78 as our combination so far.
To get the last number, we need to open the larger metal box on the bottom shelf of the toilet. Click on the circles and they’ll light up, suggesting we need the right pattern to open the box. The pattern hint is above the sink – match the lights on the box to the lights above the sink and you’ll be able to open it, getting the last number for the combination.

The number revealed is 8 in the second slot. Divided by 2, that gives us 4. So, our combination is 5478. Enter this combination in the lock behind the painting to open it and reveal the next clue – a lightbulb. If you examine it, you’ll get a hint to try putting it in the pumpkin in the cabinet on the left side of the toilet.
Shed Some Light on the Pumpkin
Put the light in the pumpkin to reveal another pattern suggestion for the Pentagram puzzle.

Head back to the Pentagram to create the next shape and unlock the final cabinet below the sink. This one can be a little tricky, as the pattern is on its side. Put the arrows in this configuration to proceed.

This unlocks the cabinet under the sink, where you’ll find the red key tile sitting on a roll of toilet paper. Grab it and get ready to escape the bathroom in Trace.

Insert the key card block into the lockbox on the door to reveal a puzzle you’ll need to solve to unlock the door. The goal is to move the shapes so you can place the key over the lock in the puzzle.
Solve the Door Puzzle
Here’s how to move the blocks to get to stage one, with the key most of the way to the lock.

Now move the purple blocks out of the way so you can slide the yellow one over, freeing the path to put the key block over the lock.

At this point, the bathroom door should unlock and you can step out into the next room.
How to Get Out of the Hallway / Living Room in Trace
Upon exiting the bathroom, the door will lock behind you. You’ll find yourself in a hallway that leads to a living room. It’s time to seek out your next clue.
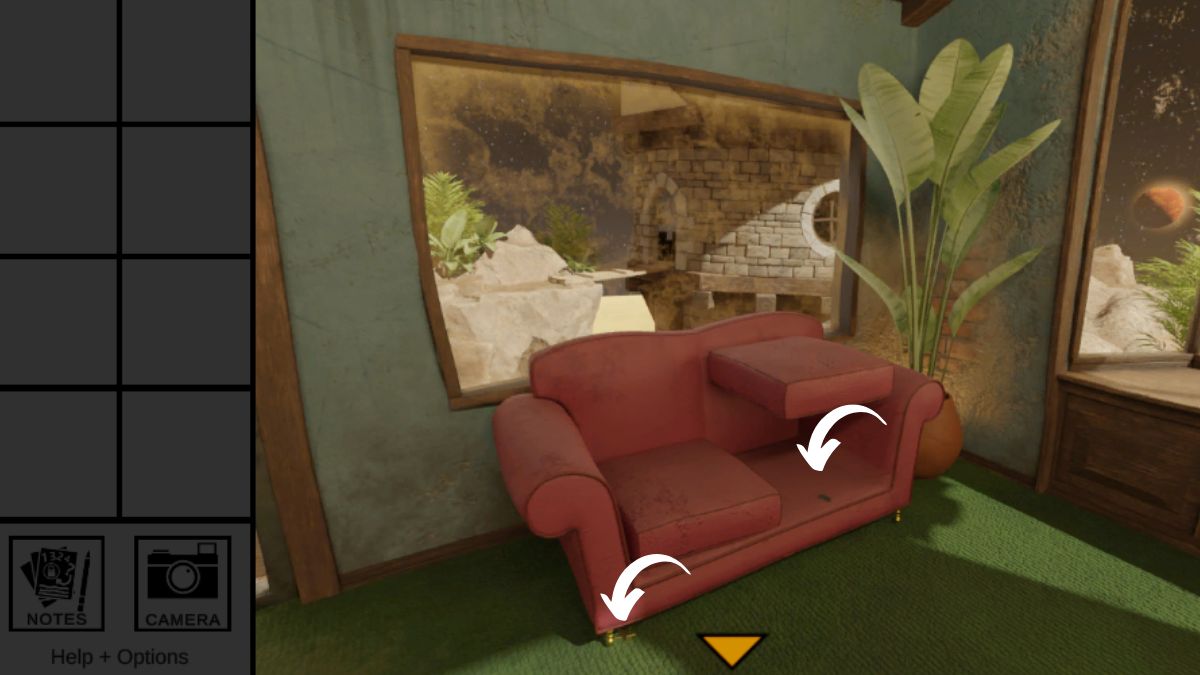
Collect Items in Living Room
Head down the hall to the red couch in the living room. Click on the cushions to search under them, where you’ll find a battery. Be sure to look under the couch as well, so you can pick up the metal star. Both items will come in handy.
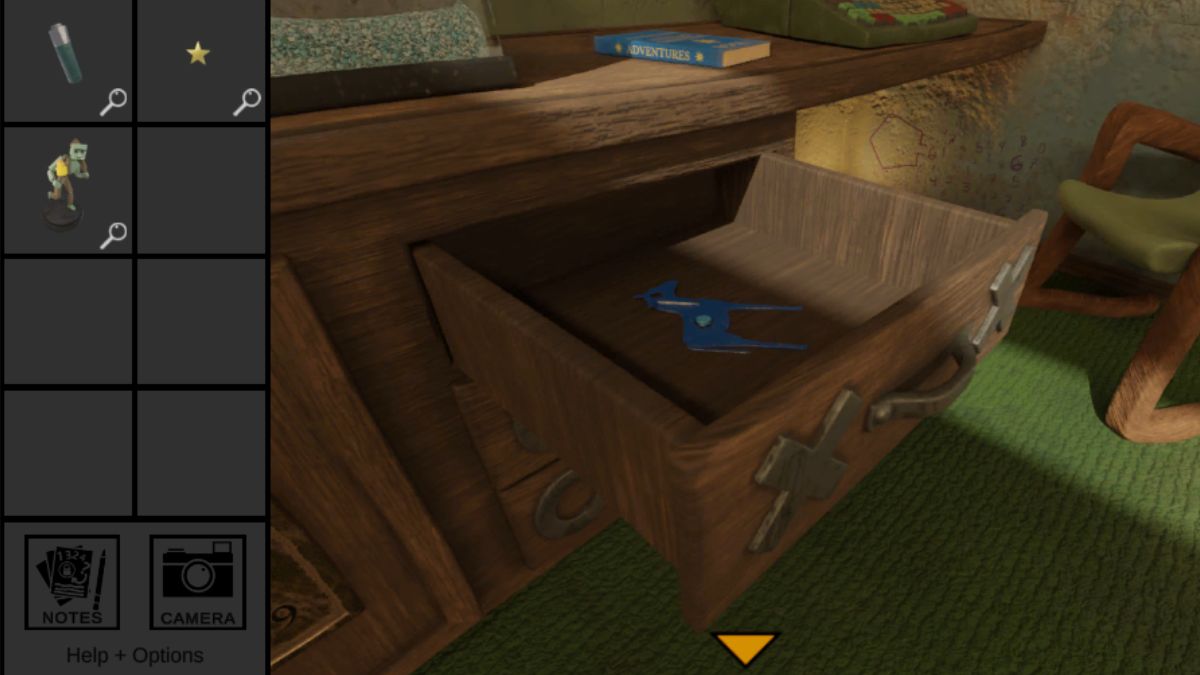
While you’re there, check out the potted plant to the right, where you’ll find a small figure of an ogre to add to your list of items. Next, head for the desk to grab one more item – a toy horse in the top drawer.
Now that we’ve got these items, it’s time to tackle our first puzzle.
Solve Bay Window Puzzles
Look around the room until you find the window with a pyramid sculpture sitting near it. Beneath the window is a cabinet with a puzzle inside. Match the sliders to the planets on the window, then hit the red button to retrieve the broken metal tablet.


Next, light up the Pyramid lights. The key here is to make sure every light is a different color, so that it looks like the planets but tilted on their side. The correct color order is below.
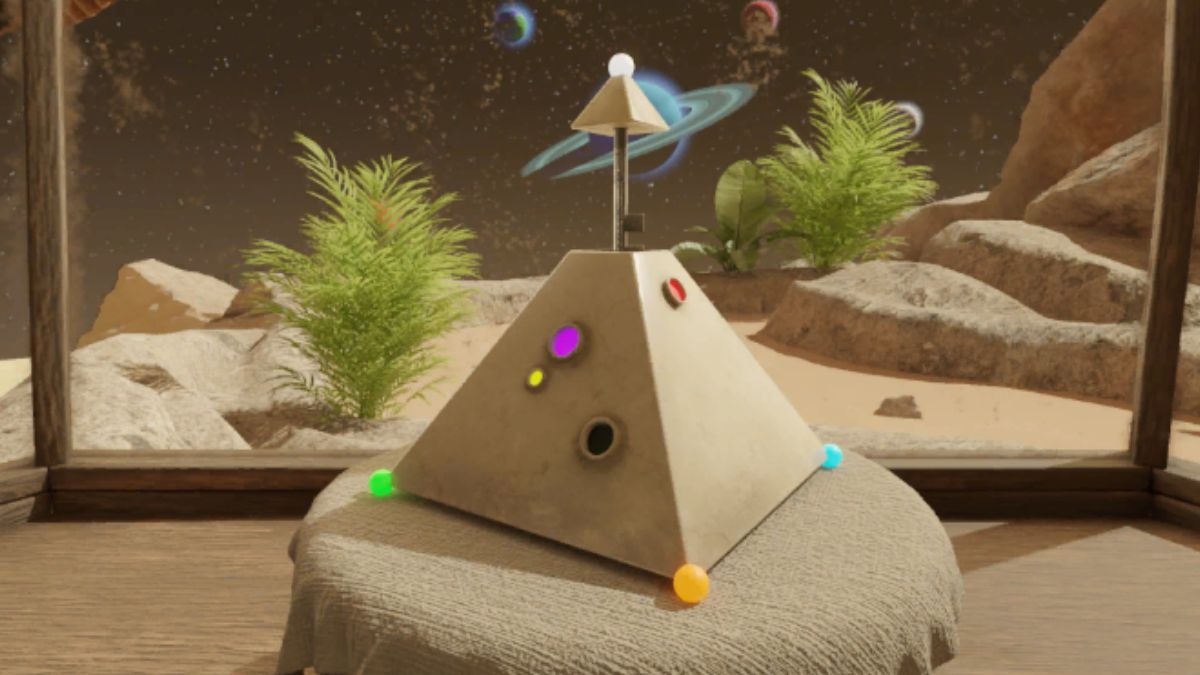
Click the top of the pyramid to get a key.
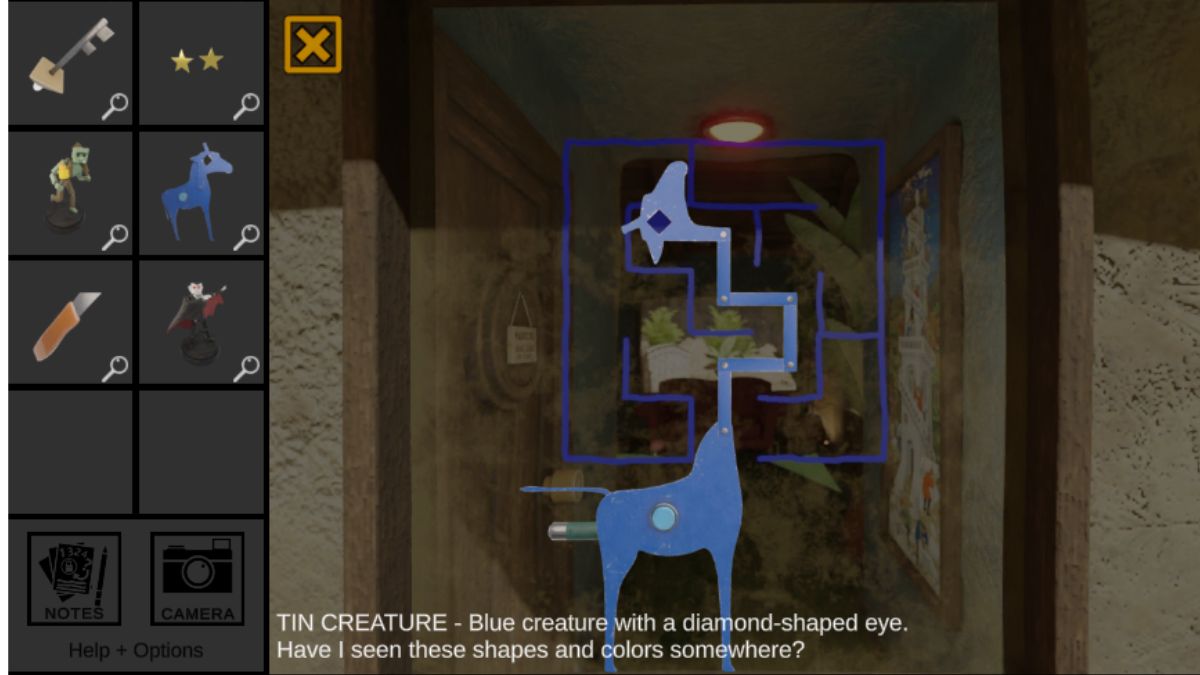
Fix the Metal Tablet
Now, head back down the hallway to the window near the bathroom. Interact with the metal horse, clicking once to extend the neck, then clicking on each section of the neck to line it up with the drawing on the window. The eye hole should line up with the diamond on the drawing, like below.
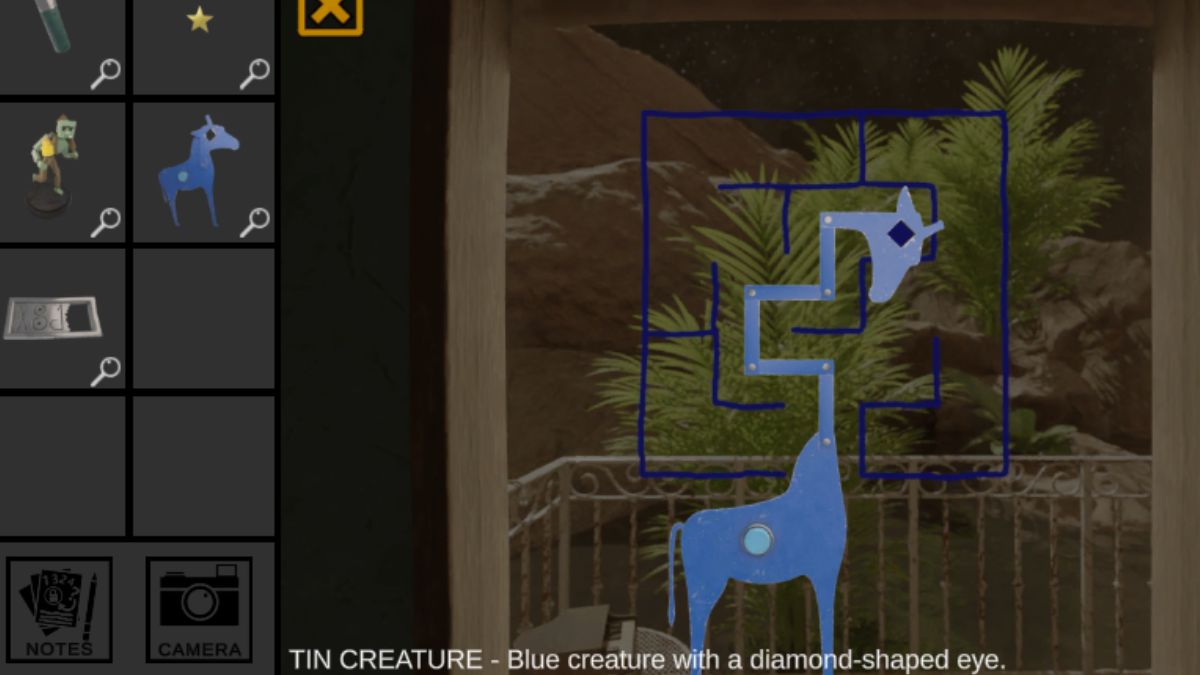
Then, press the button on the giraffe to get the missing piece of the metal tablet.
Drag the broken piece over to the tablet to repair it. Then, turn to the left and click on the painting next to the window to reveal a puzzle with familiar symbols.

Match the symbols in the wooden slots to those on the metal tablet. A red button will appear, but it won’t do anything just yet. First, we need to find & press the other red buttons.
Press the Red Buttons
The buttons are located in the following locations and should be pressed in this order to reveal the next clue. The hint for the proper order is on a painting on the wall.
1. Fishtank on Desk

2. Fan on the Shelf
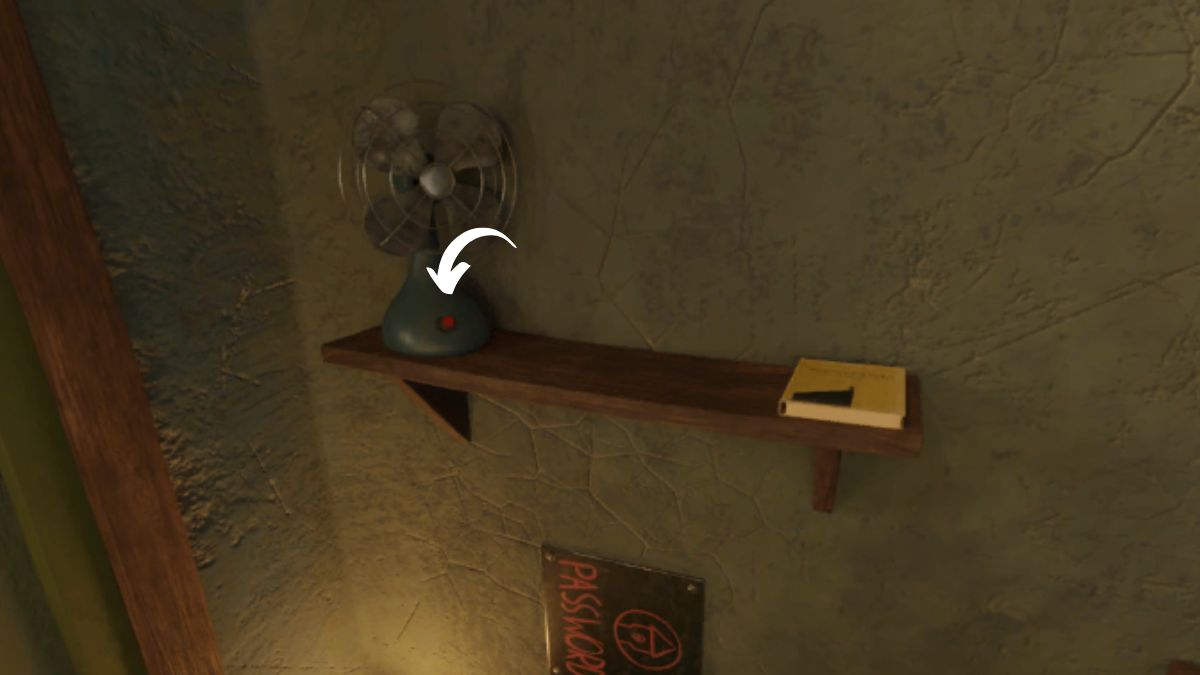
3. On the Computer Monitor on the Desk
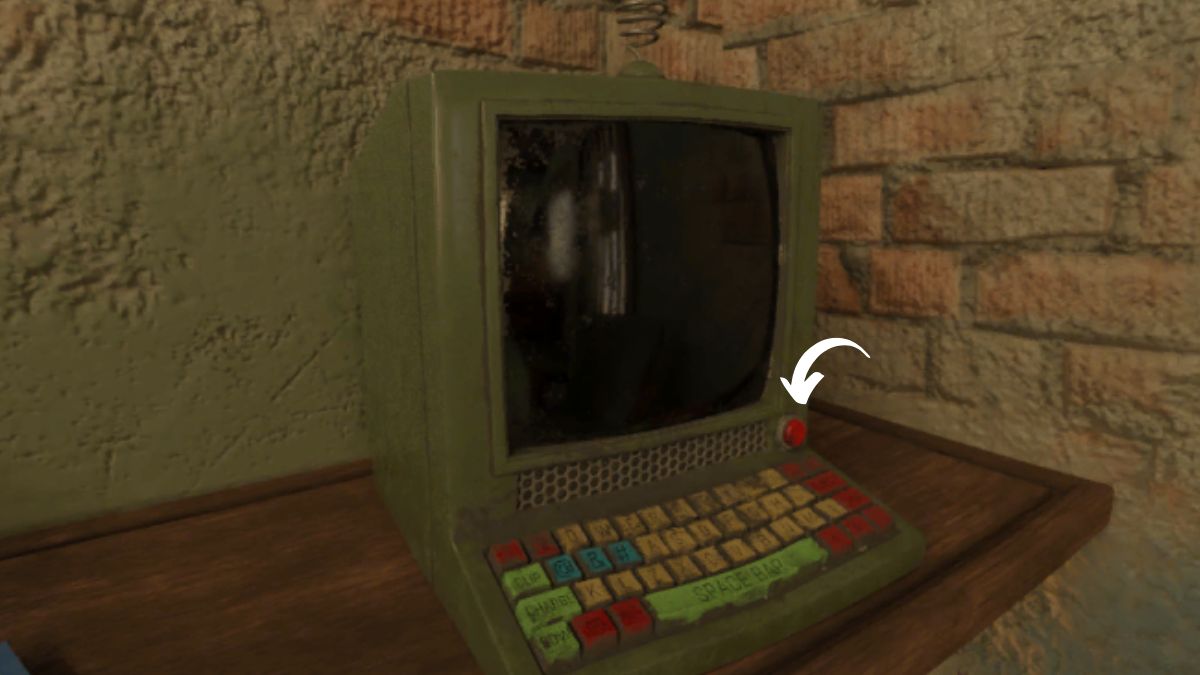
4. Button by Planet Puzzle
5. Button Behind the Painting in the Hall

6. Grey Chest on the Table

By pressing the buttons in this order, the grey box should open when you reach it. Click the box again and you will be able to grab a green key and a box cutter.
Use the Box Cutter on the Carpet
Under the table, you’ll notice a strange patch of carpet that looks different from the rest. Use the box cutter on this to reveal a puzzle. The solution requires another battery, which can be found on the porch outside.
The green key will unlock the green door, which leads to the porch. Drag the key to the doorknob to use it, then head onto the porch. Head down the hall to find the other side of the window near the bathroom. Grab that blue giraffe again and line it up with the blue drawing from the other side, then press the blue button again to reveal a second battery.
Now head back to the table in the living room. Insert the batteries into the box next to the lamp to turn on the spotlight and reveal the solution to the puzzle. Be sure to look up at the heart on the ceiling, too.
Line up the hearts and arrows accordingly, then press the red button to reveal a Yellow Submarine and a puzzle piece.
Before you leave, grab the metal star stuck to the painting above the table. Now, let’s head back to the porch.
Return Puzzle Piece to Table on Porch
Now, take that puzzle piece to its friends. There’s a table on the porch with an unfinished puzzle. Now that you have the final piece, put the puzzle together for your next clue.

Make sure to grab the metal star hiding under the puzzle before you leave. Then, head to the wooden puzzle next to the door. To solve it, make sure each tile shows a different plant, in the order below.

Then, hit the red button to get another metal star. Before heading back inside, grab the vampire figure off the ledge near the green door.
Now head back to the couch, where you will now be able to zoom in on the arm by the potted plant. Use the box cutter to open it up and grab the gold key inside.
Optional: Use Gold Key to Get Last Gold Star
Take the key to the drawing under the computer desk and line it up to find the code 923 highlighted by the triangle, circle, and pentagon shapes.

This is the password to use on the computer, for the Gear setting. Go here and click on the robot to get a hint for how to open the desk drawers. Hit the yellow arrow to climb the camera up and you will see the following pattern.

Use this pattern to open the desk drawers and grab a magnet, which you can use to get the gold star from the tube under the table. Affix the magnet to the star, then pull it towards the edge of the tube to get it out. You should now have 6 gold stars.
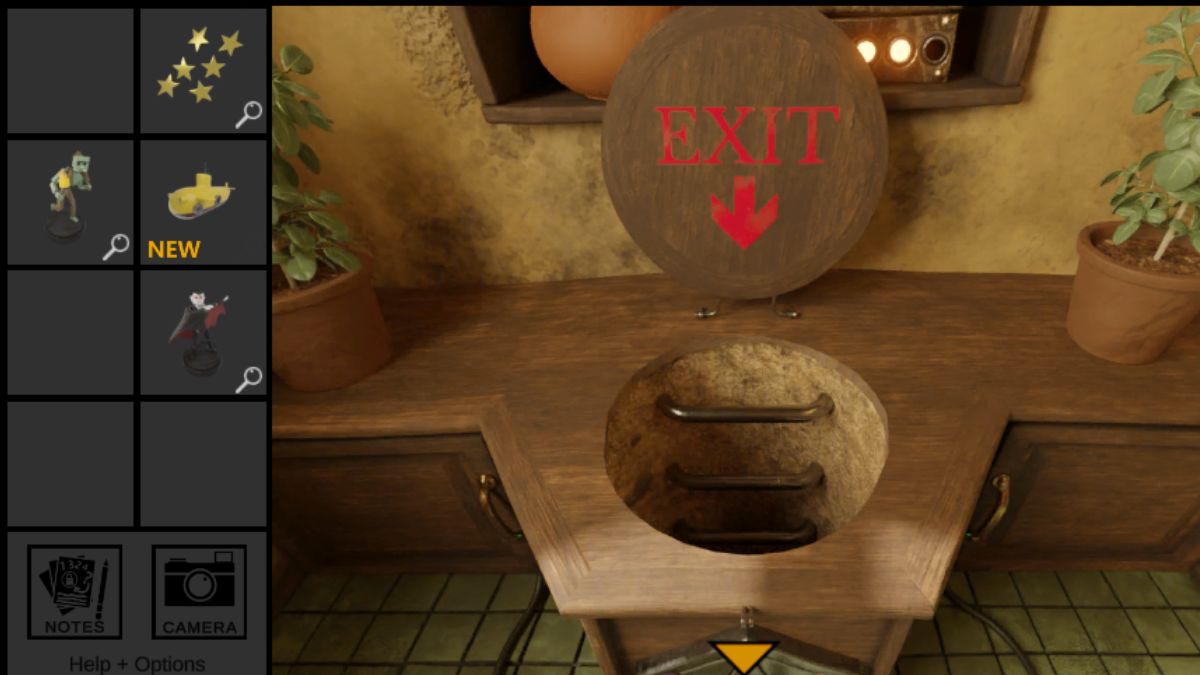
Unlock the Bathroom Exit & Escape
Now, head back to the bathroom. Use the pyramid key to open the bathroom door, then use the golden key on the toilet lock. This will reveal the exit. Use the exit, and you’re free!
The gold stars and action figures are for puzzles outside in the tower, which you could do if you wind up take another route through the escape room. With this route as described above, you can consider them a reward for a job well done!
And that’s all you need to know to escape the house in Trace!


Published: Jan 31, 2025 4:36 AM UTC