Dedicated and beginning sleuths alike love the Nancy Drew games for their simple point-and-click mechanics and mystery-solving stories. While making those grand deductions is part of the fun, we all need a little guidance now and again. That’s where our Nancy Drew: Warnings at Waverly Academy walkthrough comes in.
Contents
- Nancy Drew Warnings at Waverly Academy Walkthrough
- Getting Started – Start Menu and Mechanics
- Explore Your Dorm Room
- Using Your Tools
- Meet Fellow Students
- Call Megan Vargas
- Get Megan’s Photo From Leela
- Check the Computer
- Upload Valedictorian Photos to the Website
- How To Lay Out the Valedictorian Candidates Website
- How To Complete the DNA Model
- Read the Student Handbook & Explore the Library
- Snack Bar Duty
- Night Falls – Go To Sleep
- Talk To Corine
- How To Solve the Orthographic Puzzle
- Read the Book in the Library Special Collection Case
- Figure Out What the Key You Found Unlocks
- How To Fill the Gap in the Cornerstone
- Learn About Perfect Victorian Etiquette
- How To Find Rachel’s Math Notebook in the Library
- How To Solve the Piano Puzzle
- How To Climb the Tree To Get the Token Back
- Investigate the Tree
- How To Find the IP Address for Mel’s Plagiarized Paper
- How To Get Into Izzy’s Room To Snoop
- Take Photos of the Waverly Icons
- Investigate the Wooden Raven in the Locked Classroom
- How To Solve the Door Puzzle in Rachel’s Room
- How To Unlock the Silverware Cabinet & Solve the Silverware Puzzle
- How To Solve the Puzzle of the Cellar Wall
- Upload Icon Photos to Waverly Website
- Get Corine’s Paper and Upload to the Website
- Where To Find Corine When She’s Vanished
- How To Open the Boiler To Access the Secret Room
- How To Solve the Floor Puzzle To Escape the Cellar
- The End – Mystery Solved!
Nancy Drew Warnings at Waverly Academy Walkthrough
Nancy gives you some tips in the start menu, but once you begin your time as a student at Waverly Academy, the rest is up to you. The story involves tracking down clues to solve the mystery of the menacing Black Cat notes students keep receiving. If you’re stuck on a clue or don’t know where to turn next, our walkthrough is here to help.
While some events won’t be triggered until you complete other tasks, there’s no one correct order to track down clues. This walkthrough is organized roughly in the order you’ll likely encounter new tasks, but your playthrough may differ slightly.
Getting Started – Start Menu and Mechanics
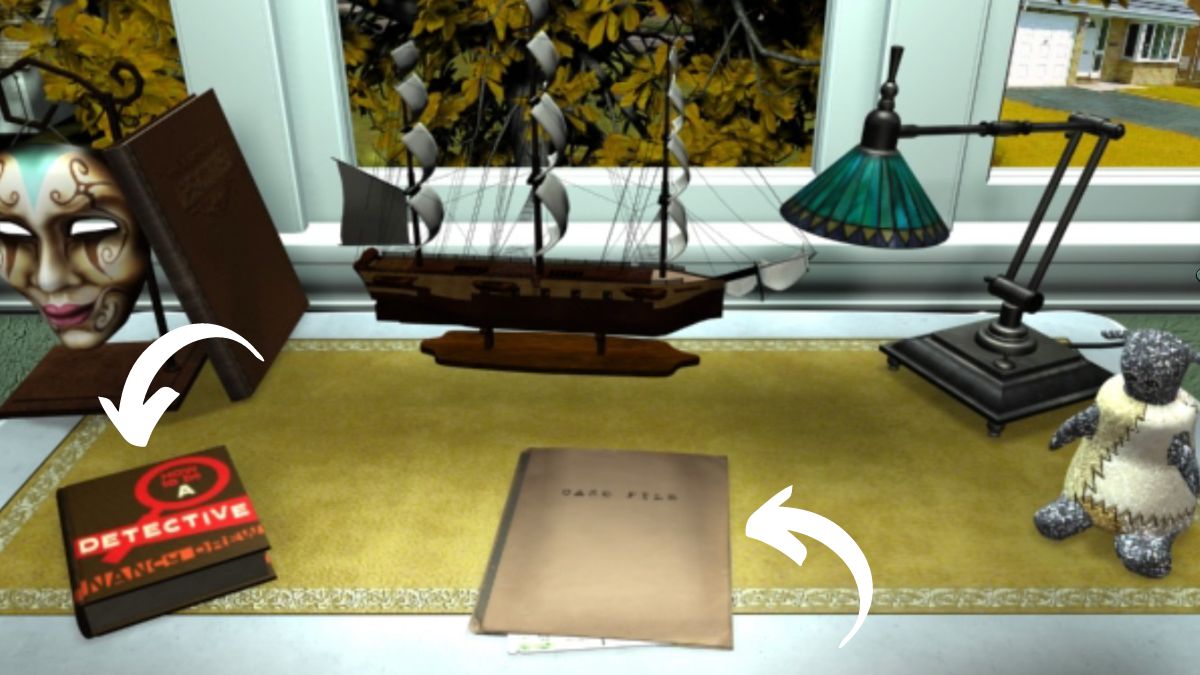
The start menu in Nancy Drew: Warnings at Waverly Academy is a bit of a built-in tutorial for gameplay. If you’ve never played a Nancy Drew game or need a refresher, you can click through the book on the desk to get some gameplay mechanics reminders. Nancy will talk you through them.
Before you can start the mission, you’ll need to interact with the manilla folder on the desk. This is your case information, and it’s where you’ll find the plane ticket that starts your quest. When you’re ready, click on the ticket.
From there, you’ll select your difficulty (Junior Detective or Senior Detective) and hop on in. The stories are the same for both levels, but choosing Senior Detective will make the puzzles more challenging.
Explore Your Dorm Room
When you first arrive at Waverly Academy, you’ll be in your dorm room with your new roommate, Corine. Start by chatting with her to get some initial information about the case.
When you finish talking to Corine, make sure to take a look around your room. Remember, your magnifying glass turns red when you can check out an object.
If you’re stuck, try looking at your desk. You’ll find a hint there that will help you learn where to get started with your exploration of the rest of the floor.

Using Your Tools
You have access to several helpful tools to navigate your exploration of Waverly Academy. Be sure to make use of them as you work to solve the mystery.

The Task List in particular can help you know what to do to track down your next line of investigation.
Your Journal also has some hints if you forget where to go next.
Your Cell Phone lets you take photos, set an alarm to skip time, and check your texts.
If you’re ever stuck, you can always call Nancy’s boyfriend, Ned. Nancy will talk through things with him, which can sometimes help you figure out what to do next.
Clues and other items you pick up during the game will be in your Backpack, so head there for keys, books, etc.
Meet Fellow Students
On your to-do list, Nancy wants to make sure you meet and talk to all the girls on your floor. That’s a good place to go after you finish up in your room.
You can start in any order, but I suggest going to find Rachel Hubbard first. She has a task for you that involves talking to the other girls from the floor, so you can avoid needing to revisit the same girls several times if you add this project to your task list first.
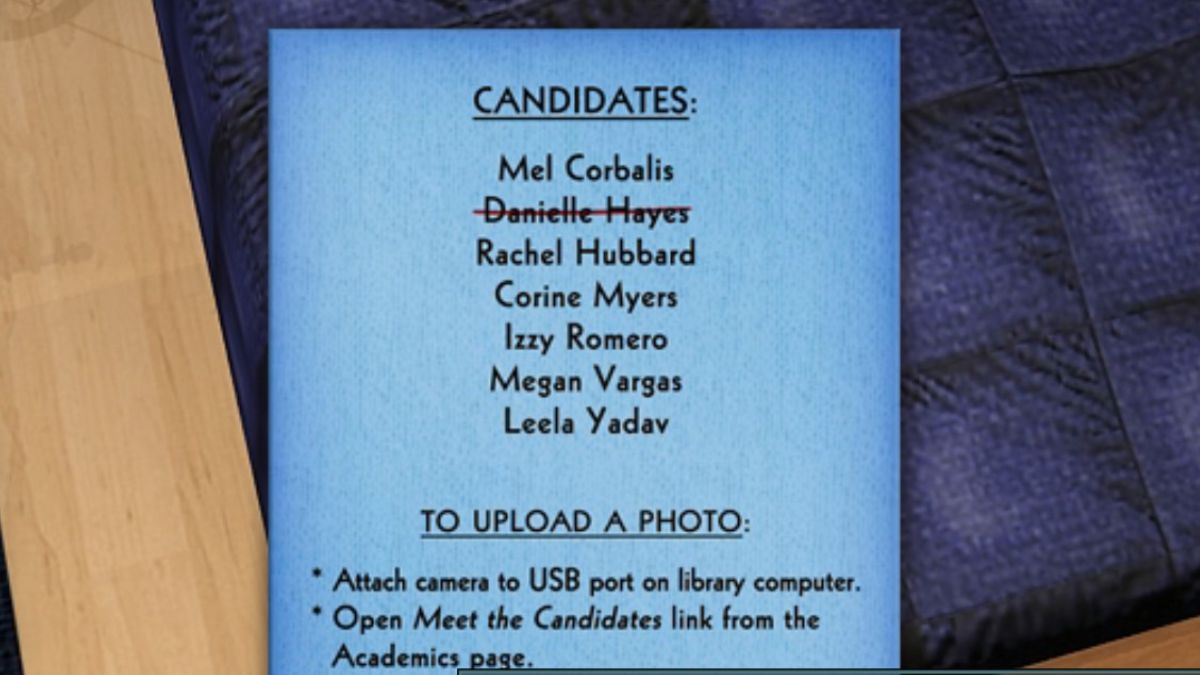
Each door has a nameplate with the names of its residents, so you can easily explore until you find the right room. Or if you want a hint, here’s where I found each Valedictorian candidate:
| Student | Location |
|---|---|
| Mel Corbalis | Her Room (Right next door to your room, where the cello music is coming from) |
| Rachel Hubbard | Her Room (Head down the hall to the left) |
| Corine Myers | Your Room |
| Izzy Romero | The Library |
| Megan Vargas | Not On Campus (get her phone number from Mel) |
| Leela Yadav | Foyer (Kicking a soccer ball near the air hockey table) |
When you talk to each student, be sure to check their room as well. If you see anything with a red magnifying glass, give it a closer look.
Hint: There’s an object in Mel’s room you want to examine, as it unlocks another line of investigation.
Call Megan Vargas
When you talk to Mel, she’ll give you her roommate’s phone number. This number is saved on your phone. Click the arrow buttons to cycle through your contacts. Step out into the hallway and give Megan a call to get her intel about the Black Cat note she received.
You will also need to ask her about taking her picture. She’ll let you know who you can talk to to get a picture and finish up Rachel’s request for help with the school website.
Get Megan’s Photo From Leela
Megan lets you know that Leela should have a picture of her you can use for the school website. Talk to Leela, and she’ll challenge you to beat her at air hockey for it.
Win at Air Hockey

You’ll need to win the air hockey game by scoring 7 points first. Grab your mallet, and then play your best game. When you finish, she’ll offer to get the picture next time she goes upstairs. Then, you’ll get a text about Izzy to follow up on.
Head to the library to chat with Izzy. Once you’re finished, enough time will have likely passed to head back to Leela and finish out your quest for Megan’s photo. If she doesn’t offer to play Scram for the photo, try completing other tasks from your checklist to make sure you’re at the right point in the story for this next step.
Win at Scram
Of course, you need to beat Leela in another game to get the photo back. This time, play Scram, a dart game. To win, make sure you throw darts at the highest numbers Leela hasn’t blocked off during each round. When you’re the blocker, block high numbers as quickly as possible.
You can keep track of what’s been blocked by looking at the number lights on the right. When a number goes out, it’s been blocked for that round.

TIP: You can throw darts at the same high number multiple times in a round until it’s blocked.
After you win at Scram, you’ll get Megan’s picture. Take a picture of the picture with your phone camera.
Check the Computer
Corine mentions the student handbook on the computer, and Nancy wants to check it out. The library is on the first floor, down the hall — interact with the door to head in. The computer will be to your left.
When you try to log in, you’ll be directed to the student body president for your password — that’s Izzy, who’s sitting in the library. You can head over to talk to her about the password right away.
Unfortunately, she’s not giving up that password without something in exchange. She asks you to complete her DNA model, which will become your first major puzzle in the game.
Upload Valedictorian Photos to the Website

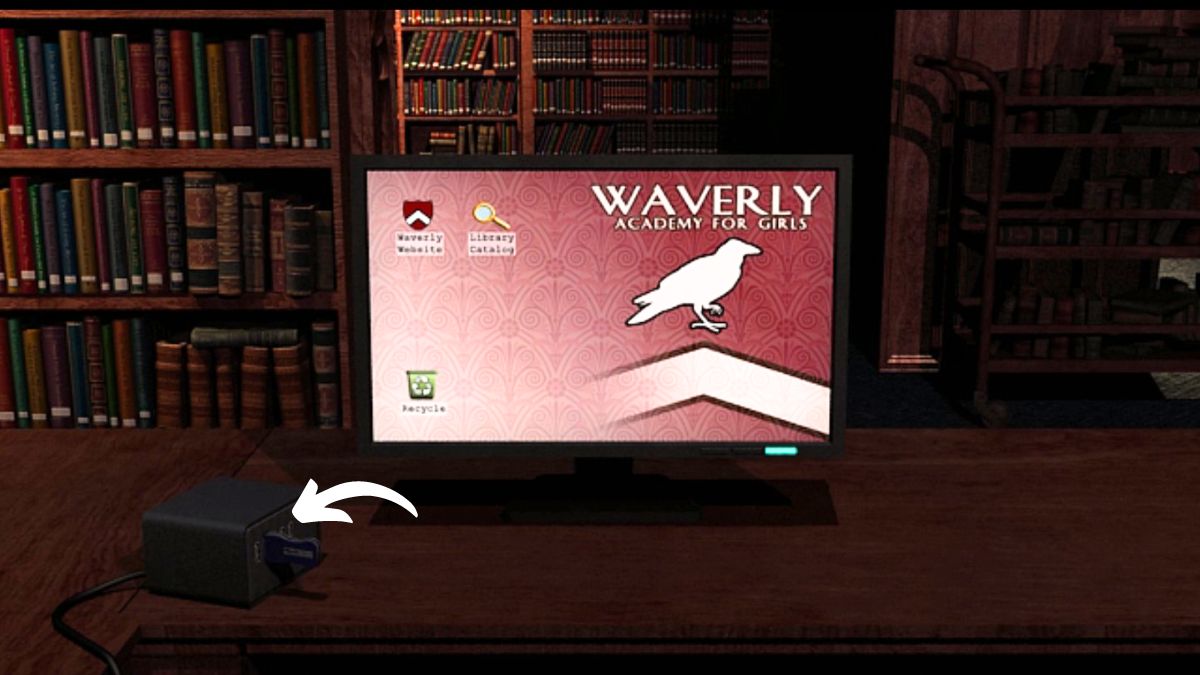
Once you have pictures of all the Valedictorian candidates from Rachel’s list, head to the computer in the library. Click on the USB box next to the computer to plug in your phone.
Then, head to the Waverly Website, then the Academics page. Then, download the photos by clicking the “download” button. At this point, you can head back to Rachel’s room, where she will give you your next task — laying out the webpage for her.
How To Lay Out the Valedictorian Candidates Website
Rachel wants you to help lay out the photos and candidate info on the website, so it’s back to the library you go. Log into the computer and head to the Academics page again. Then, click on “Valedictorian Candidates.”
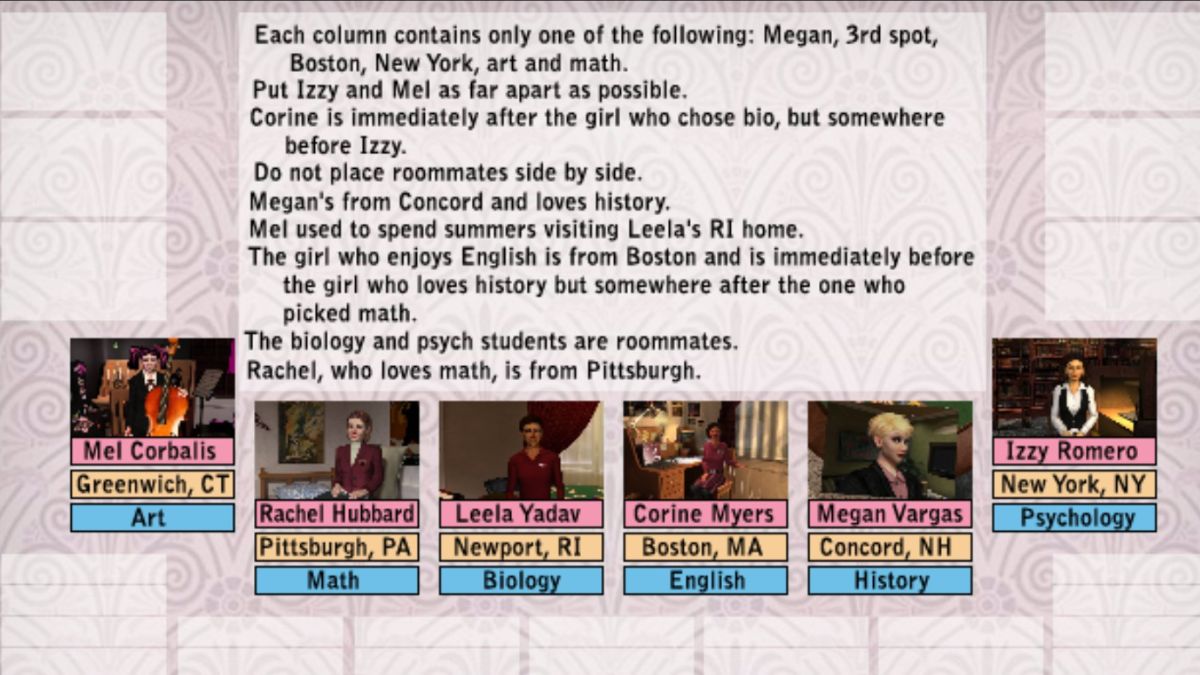
There, you will see the notes Rachel left you about the candidates. They’re more of a riddle than a clear set of instructions, so you’ll need to puzzle through the clues.

Solving the hints will help you match the hometown and major to each candidate and determine the order you should list them.
I found it helpful to start from the bottom up, as the last hint gives you a complete picture for Rachel and takes some info off the table. You also have full details on Megan, so you can work from there to fill in the other candidates based on what you know.
You can get additional hints by completing the layout and talking to Rachel in her room. She’ll leave notes about what you didn’t get right, which can help narrow in on the solution.
Still stumped? Here’s what the final layout looks like when done correctly.
How To Complete the DNA Model
The DNA model puzzle in Warnings at Wavery Academy can be a bit of a pickle, but there are a few tricks that can help you solve it.
Izzy tells you which elements to pair — always match yellow (Adenine) and black (Thymine), whereas red (cytosine) needs to go with blue (guanine).
Also, don’t forget that everything in the DNA model has to be connected by the little pink lines. Not every piece has one, and any gaps between them will mean an incorrect solution.
To start solving the puzzle, it’s best to begin by looking at the fixed pieces. Pair these with the correct colors to begin filling in the puzzle. Keep an eye on those pink connectors — they can be tricky to spot.
You can rotate elements by right-clicking to help you fill in the correct gaps. Once you think you’ve got the solution, take it to Izzy. She’ll approve or let you know you need to check your work.
If you’re really stuck, here’s a screenshot of the solution that worked for me.

Read the Student Handbook & Explore the Library
Once you get the DNA model back to Izzy, log into the computer so that you can get the lay of the land. This step also unlocks several new quests to progress the story.
When you finish on the computer, be sure to fully explore the library while you’re there. Do a full turn around the room and make sure to click on anything where the magnifying glass turns red.
Hint: Make sure you find the locked case, which sparks a new quest line for you.
Snack Bar Duty
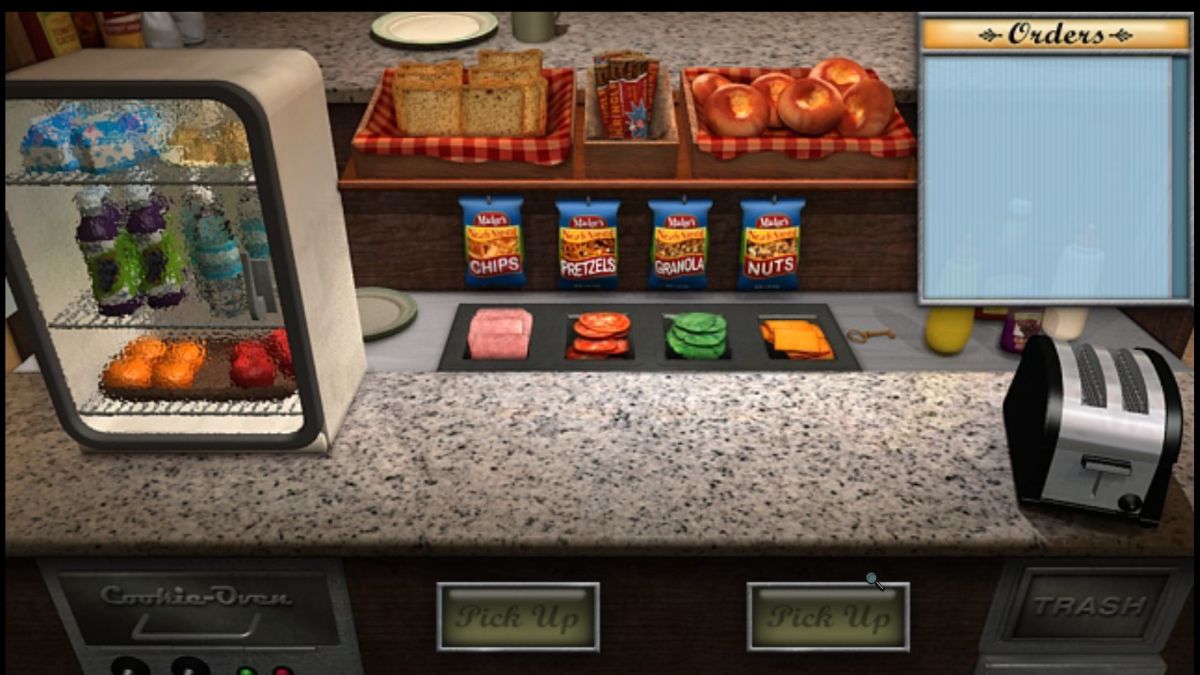
When you read the student handbook, you’ll learn that you have snack bar duty. Head to the kitchen area once per day to complete a shift, or you’ll get demerits from Paige. The kitchen is downstairs, across from where Leela hangs out, and next to the area with the couches.
The first time you go, you’ll get an orientation handbook to help you with the minigame.
During snack duty, pile each tray with the items in the order — each order ends with a dotted line before the next one begins. Keep in mind that cookies have to go in the cookie oven before you can add them to the tray.
After your first shift, you’ll also uncover a helpful new clue — a mysterious key.
Night Falls – Go To Sleep
When you hit 5 PM in the game, you’ll get a notification that night falls. Make sure to go to your room before the 11 PM curfew to avoid demerits. To sleep, set the alarm on your cell phone for when you want to wake up.
During your first night, you’ll be interrupted by a mysterious event. This, along with a text that arrives when you get up, will open up some new lines of questioning for you in the morning.
In future nights, you may have things to do while Paige is asleep, so it’s a good idea to keep an eye on the time using your cell phone and set alarms if you need to kill time until you can sneak around in the dark.
Talk To Corine
To get into the locked case, you need to talk to the current library attendant — who just so happens to be your roommate. Chat with her and use this time to ask any new questions you can to gather up info. Then, ask for the key. Corine, like Izzy, will ask for a favor first.
She’ll give you a project to finish. This time, you’ll need to solve the orthographic projection puzzle to move forward.
How To Solve the Orthographic Puzzle
This puzzle involves rotating 3D objects to match them with their 2D viewpoint. It can be a little tricky, but once you figure out what the assignment defines as the side versus the front view, you can match the shapes pretty easily.
Talk to Corine to check if you’ve done it properly. She will give you a hint about which part of the projection isn’t right. For me, I’d mixed up the side view and front view, so once I swapped those out, I had it right.
If you’re stuck and want a clearer hint, here’s a screenshot of how the model looked when I completed it correctly.

Read the Book in the Library Special Collection Case
Once Corine gives you the key, you’ll be able to open up the special collection case. The book inside just so happens to match the name Moore from the embroidery in Mel’s room.
Interact with the book to read it and open up your next line of investigation.
HINT: Be sure to examine the photograph as well.
Figure Out What the Key You Found Unlocks
You found a mysterious key at the end of your snack shift! When exploring the dorm, you’ve likely found plenty of locks to test this out on. To test the key, open up your backpack and click on the key to hold it. Then, interact with a lock to see if the key works.
We know it’s not the key to the library case, since Corine has that one. Test out other locked doors around the dorm to find the right one.
Hint: Try going outside and looking around if you still haven’t figured out where to put the key.
Still stumped? Here’s a screenshot of the correct location to use the key.

How To Fill the Gap in the Cornerstone
When browsing the book in the library, you notice that the cornerstone on the front of the building didn’t always have a gap. Time to investigate!
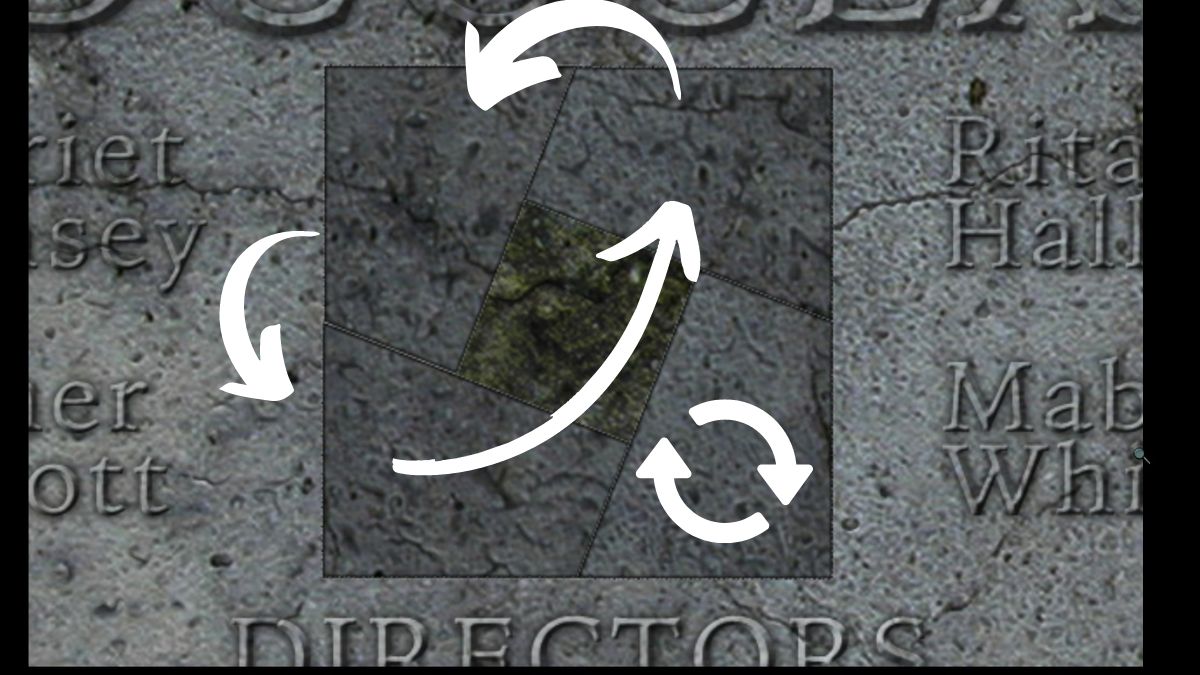
This is our next puzzle. You need to rotate the different pieces of the cornerstone to fill in the gap. To rotate, hold the right clicker and move your mouse in the direction you want to rotate.
HINT: Try starting with the top left corner piece.
Still stumped? Here’s where I moved each piece to fill the gap.
Inside the secret compartment, you’ll find a hidden journal that belonged to Rita Hallowell. Read it to get several leads for Nancy to follow up on.
There’s also a little pendant inside, but that tricky albino squirrel grabs it and runs up the nearby tree! You’ll need to get it back — after dark, so Paige doesn’t catch you climbing trees.
Learn About Perfect Victorian Etiquette
After you read the hidden journal, Nancy has several more lines of questioning for us to track down. One is to figure out what Victorians like Rita Hallowell considered “perfect etiquette.”
Channel your inner Hermione Granger and, when in doubt, head to the library. Once you get there, try searching the library catalog, using different keywords to find a book that can help.
HINT: Try the search term “Victorian” if you’re stumped.
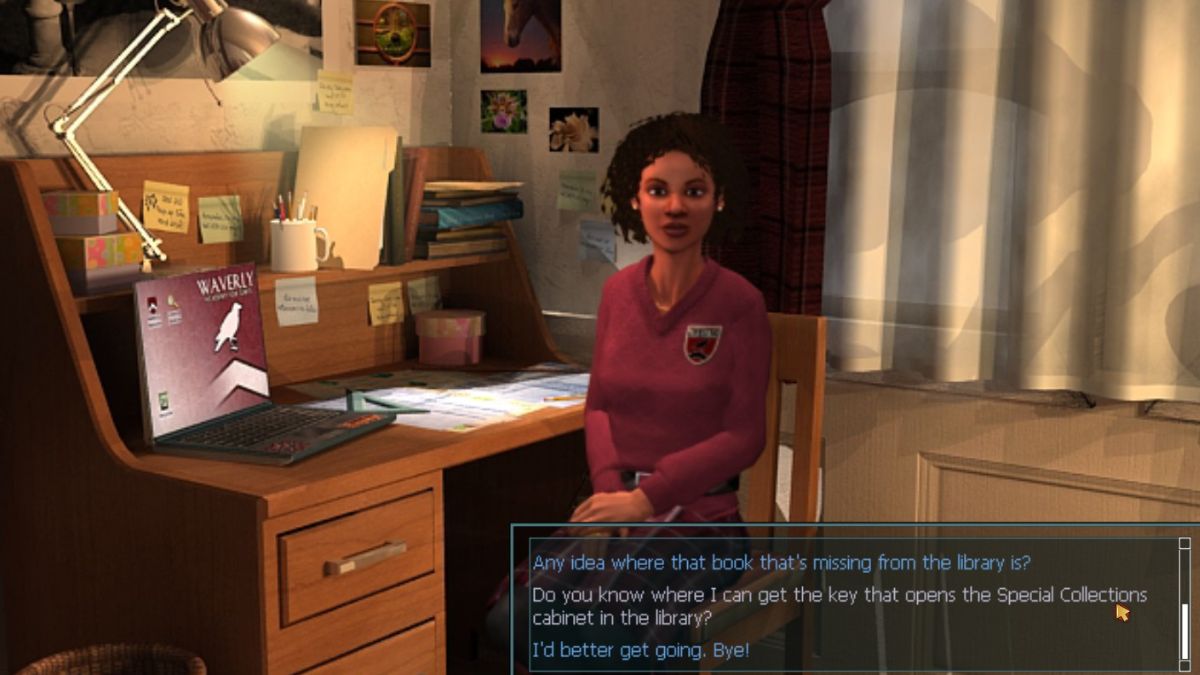
Unfortunately, the book you need has been checked out. You’ll have to talk to Rachel about borrowing it.
Of course, Rachel won’t give you the book unless you help her out. She needs to get her math notebook back but doesn’t want to talk to Mel.
Visit Mel and you’ll learn she left the book in the library.
Flip through the pages carefully, and you’ll find a discarded student ID. That’s going to come in handy later, so make sure you find it.

The book also has some info on silverware placement, which you’ll need for unlocking another line of investigation.
How To Find Rachel’s Math Notebook in the Library
Head back to the library and have another look around to find the notebook.
Hint: Try poking around near the library front desk.
Once you find the Lost & Found drawer, Nancy remarks that’s probably where the notebook wound up. But it’s locked! You’ll need to figure out the combination to get the notebook.
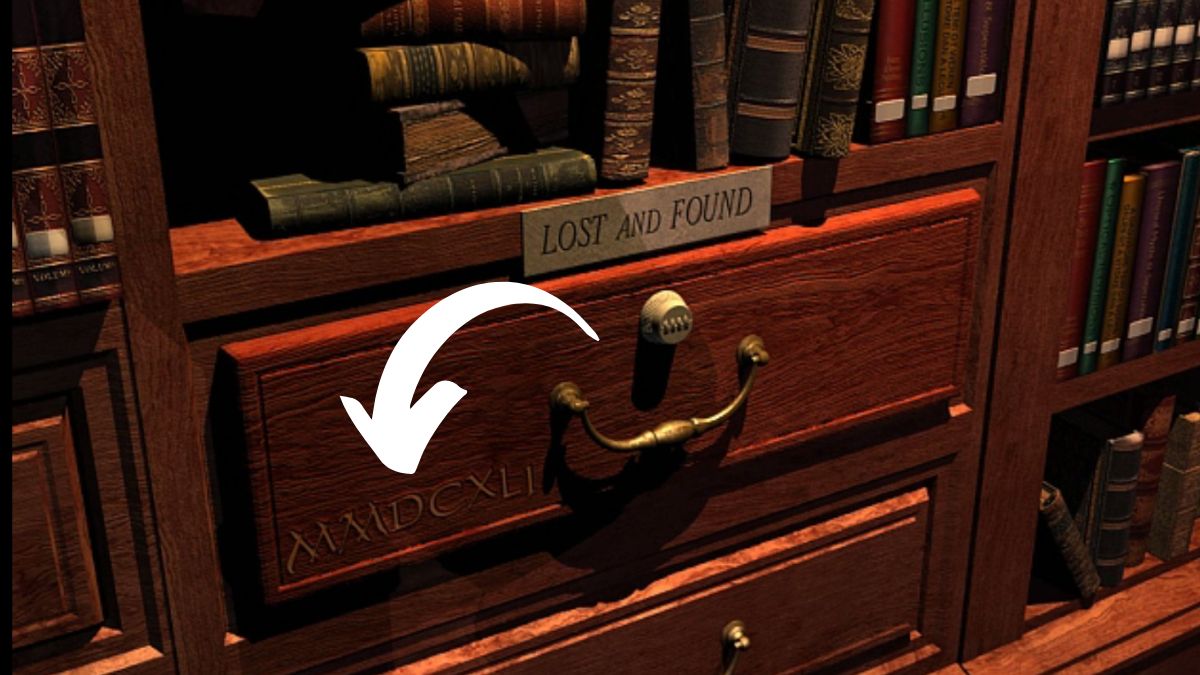
The drawer has some Roman numerals printed on the front. Translate them into numbers to unlock the drawer! There’s a book on the library reference desk that can help.
Still stuck? The Roman numerals make the number 2641. Enter that to unlock the drawer and get the notebook.
How To Solve the Piano Puzzle
If you clicked on the piano well before finding the journal like I did, you no doubt guessed you’d need to do something with it eventually. That star sticker on the keys is a clear giveaway. Once you read the journal, you’ll officially have this puzzle on your to-do list.
First, you need to investigate the lamps in the foyer that look like piano keys. They’re just to the right of the piano, near the door that leads to the grounds. Click on them and they’ll spin around to reveal a code that will help you learn which keys to play.

Head to the library and search the catalog for a book that can help you interpret what you found.
Hint: Try searching “Piano.”
You’ll learn that there is a book about piano musical notation, but that it’s checked out by one M. Corbalis — aka Mel. Head to her room to ask for the book.
In exchange for the book, Mel asks for some milk and cookies. She doesn’t want to risk her goth image by asking for them herself.
To get her treat, work a normal Snack Shop shift. You’ll have the opportunity to plate up the milk and cookies like any other order at the end of your shift.
The book Mel gives you contains the key to crack the code on the lamps and figure out which keys to play.

Match the notations on the lampshades with the piano keys to play the tune and unlock another clue. The key with a star helpfully divides the higher and lower octaves on the piano, and you can use the arrow key to slide back and forth.
Hint: Start with the lower octaves (right lamp), then move to the higher ones (left lamp).
Still stuck? Here’s a guide to the exact order to press the piano keys on each side. No need to rush — you don’t need to do it at warp speed to get it right, and accuracy is more important.

After you play the first notes, switch to the right side of the piano to finish the sequence. You can do this with the arrow while still looking at the piano, or back away and click back in. Both should work.

When you play it correctly, the compartment will immediately open and reveal another token.
How To Climb the Tree To Get the Token Back
Hands down one of the most frustrating puzzles in Nancy Drew: Warnings at Waverly Academy is the memory game you play while following the squirrel up the tree. To begin, make sure it’s nighttime. Then, head to your room and click on the window, then click again to open it up and climb out to the tree.
There, you will see the squirrel run up the tree. In order to follow it, you need to match the pattern of branches the squirrel hops on as it climbs. The trick is, he goes pretty fast! If you’ve got a shoddy memory like I do, it may be helpful to rip up a sticky note and quickly stick the bits to each branch in order to help you remember the pattern.
If you fail the pattern, Nancy falls and the game ends due to a “fatal error.” But don’t worry too much — you can hit “yes” when asked to start over to try again.
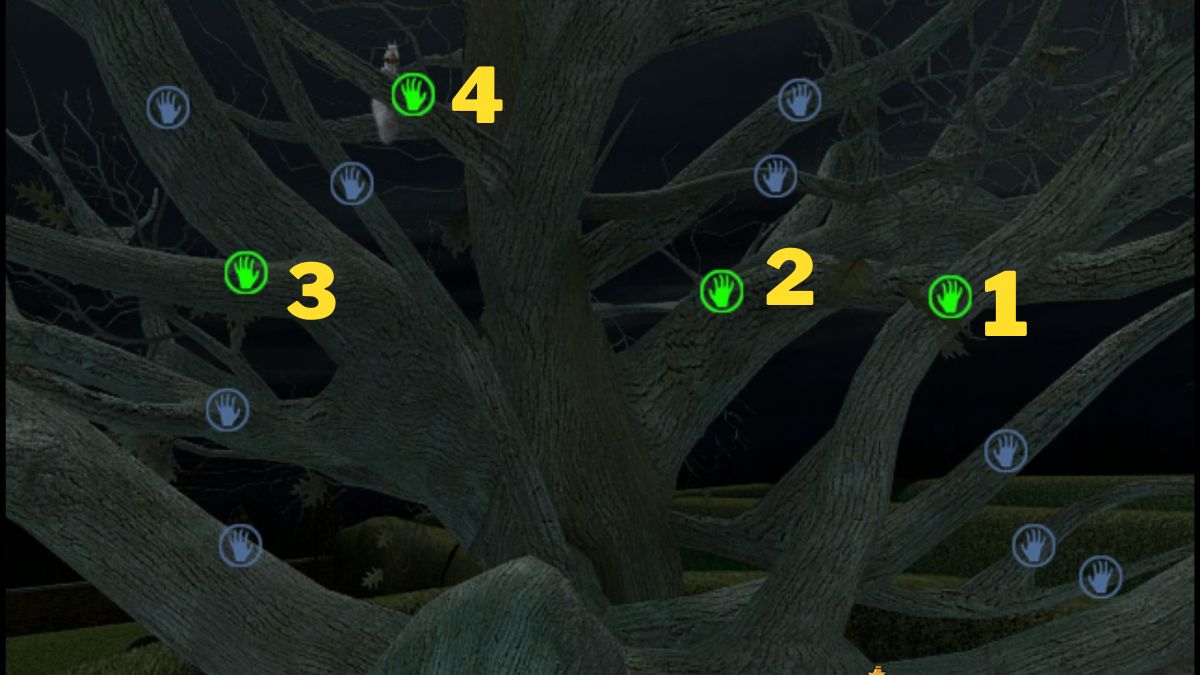
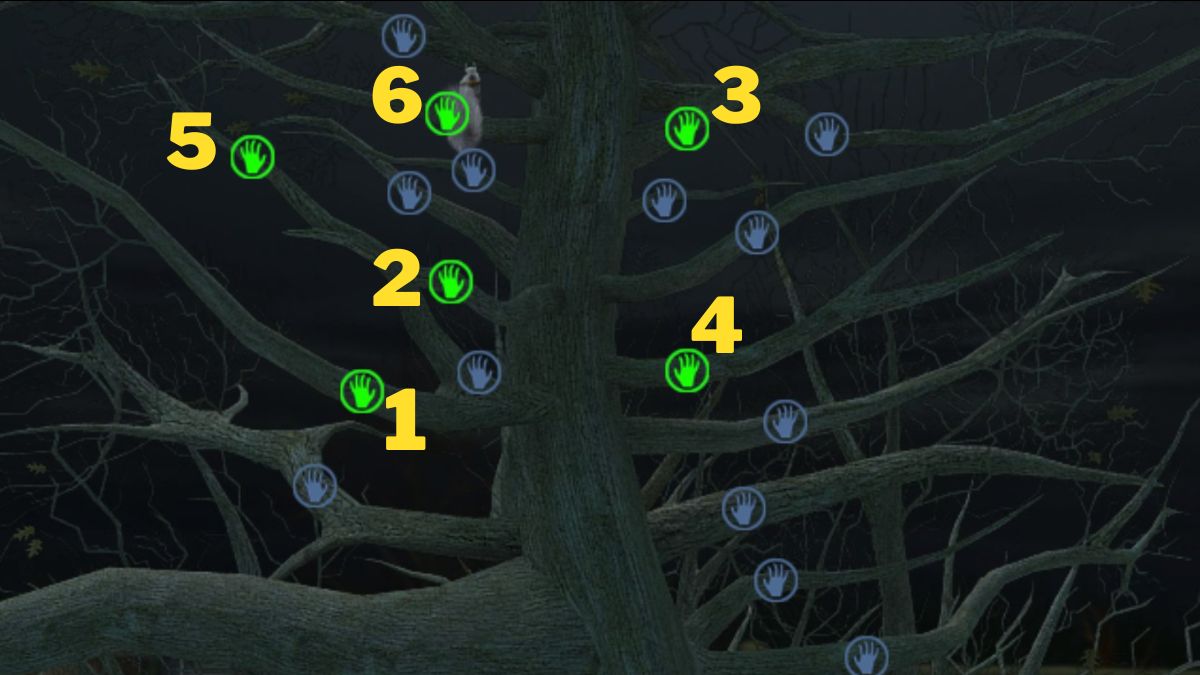
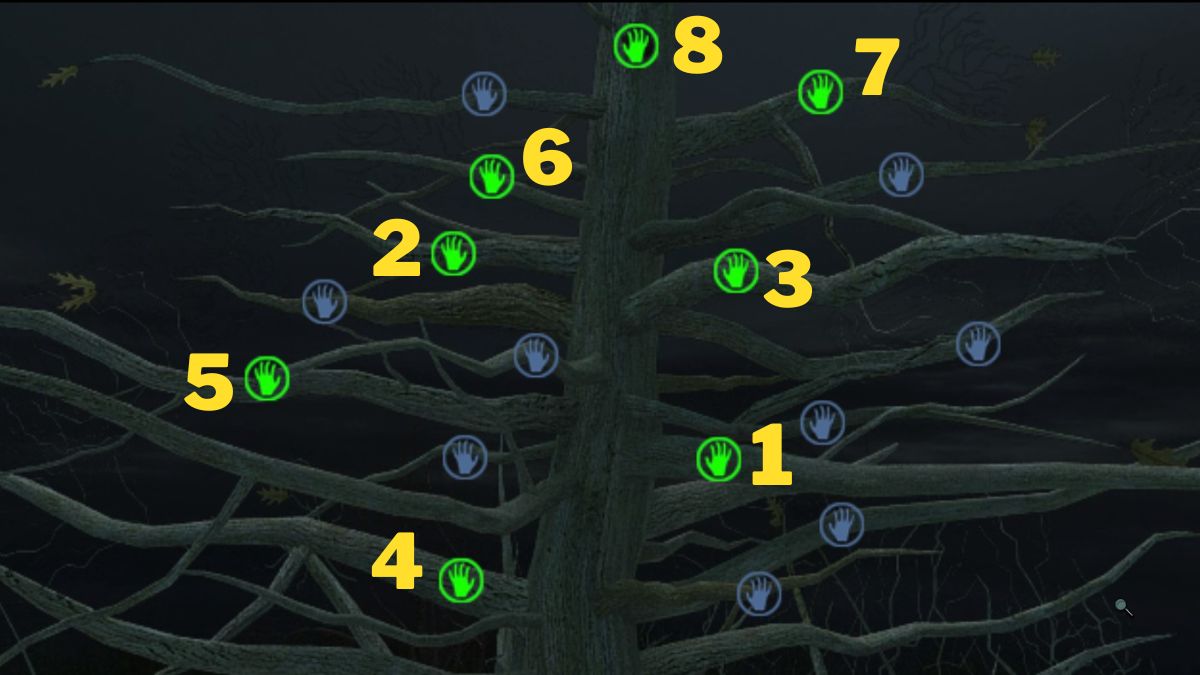
You will need to follow the squirrel three times with increasingly complicated patterns. If you’re not up for memory patterns, I’ve got screenshots of each stage below. This is the Junior Level — the patterns are more complex for Senior Detectives.
Climbing the Tree – First Time
Climbing the Tree – Second Time
Climbing the Tree – Third & Final Time
Investigate the Tree
While in the tree, Nancy oversees a strange ritual. Several people in robes gather, chant, and leave. Afterward, you’ll want to take a look and see if they left any clues behind. Head out to the courtyard and look around near the base of the tree for a clue.
Once you find the item, you’ll need to track down its owner! Try interacting with the different girls at Waverly Academy to see who has dialogue options about the barrette.
Still stuck? Try talking to Mel. You’ll get some information about what was going on under the tree from her.
How To Find the IP Address for Mel’s Plagiarized Paper
When you get a text about Mel plagiarizing her paper, head to her room to follow up on the rumor. According to Mel, she’s been framed! She asks you to help out by heading to the computer in the library and finding the IP address of the paper she supposedly plagiarized.
You’ll need to head to the Academics page, then hit “Resources” to open up Paper Trail. Next, you’ll need a number to enter into the system. Grab Mel’s paper from your backpack to get started.
To search for the IP address, enter any of the codes in the lefthand margin of Mel’s paper. Any of these number sequences will get you the same result — a return data error.
Mel told you that none of the numbers in the IP address repeat, and that’s your hint to click on the number combinations to get the correct IP number.
Still stumped? Here’s a screenshot of the solution.

How To Get Into Izzy’s Room To Snoop
As you’re going about your business, you’ll get an anonymous text suggesting now might be a good time to sneak into Izzy’s room and look around. Her door is locked and you haven’t found a key, so how can you get in?
You have something in your backpack that can help you get in without a key.
HINT: Use the Student ID you found on the door.
Once you get into Izzy’s room, be sure to look at everything you can. Be thorough — there are a few good clues in here. Click on everything with the red magnifying glass.
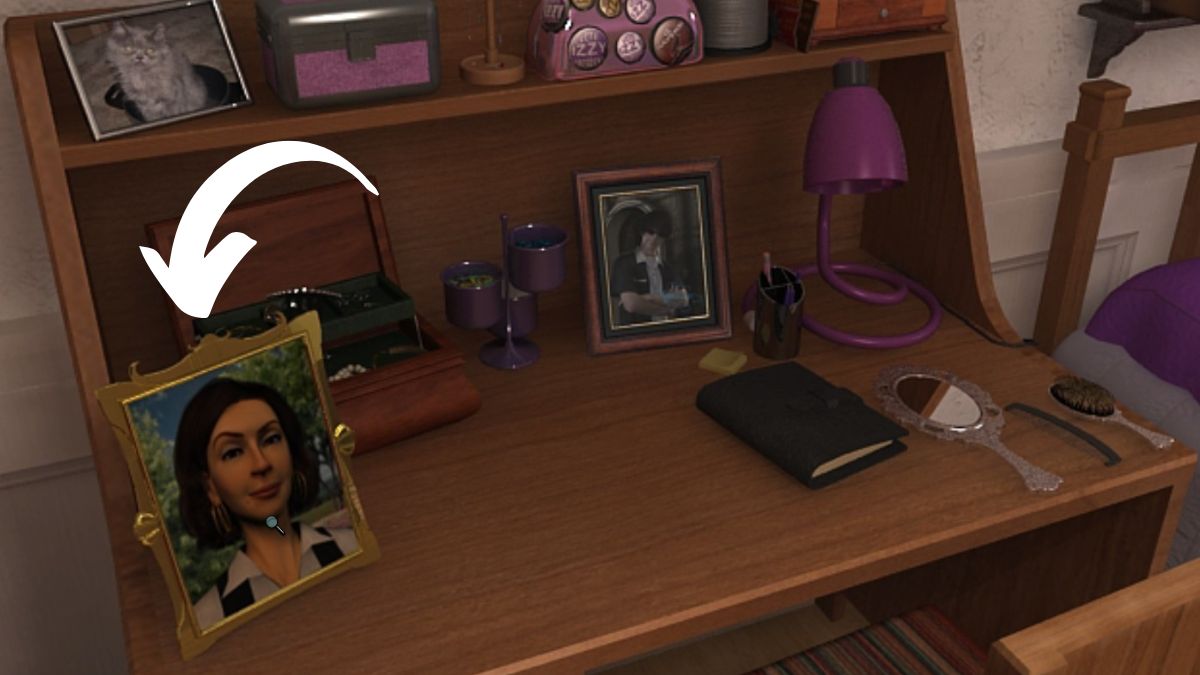
If you’re stumped on how to open her locked trunk, try taking a look at the photo on her desk. Be sure to interact with it again after picking it up.
Take Photos of the Waverly Icons
Once you finish the Valedictorian website, Rachel has another project for you: photograph iconic spots on campus. Most of them are pretty easy to find, but a few are trickier.
By now, you’ve likely spotted most of these landmarks already. But if you need a hint, here’s where and how to photograph each one.
Wood Inlaid Emblem
This is on the floor in the entryway. Try standing just inside the exterior doors to get a good shot of the emblem.
Entry Arch to Waverly
This is the front door to your building. Walk outside, turn to face the building, and snap your photo.
U.S. Map With Handcrafted Wooden States
This one is tricky. It’s in the locked classroom in the downstairs hallway. You can use the same trick you used to get into Izzy’s room — but watch out! Don’t try it during the day or you’ll get 10 demerits from Paige.
You should also wait to do this until Nancy drops her phone under her desk. This will give you the chance to find something under there that will be helpful in the room.
While you’re in here, you’ll have a chance to follow up on some other clues, so be sure to look around and make sure you see everything you can!
1st Academic Win Trophy
The trophy is in an unlocked display case in the downstairs foyer. Open up the case and click on the trophy to get a good shot, then photograph.
Courtyard Oak Tree
Try clicking on the tree to get a good comprehensive view of it before taking your photo.
Rita Hallowell & Usher
This photo is locked away in a secret place. You will need to solve the mystery of the wall in the cellar in order to find it. It will likely be one of the last things you’re able to do, so don’t fret if you need to wait on this icon.
See how to solve the cellar puzzle below for help on finding this photo for your collection of Waverly icons.
Investigate the Wooden Raven in the Locked Classroom
While you’re in the locked classroom, make sure to snap a photo of the wooden map. You’ll notice that it has a state missing. Check your bag for that piece of wood you found under your desk when you dropped your phone and put it in place before you take your photo.
TIP: Make sure to zoom in on the map to get a close shot, or you’ll have to retake the photo.
After you get your pic, look around the room for anything else of interest.
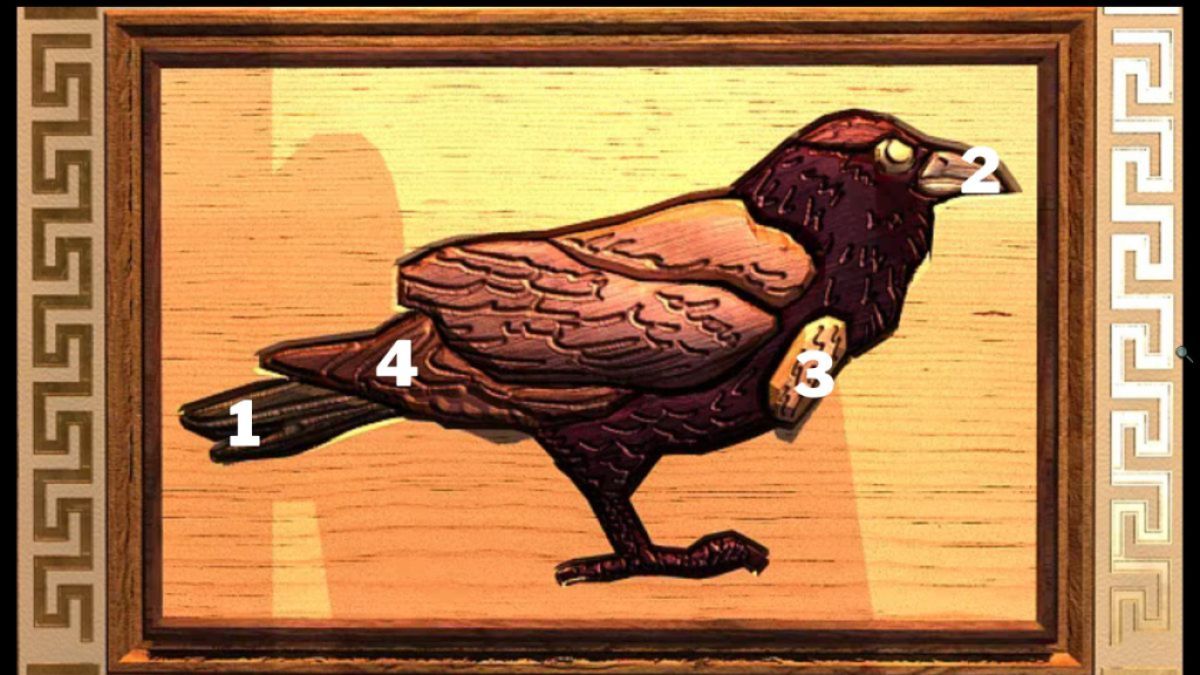
You will notice a wooden raven on the wall near the door. Click on it to take a closer look and you’ll see that the different parts of the raven can be pressed.
You just so happen to have a journal with an illustration of a similar raven in your backpack. Take a look at the journal for a clue as to what to do with the raven. I found it helpful to grab a piece of paper and jot down notes IRL to refer to when I went back to the raven.
Want the solution? Here’s the order to press the raven.
After you complete this, the raven will spin really quickly and all the wooden pieces of the map will fall down!
You will need to put the map back together before you can find the final token. I pulled up a US map for reference while doing it to help me get the smaller states in the right spots.
Here is what it should look like when complete.

Once you fix the map, turn around and take another look at the raven. You should be able to examine it and find the last token.
Then, Nancy will see Rachel sneaking around and suggest we should follow her to see what she’s up to.
How To Solve the Door Puzzle in Rachel’s Room
When you see Rachel sneaking around at night, follow her to her room. Use your handy dandy student ID to get inside, where you’ll briefly see one of the panels sliding shut. Click on it to investigate, and you’ll see a “reset” button in the bottom right corner. That’s your hint that another puzzle is afoot.
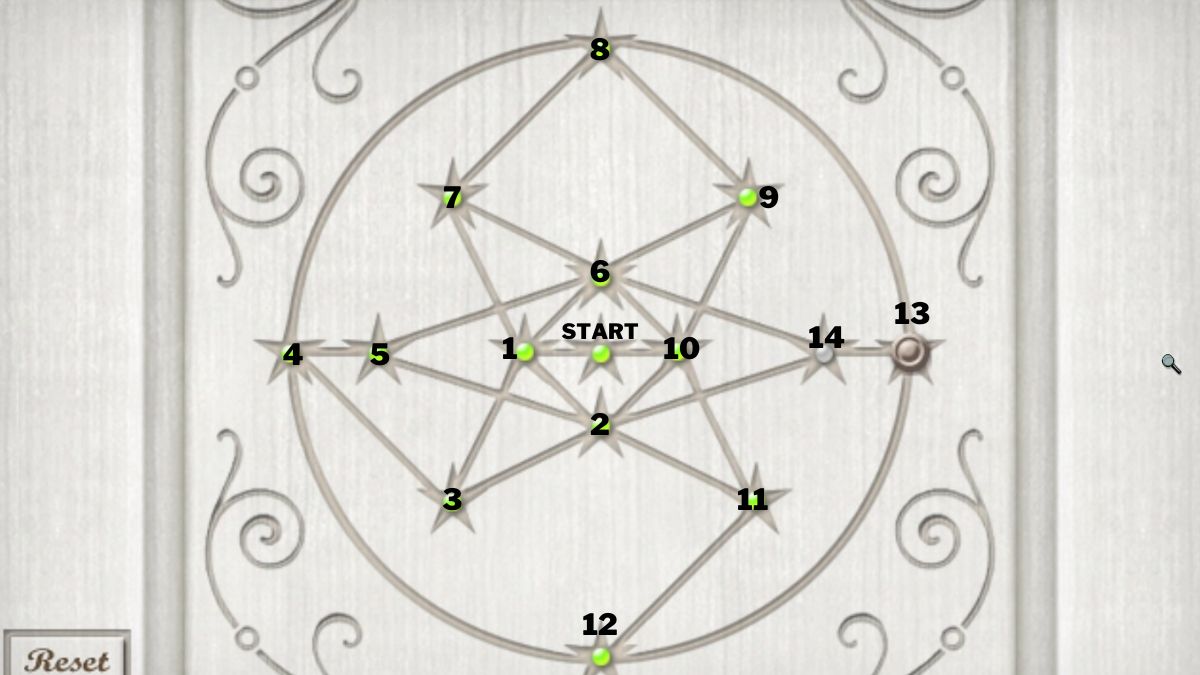
This one can be a little tricky to figure out how to start. Basically, you need to slide the star in the center to light up every slot in the pattern without having to double back or repeat. To slide the star, click on the spot where you want it to go and it will slide over.
Once you manage to light up every slot, the door will open and you’ll learn Rachel’s secret.
Need a hint? Here’s the order to slide the star and solve the puzzle.
How To Unlock the Silverware Cabinet & Solve the Silverware Puzzle
Before you can try pulling on the silverware in the case to test out Nancy’s theory about Victorian etiquette, you need to find the key to the display case.
Try searching the closet in the foyer if you haven’t found the key yet.
Still stuck? You need to flip on the light switch to the right of the closet. Then, you’ll be able to click to the top shelf, where you’ll find a key.

Use this key on the display case to access the silverware.
Then, you’ll need to pull on the silverware in the proper order per the Victorian Etiquette book you got from Rachel. Flip through the pages to learn the general order the silverware would’ve been used to piece together the puzzle.
Stumped? Here’s the order I used to get the secret stashed with the silverware.

How To Solve the Puzzle of the Cellar Wall
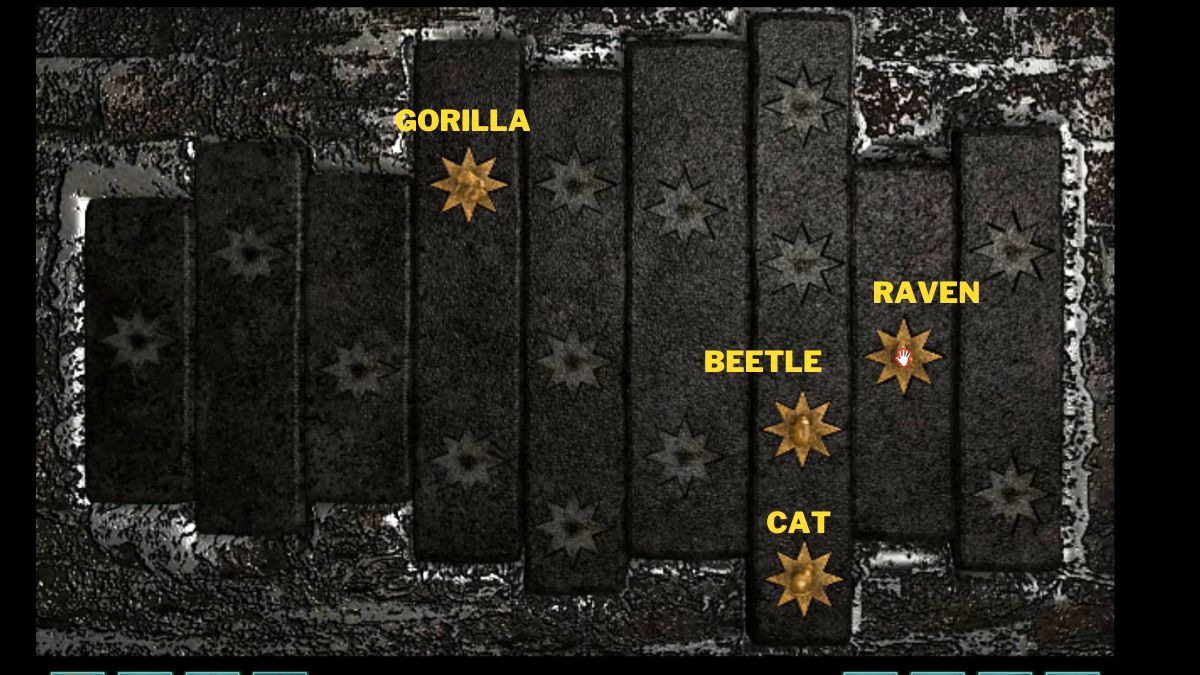
The cellar wall has several star-shaped holes that fit the little tokens you’ve been finding. Naturally, you’re going to need to fit the tokens into the wall to unlock its secret.
Thankfully, you don’t actually need to find the same number of tokens as there are holes. There are four tokens in total: a gorilla, a bug, a cat, and a raven. Once you have all four, you can head to the cellar for some sleuthing.
This is a tricky one, but think about what you’ve got in your backpack that hasn’t proved useful yet. Try that Black Cat Poe book.
There’s a list of years in the front of the book. They correspond to the columns on the wall, and the tokens each match the title of a book by Edgar Allen Poe.
Want more help? Here’s where each token fits into the wall for it to open up and reveal its secrets.
Behind the wall, you’ll find a box with the photo of Rita Hallowell and her cat inside. There’s also an old blueprint of the cellar, which should give you a hint about those valves on the other side of the room.
For now, though, go ahead and use the photo to finish out the icons so you can progress your storyline with Rachel.
Upload Icon Photos to Waverly Website
When you have all the photos, head to the library. Plug your phone into the USB drive again and head to the website. This time, click on “About Us” and then “Why Waverly?” to download the photos.
Step away from the computer, then log back in to confirm the photos are approved. If any of the photos aren’t close enough, you will see a message telling you what to fix.
Once you’ve got them all looking good, go talk to Rachel. She will have one final task she needs help with.
Get Corine’s Paper and Upload to the Website
Rachel needs the winning essay for the school’s writing contest, so you’ll need to get it from the winner — your roommate Corine.
Head to your room to talk to Corine at her desk. She’s happy to give you the paper — but she wants a snack first. Head to the snack shop and complete a shift. You’ll make Corine’s tray at the end of your shift. Then, head back to your room.
Give Corine the snack and she’ll give you a flash drive with the paper on it.
Head on back to the library computer. This time, you’ll need to grab the USB drive from your bag and click on the USB port with it.
Head to the school website, under “Academics.” Click on the blurb about the writing contest to upload Corine’s paper.
Hint: Make sure you flip through to read the paper in its entirety. This will give you an important clue to move forward in the game.
Once you upload & read the paper, head back to your room to speak with Corine. When you get there, you’ll find that she isn’t at her desk for the first time since you came to Waverly!
Where To Find Corine When She’s Vanished
First off, investigate Corine’s desk now that she’s no longer sitting there. Be sure you click on everything that has the red magnifying glass.
Hint: Look for two sticky notes that will tip Nancy off.
Once you find the right sticky note, you’ll figure out where to go search for Corine.
Head to the cellar to see if she’s there.
How To Open the Boiler To Access the Secret Room
When you first get to the cellar, no one is there! But if you looked closely at those blueprints from earlier, you probably noticed there seems to be a small room behind the boiler.
Head to the boiler and take a look around.
Hint: There should be a small folded piece of paper sitting nearby. Click on that for a big clue.
Combine the clue you found by the boiler with another lead you’ve yet to follow up on from your checklist.
Hint: This is where that Waverly Chant will come in handy at last!
By using the numbers from the blueprint and the chant, you can figure out which order to pull the valves to unlock the secret chamber.
Want the answer? See the screenshot below.
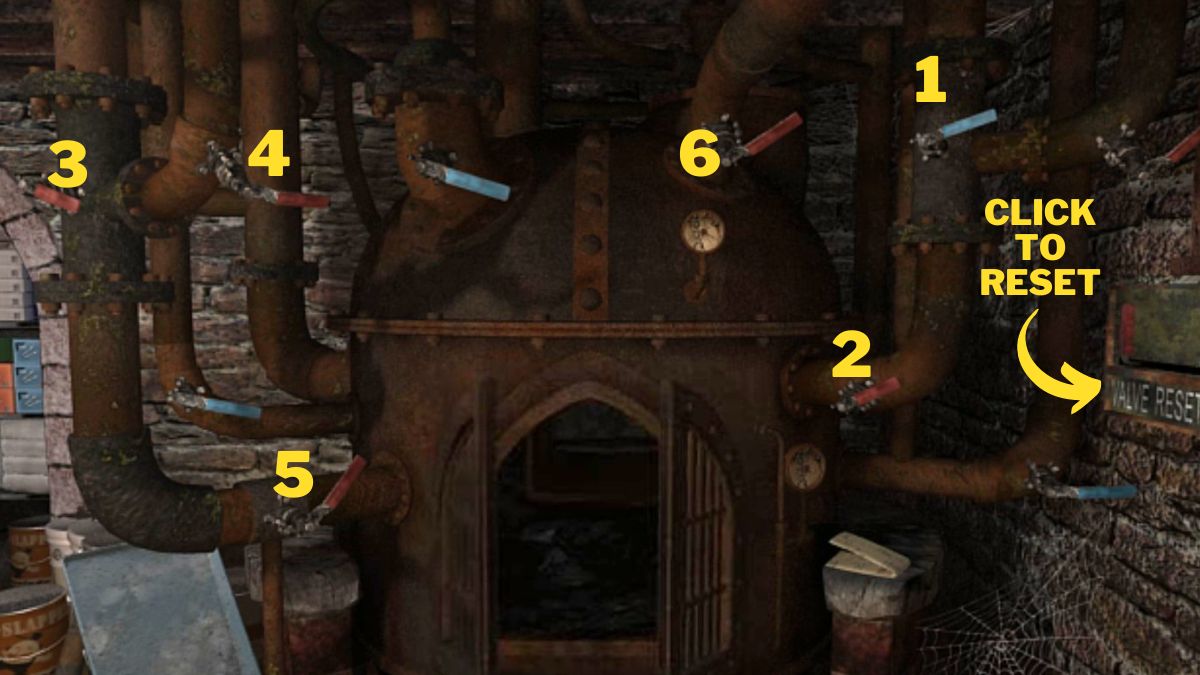
When you pull all the valves in the right order, the furnace door will pop open like in the screenshot above. Crawl on through to see if Corine is beyond.
How To Solve the Floor Puzzle To Escape the Cellar
After you confront Corine, she runs off with the book. Worse, she leaves you trapped!
Investigate the room for a way out.
Click on the block at the center of the room. Unfortunately, this causes a razor-sharp pendulum to pop out of the ceiling and begin a slow and deadly descent toward Nancy! You have only a few moments to solve a puzzle and escape.
There is a grate with several small shapes laid into the block at the center of the room. It’s surrounded by four plates with similar-shaped holes in them. You need to click them in the right order to make all of the tiny shapes fall through the holes in order to escape!
This is a shape-fitting puzzle that you can reason your way through by watching each of the four circles with the shapes in the middle. Find the right order, and Nancy is free!
Having trouble? Here’s the order I used to escape.

The End – Mystery Solved!
Once you escape the cellar, you’ll enter an extended cutscene where the story wraps up. Nancy solves the mystery and gives you some info about what happens in the aftermath. Congratulations, Junior Detective — you did it!
If you want a challenge, you can play through the story again in Senior Detective mode. You’ll have the same puzzles, but they’ll all be more difficult.
Nancy Drew: Warnings at Waverly Academy is available now on PC.


Published: Sep 15, 2024 7:32 PM UTC