
After a long journey, Null’s Body is the final dungeon in The Legend of Zelda: Echoes of Wisdom. If you’re ready to end this journey, read on for a step-by-step guide on how to defeat Null and save Hyrule.
Table of Contents
Null’s Body Walkthrough

Once you’re able to move, follow Link until you reach an arena. Three waves of enemies will come at you, but thankfully, Link will fight alongside you. He’s incredibly strong and can’t be defeated, so rely on his strength as you fight. Summon a strong Echo and lay waste to these first two waves alongside Link. The third wave will throw only a single enemy at you, but it’s the strongest basic enemy in the game – a Lynel. Lynel’s are fast and can close the distance quickly, hitting you for a ton of damage, even if you have damage reduction accessories and smoothies. Just focus on keeping your distance and summon strong Lv. 3 enemies, or even a Lynel of your own, and keep pressing him until he’s defeated. Then follow Link to the next room.
You’ll be separated from Link here and have to take a different route from him. In this first room, you’ll see a switch in the distance behind a wall. Summon a Beamos from a distance onto the far platform, then target the switch, which should cause the Beamos to hit it, opening the locked door. In the next room, you’ll have to fight some Echoes on your own, so summon a Lv. 3 Echo to steamroll your enemies. When all enemies are dead, head into the next room and go down the ladder.
In this section, you’ll want to reverse-bind onto the overhead moving platform to cross the gap. There will then be two moving platforms. Jump down to the lower platform, then ride it to the left-hand side. Summon a Strandtula then climb up the small gap it brings you to. Now, use a Flying-Tile to cross the gap with the Gustmaster, then use the Gustmaster’s wind to float yourself over the next gap. You should see two large gusts of wind coming from the ground. Summon any flying-based Echo and ride the gusts of winds while holding it, then time your glide so that you also ride the Gustmaster’s wind when it starts to blow. This should propel you to a small ledge. Summon some water blocks, then use them to reach a ladder. Climb up it, then head into the next room.
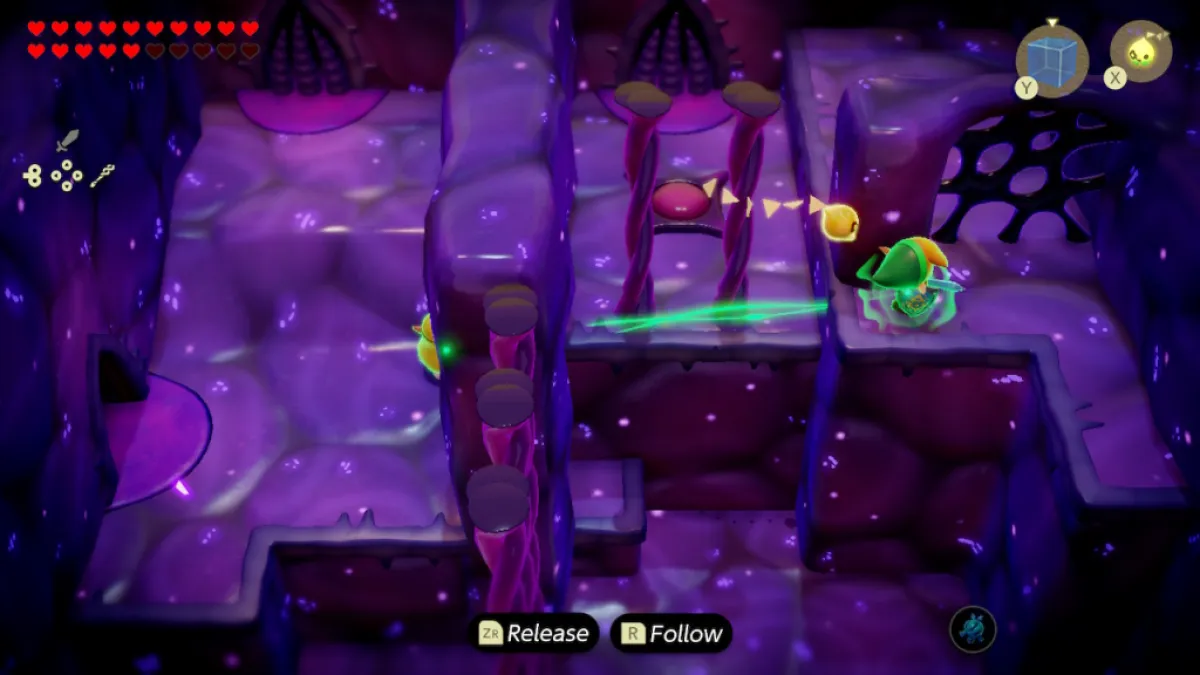
In this room, which is the final puzzle in the game, you’ll see Link standing alone on the opposite side of the room. You’ll have to use Bind on him and move him into the upper area so that he can step on the switch there. Bind him while he’s at the bottom of the room, then put as much distance between the two of you as possible. Then start climbing the platforms until Link is on the same ledge as the destroyable wall. Release him, then watch him head over to the switch and open in on both sides. Enter the room and you’ll be reunited with him.
Once you enter the large room, this will be the last moment before you fight Null. Heal up, get your Echoes in order, and get ready to fight the final boss in The Legend of Zelda: Echoes of Wisdom.
How To Fight Null

Null, like most of the bosses in The Legend of Zelda: Echoes of Wisdom, has multiple phases, but unlike other bosses, each phase requires a radical shift in strategy to defeat him. For the first phase, Null will float around the room and slam a hand down, producing a shockwave. He’ll do this three times, then stop. Once he’s stopped, Bind his exposed arm and pull it until Link is able to launch an attack, severing it. Once each of his three arms is disconnected, attack Null with a Lv. 3 summon until he flees into the walls. Now his hands will pop out of the wall, and he’ll try to slam the ground with all three simultaneously. Like before, Bind one of his arms and pull it until Link slashes it. Once all three arms have been pulled from the wall, he’ll pop out and the phase will start again.
Now some of his attacks will leave behind a poisonous cloud. Link won’t be able to attack an exposed arm if it’s in a cloud of poison, so move the arm to an area without it so Link can attack it. Simply repeat this phase two more times until Null shifts into his second phase by transforming and then running away.
You’ll have to now fight Null in a horizontal segment without Link. This segment is also an underwater section where Null will try to swim away from you. He’ll summon several large whirlpools across the screen that you’ll have to dodge, as well as several underwater enemies like Biris and Sea Urchins to damage you. Simply dodge them while maintaining your oxygen, then summon some Chompfins to chase down the tentacles from his body. After all of the tentacles are removed, he’ll swim away and spawn more. Just keep chasing him and summoning Chompfins until he leaves this underwater area, signifying the start of the final phase.

It’s at this point Null transforms one last time, but this phase is somewhat similar to his first phase. However, it’s much more chaotic and easily the hardest fight in the game. Now instead of having three arms, Null will have five that you need to pull out to let Link attack. Plus, instead of slamming his hands on the ground to attack, he’ll disappear and summon previous bosses to launch attacks. First, he’ll summon the Seismic Talus to do a large spin, then he’ll summon some Mogryphs to launch their tornadoes. After each summon, Null will reappear and you can continue to pull his arms off. You’ll only be able to pull an arm or two off before he summons the next wave of bosses, so try to aim for two arms per turn.
After all five arms are off, Null will once again retreat into the walls, and you’ll have to pull each arm out again. The new layer of complexity comes from the enemies that each arm will summon who will attempt to attack you. Also, a Floormaster will be summoned to try and grab you, immobilizing you. If you’re caught, you’re going to have to wait until the hand lets you go or Link and your Echoes free you. During this phase, always have a Lv. 3 Echo summoned to help defeat the endlessly spawning enemies so you can focus on the hands. When all of the arms are off, Null will reappear and the phase starts over.
Like the first phase, you’ll have to repeat this pattern two more times to finally defeat Null, but each new round will have Null change his summons. For the second round, he’ll summon several Ganons who will lunge at you with their spears, followed by two Skorchills who will slide around the room. In the third round, he’ll summon almost every boss in large numbers. Sometimes, he’ll summon six Ganons. Sometimes, it will be three Mogrpyhs. He’ll even add in Gohma to shoot spiderwebs at the ground slowing you down. If Gohma is summoned, burn the wens he spits out instantly, or Link won’t be able to reach Null fast enough if you grab one of his arms. It’ll be a long phase, and you may have to heal to make it through, but once you strike his body for the third time, Null will finally be defeated and the day will be saved.
And that’s everything you need to know to clear Null’s Body in The Legend of Zelda: Echoes of Wisdom. Check out more walkthroughs and tips here.
The Legend of Zelda: Echoes of Wisdom is available now on Nintendo Switch.


Published: Oct 9, 2024 12:49 PM UTC