
Visions of Mana is the latest installment of the famous long-running series, and it brings dozens of hours filled with battles, treasures and secrets to uncover in this long journey, so here’s a walkthrough of everything you need to beat the game.
Table of Contents
- Visions of Mana All Chapters Walkthrough
- Prologue
- Chapter 1
- Chapter 2
- Chapter 3
- Chapter 4
- Chapter 5
- Chapter 6
- Chapter 7
- Longren, the Vale of Wind
- Wind Sanctum
- Aello & Ocypete (Boss)
- Besseroth, Benevodon of Wind (Boss)
- Etaern, the Moonlit Parish
- Castle Cresceno
- Vampire (Boss)
- Tor Marne, Benevodon of Moon (Boss)
- Illystana, the City of Water
- Luka Ruins Undertemple
- Shreegill (Boss)
- Gandoom, Benevodon of Water (Boss)
- Floating Island of Ulul
- Floaret, Benevodon of Wood (Boss)
- Tianeea, the Fire Village
- Charred Passage (2)
- Dorpher Volcano
- Axe Beak (Boss)
- Vaulchibel, Benevodon of Fire (Boss)
- Daelophos (Boss)
- Chapter 8
- Chapter 9
Visions of Mana All Chapters Walkthrough
Visions of Mana has a total of 9 Chapters plus a quick Prologue. You also have an extra tenth Chapter serving as your post-game content. Chapters have varying lengths, with some taking only a few minutes while others take from 6 to 8 hours to complete depending on your pace. The game has an auto-save mechanic, but you can manually save whenever you reach a Meridian, as well as teleport to any other place in the same continent.
Prologue
During the Prologue, you control Eoren while trying to escape Gudju with Lyza. The game will teach you the basic commands while you go through various sessions of enemies. There aren’t any hidden treasures here, so keep heading forward and defeating the opponents as needed. After finishing your third encounter, you’ll find the first boss:
Gardlegrog (Boss)
Gardlegrog is a simple introductory boss that teaches you about weak spots. Hitting his legs will bring him to his knees, making it easy to hit his head, which is his weak spot. Weak spot attacks have an enhanced chance of being critical hits, so keep this in mind for future battles. His main attacks involve close-distance slashes and a laser beam around him. Dodge as needed and get back to hitting his head with aerial combos to make quick work of him.

After beating Gardlegrog, you get a final cutscene that concludes the Prologue, giving you control over the actual protagonist this time.
Chapter 1
Tianeea, the Fire Village
You finally get to control Val, the game’s true protagonist, while also having access to the menu and its options. Chests are always marked on the map, so try to grab as many as you can before start following the main objective. There’s a Cup of Wishes in a treasure chest southeast of the village, so grab this one as a priority. Don’t ignore the Gold Clovers (the yellow glowing items on the ground) either, as they are important for progression later. Get as many treasures as you can before following the main objective.
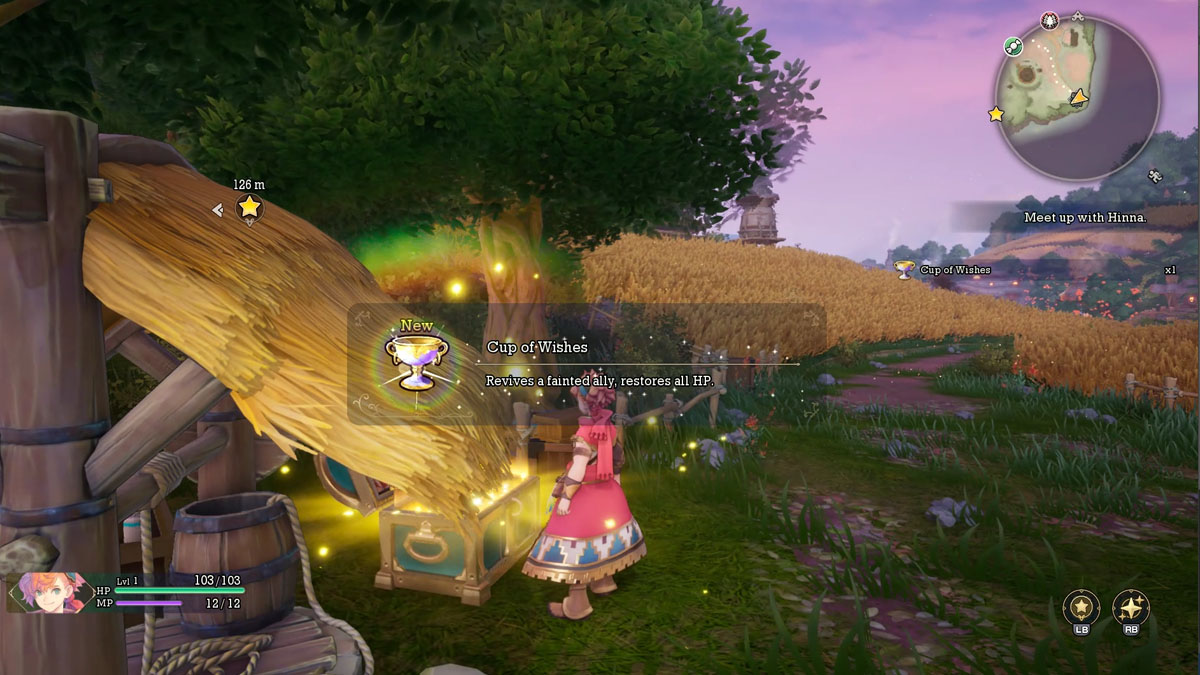
Unlock the Meridian (save point) by the bonfire before meeting up with Hinna. Once you meet her, head back to the bonfire and she gets chosen as the village’s alm, who you’ll protect during the journey. Visit the Gear Shopkeeper and buy a Patchwork Vest for Val. You’ll also get a Fireball Ability Seed as a parting gift, but Val isn’t particularly great with magic, so no need to equip it just yet.
Charred Passage
As soon as you first exit the village, you’ll have a mandatory fight. Hinna will back you up with healing spells, but don’t rely too hard on her. After winning you’ll learn about Corestones. They can be obtained randomly after a battle, and you can exchange them at a later point for Ability Seeds.
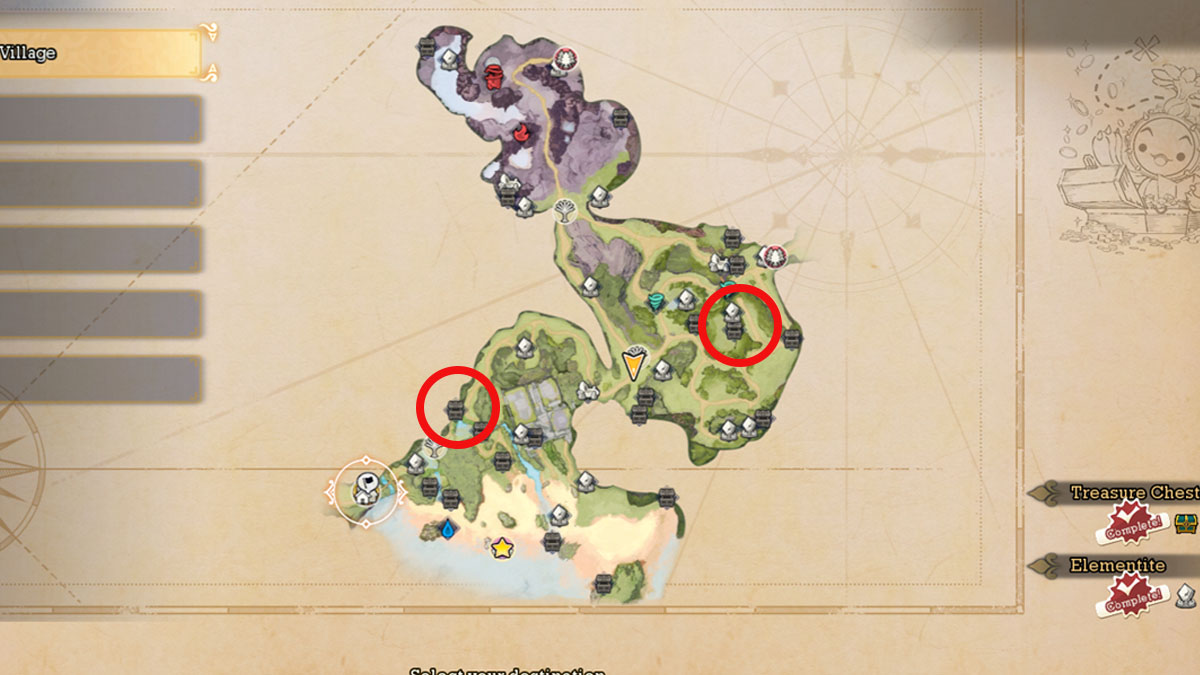
Take your time to explore the map, as most of the game is composed of similar zones that can take a while to enjoy at their fullest. You can unlock another Meridian right after the first battle, and open the chest a bit ahead of it (below the waterfalls) to get Move Damage, a very useful Ability for Val. The image below shows the exact location for Move Damage, as well as another important chest you’ll need on this map.
If you decide to explore for a while, try to grind at least until Level 3 to make your next fights easier. Be careful with the Ancient Ruin zone, as it houses Level 50+ monsters that aren’t meant to be fought right now. Keep following the main objective until you meet Eoren again during a cutscene.
After parting with Eoren and following your way, the next cutscene will introduce you to Dudbears, who become merchants for various items later. You’ll need to grab as many Grizzly Syrup as you can from the maps to trade with them, so you better start grabbing some.
The very next event is meeting up with a Nemeses for the first time, the Tricky Buju. These are stronger-than-average enemies, and give out some of the best experience values in the game. You can save the game in the Meridian before facing it.
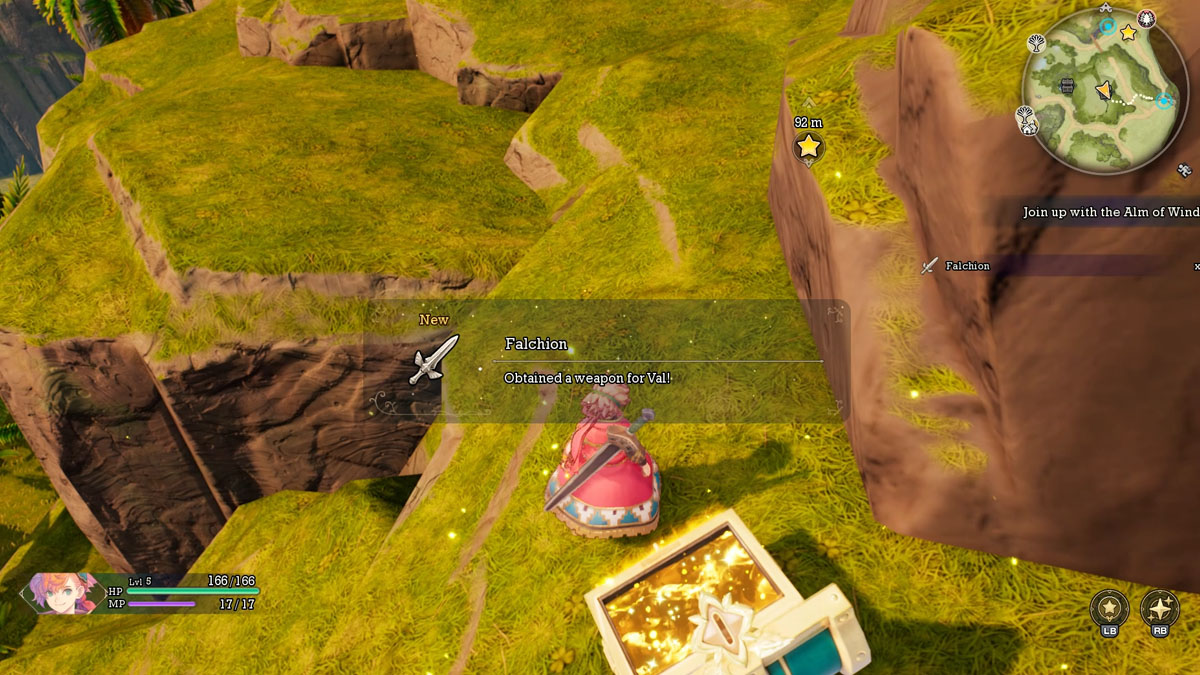
Continue following your way, but remember to stop to pick up the Falchion sword first. Equip it immediately. The northern zone of the map is unavailable for now, so don’t bother with it. There’s another Nemeses a bit north of your next main objective. You can fight it before leaving the zone, or leave for later when you have more teammates.
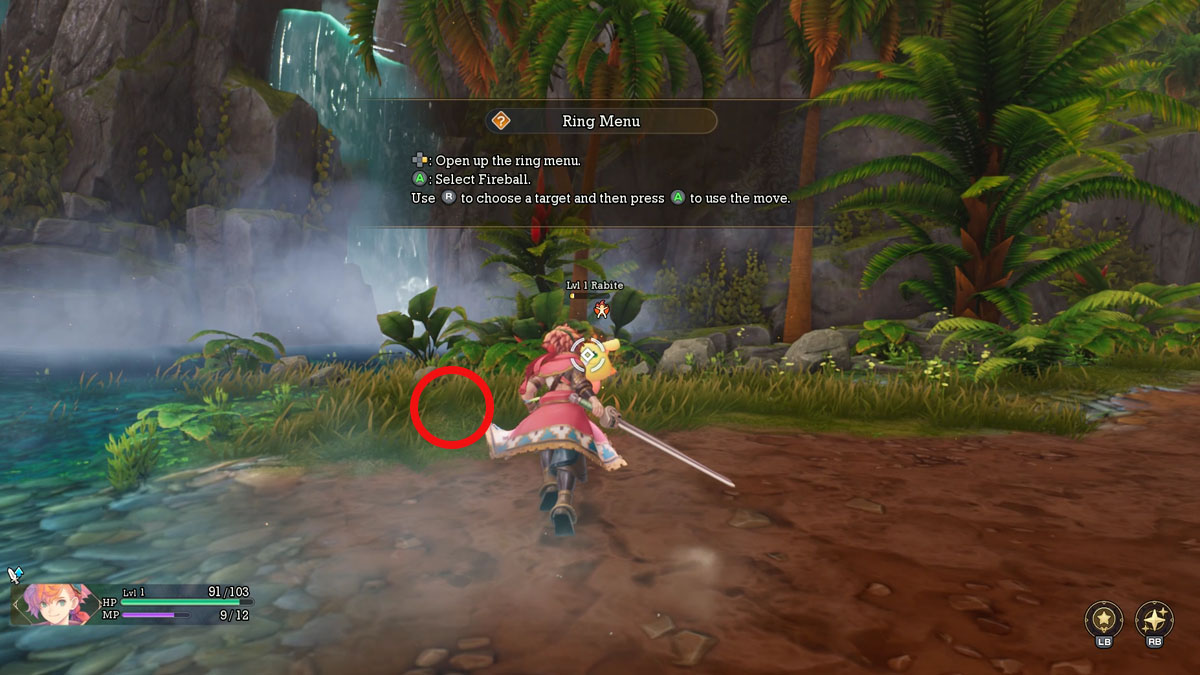
There’s another mandatory battle before you can leave the map, which teaches you about Class Strikes, the game’s ultimate attacks. The CS bar fills whenever you deal damage to enemies, and can be used to quickly wipe out an encounter or deal some good damage to bosses and Nemeses. Use it often as soon as it’s up! Once you’re done with this fight, it’s time to head to the Aery Passage.
Aery Passage
As soon as you enter the zone, you’ll see a wind tower in front of the Meridian. Another Nemeses is waiting in front of it, and you can fight it if you want. Just be careful with its Sleep status effect. There isn’t much more to see here, so keep heading straight to your objective and opening chests until you get the cutscene with the little dragon cub Ramcoh. You’re also handed an Elemental Vessel, which you must return to the village’s chief, so head out for Longren.
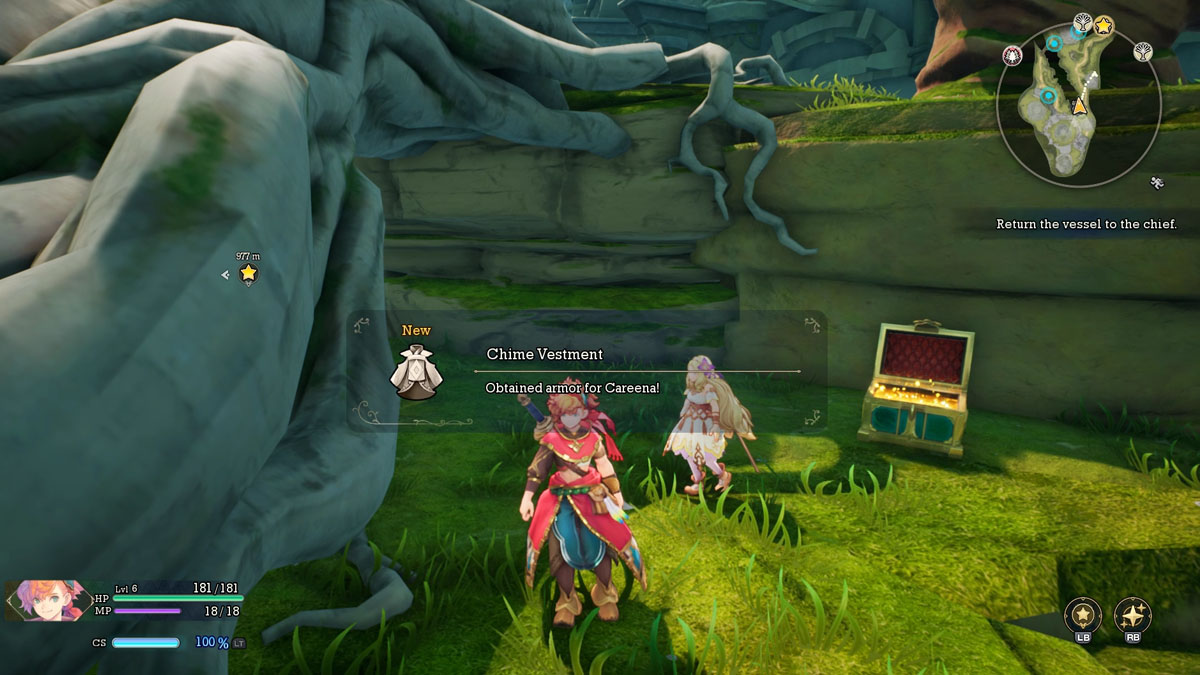
But before heading out this way, take a quick detour to the south of the map to visit the Ancient Ruins and grab the Chime Vestment, which you’ll be able to soon equip in your new party member. Once you’re done with the chest collecting, head back to the north to visit Longren.

Longren, the Vale of Wind
The second city you’ll be visiting in the game is about the same size as Tianeea. However, there’s much more to do here. Grab all the treasures you can before speaking with the Chief, as one of them also has a new spear for Careena, your soon-to-be party member.
You meet her as soon as you speak with the chief, and she asks you to return to Aery Passage and find Shiriu for her. This section is an introduction to Side Quests. Shiriu’s location is shown on the map once you return to the Aery, so look out for him and ask him to come back to the village. Speak with him, then return to Longren to speak with Careena again.
You’ve now properly unlocked Side Quests, and you can grab some of them for some extra rewards. I recommend completing Behind the Scenery 1 at the very least.

But before heading out of the village, speak with Careena again to attempt the wind dyeing. She asks you to help her find Ramcoh, who’s hiding next to the village’s entrance.
Once you two find her, Careena will join your party to search for Sylphid, the Wind Elemental, in Mt. Gala. Equip her with all the equipment you’ve obtained thus far. Remember to change her and Val’s Strategy settings in the menu to determine how you want them to act when you’re not controlling them. I recommend the following setup for general gameplay:
- Tactics: On the offense
- Target: Nearby enemies/Same enemies
- Moves/Magic: Reserve resources
- Items: Reserve resources
- Elemental Vessel: Use
You can change these during battle by pausing the game and selecting Strategy, so use it to adapt to other situations. However, these setups usually work out for the whole game with rare exceptions.
You’ll also unlock the Dudbear merchant next to the village’s exit. Take this chance to get a few items from it if you’ve been gathering enough Grizzly Syrup. I recommend one or two Cup of Wishes and as many healing/status-removing items as you can. Complete any Side Quests you have in Aery Passage before heading out, then go through the village’s north exit to keep following the main story.
Mt. Gala
You’ll finally unlock Classes once you’re here. To equip a class, all you have to do is to equip the appropriate Vessel to your character through the Gear menu. Changing classes can also change a character’s weapon and gameplay.
As you only have one Vessel for now, I recommend giving it to Careena to give her the Dancer class, but Val isn’t bad with Rune Knight either. You can also use the Elemental Vessel in battle. As its cooldown recharges very quickly, don’t be afraid to spam it whenever it’s up.

You can also level up a character’s Elemental Plot, which unlocks new skills for them. Active skills (such as Careena’s Cyclone) can be used even if the character isn’t equipped with that specific class. You get more Elemental Points for leveling it by interacting with Elementites around the map or leveling up. Gold Clovers can also be used instead of points.
Related: All Classes & How To Unlock Them in Visions of Mana
There’s another Move Damage Ability hidden in Mt. Gala, which you can now equip to Careena. Keep heading north and collecting all chests/Elementites you can. Be careful with the slime enemies in the ice portion of the map, as they can poison you. Try to get at least to Level 7 to face the first actual non-tutorial boss in the game, found right in front of the second Meridian in the map.

Mantis Ant (Boss)
Mantis Ant is weak to Wind and Strike attacks, so Cyclone from Careena and the Sylphid Boomerang will be the most effective attacks to use here. If Val learned Thunder Saber, use it to enhance your weapons with the Wind element, making your strikes even stronger. Whenever you Class Strike is up, use it with whichever character is equipped with the Wind class, as their Class Strike takes the element from its Class. Focus on breaking the Mantis’ Belly when it starts channeling its crystal attacks, and be careful not to be poisoned.

The Mantis Ant is very straightforward, but it can take a while to defeat, so be patient. Use the Cup of Wishes immediately if one of your characters dies, and keep pressing the attack. Hinna will provide you with more healing than usual, but don’t forget that you can also heal yourself with items. The victory will eventually be yours, and Careena is officially appointed as the Alm of Wind.
Lefeya Drifts
Another very straightforward area, especially during this first visit. There isn’t much to do here, except by grabbing two important chests, which contain a new Fan for Careena’s Dancer class and the Flame Saber Ability Seed, which is one of the most useful skills to have in the early game. You can see both of their locations in the image below.

There are two Nemesis to fight here. They’re both weak to Fire, but it’s better to save them for later as you’re about to meet another of your party members. Try to reach at least Level 9, though. As a side note, characters will always join the party at the same level as the other members and get the same experience regardless of participated in battle or not.
Etaern, the Moonlit Parish
As soon as you enter the area and approach the Parish, you’ll meet Morley. Follow him to his encampment and, after a few cutscenes, he joins your party as the third member. He asks for your help to find the Moon Sphere, which is located back in Lefeya Drifts.
Return to the area and head to the Plundering Tytonrik Nemeses zone. The Moon Sphere is located in a star-marked zone next to it. You don’t need to beat it to progress, but it’s a good thing to do it now. Equip the Flame Saber to Morley and use it to enhance all of your characters if fighting against the Nemeses.


Once you have the Sigil, return to Etaern to continue your journey, but make sure to equip Morley with his Rogue class with the Sylphid Boomerang before entering the zone. After a few cutscenes, Val will be the only character left in your party, but you’ll obtain the Luna Globe elemental vessel. Use it to turn Val into the Aegis class, then return to the Lefeya Drifts.
Search for Morley in the area, and you’ll enter a scripted battle with only Val and Morley. There are two main waves of enemies to overcome, but it should be easy as long as you’re around Level 9. Use the Luna Globe to stop enemies in their tracks whenever possible. Return to Etaern for the last time, where Morley is appointed as the Alm of Moon, meaning he’ll accompany you throughout the rest of your journey.
As soon as you start leaving the Parish, you’ll meet the three merchant sisters. These three will often show up offering you good weapons, gear and items. If you saved up some Lucre, get some new weapons for your characters and their classes. A Horn Lance for Val is particularly great, as he’s probably the best user for the Luna Globe here. If you have some money left, also get new armor for your team.
Rime Falls
As soon as you enter the map, you’ll meet Lil’ Cactus. They will give you the Li’l Cactus’s diary, and completing it will give you many bonuses. You’ll get the first entry for free, which gives you the exact number of treasures and Elementite spots on each map. There’s a Lil’ Cactus hiding in each of the game’s maps (including the ones you’ve already passed), so take some time later to find them.

Related: All Li’l Cactus Diary Pages Locations in Visions of Mana
Rime Falls is a very quick area, with the biggest event being a mandatory battle with multiple waves of enemies in the end. I recommend being at least Level 10 here. Enter the battle with a full CS bar to make quick work of the first wave. Equip one of the characters with the Freeze Resist ability seed if you happen to grab it in Lefeya Drifts to make the battle safer, but this isn’t really necessary. Focus down the flying enemies first and you should be good.
Fallow Steppe
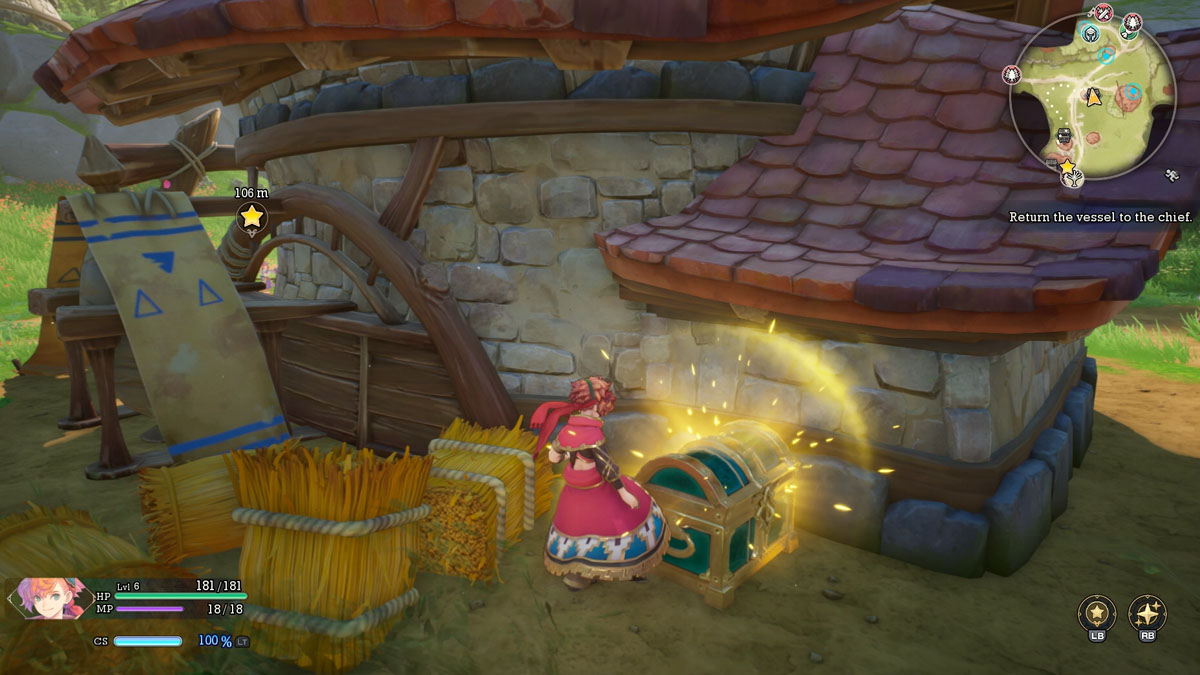
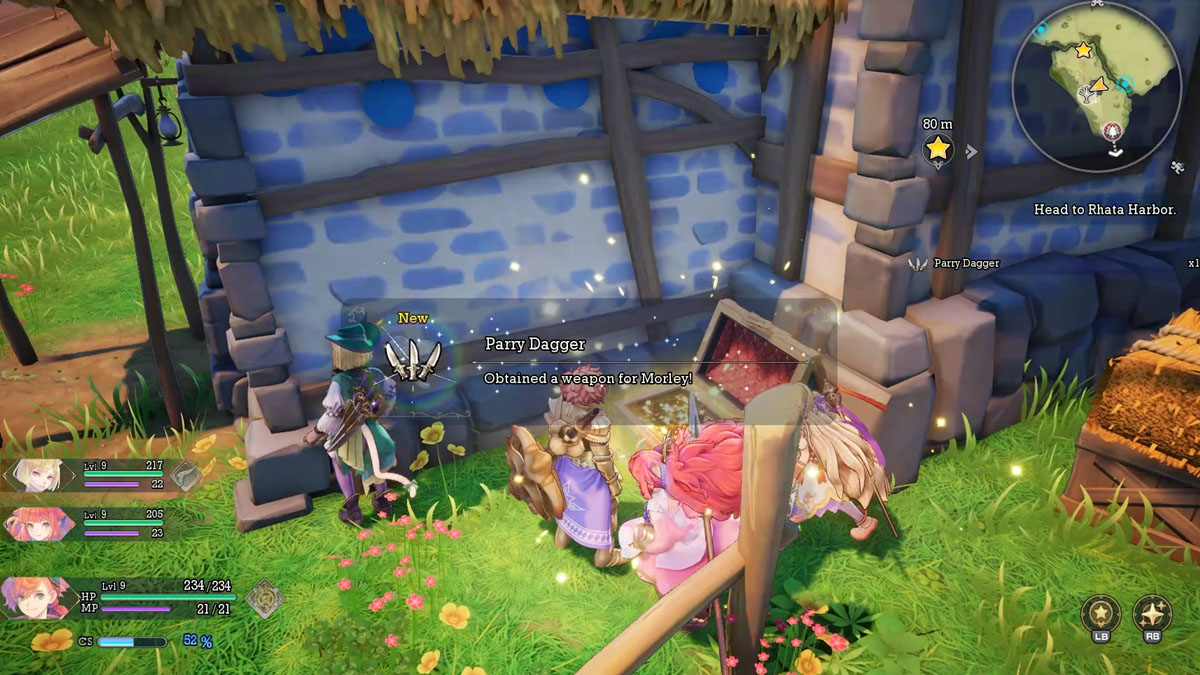
Grab the Parry Dagger for Morley next to the small house at the entrance. Interact with the first objective and you’ll be granted the Beckon Bell, which lets you call the Pikul mounts. They will carry you through this huge area.
There are dozens of treasures to collect and even some side quests to complete, so you can take your time with those if you want. I suggest doing so until you reach Level 11 for the next battles. After you feel satisfied with your grinding, it’s time to visit the last area in the first chapter.
Rhata Harbor
Once you get here, follow the main objective and Careena will be accused of stealing the key from Master Passar. You’re tasked with finding the key to prove her innocence, and you cannot leave the Harbor until she’s free of any accusations. The key is found inside a chest next to the Mayor, by the entrance of the map, marked as the main objective.

Grab it and return to Passar to get Careena back to your team. You keep the key, and can use it at a later point. You’re now free to roam through the world as you want or board the ship to finish this section. You won’t be able to return to any Chapter 1 area for a while once you board the ship, so make sure you’re prepared with items and equipment. Complete all Side Quest as you can too, including Behind the Scenery 2 (if you have done the first one).
You won’t need any more grinding, but I suggest returning to previous zones to grab other Elementites you couldn’t get before to unlock new abilities, as well as finding some Lil’ Cactus in the zones using our complete guide for that. Once you feel like you’ve done enough, board the ship and get ready.
Kraken
This is the final boss in Chapter 1. The Kraken is weak to Fire and resistant to Water, so using the Fireball skill or the Flame Saber ability you got previously will be a huge help. Don’t stay close to its head for long, or he’ll swipe you away with its tentacles. You can dodge them by jumping and going in the opposite direction, but the safest play is just to get away from his head and focus on the tentacles instead.

Use the Moon Sphere whenever it slams one of the tentacles in the ship. This will expose the tentacle for longer, giving you the perfect opportunity for a counterattack. Be careful of his bubbles attack, as they deal heavy damage and can be tricky to dodge. Go as far as you can from his head to dodge it.
The Kraken occasionally shakes the boat and starts throwing ink at you, which can also be easily dodged as long as you’re away from it. This fight is all about knowing when to disengage and when to attack. Overcoming it will reward you with a Soul Guard Tonic, which is used to further expand the Elemental Plot for Val. Congratulations on your first chapter done!
Chapter 2
Ledgas Bay
Not much to do here, aside from grabbing a few chests. Follow the main objective and go up through the elevator. After a few cutscenes, you can stock up on items if you spent a few too many fending off the Kraken. Get some new equipment too, as the battles will be tough. There are plenty of Side Quests here too, so grab them now. The Dudbear store is also updated with new items, so spend some of that Grizzly Syrup if you’ve been stocking them.
Pritta Ridge
This is another huge area, so use the Pikul rides to get through it. Plenty of important treasures to find around here, so keep your eyes open for them. I recommend grinding out to Level 13 at least, which can easily be done by tackling the Nemeses you find in this area.
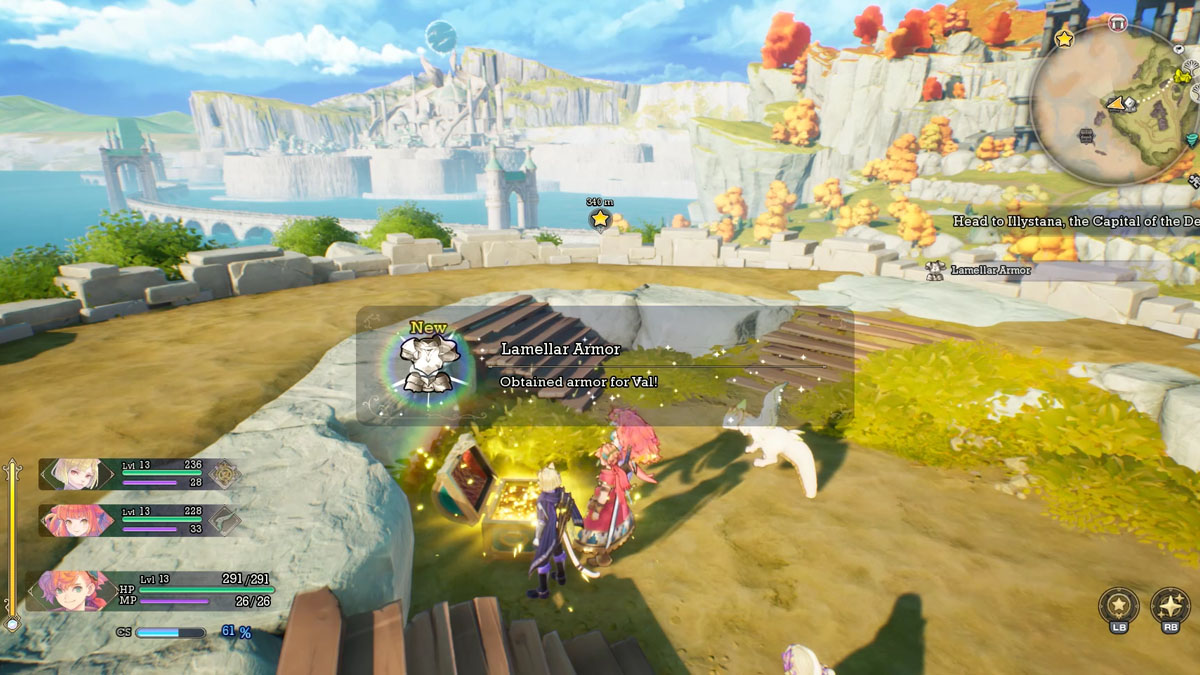
While exploring, make sure to grab the north Meridian next to the Ancient Ruins to save you some time later. Also try to grab the Lamellar Armor here to save some money when equipping Val.
You must have also noticed the Elemental Aerie time challenges around here. They give out Abilities related to their respective elements as rewards, so they’re worth trying if you can. Try to enter with a filled Class Strike gauge to instantly get rid of the first wave, then take down the second one normally. The opposite also works if you enter without a full gauge.

The Side Quests you just got in Ledgas Bay can be completed here, so return to deliver them if you obtained them. Once you’re done with the side activities, head straight to the city of Illystana by going through the bridge.
Illystana, the City of Water
You’ll be greeted the moment you enter Illystana, but you’ll also be informed that they haven’t selected an Alm just yet. Take your time to explore the city and open a few of its chests. Once you visit the fountain at the center of the city, you’ll meet with a “mysterious” figure before gaining access to the rest of the city.

Keep exploring the other regions in the area. Head to the east portion (next to Niccolo’s Emporium) in particular, as there’s an unmarked chest you can only open using Passar’s key. This will give you a Magic Smash skill, which will be great for the next party member. Once you finally decide to head for the palace, you’ll learn that Queen Palamena is also missing, so the situation is a bit chaotic.
Return to the marketplace to get a souvenir with Hinna, as well as learn the “mysterious” person’s identity. Approach Hinna once again to have another cutscene and advance time, starting a whole section revolving around watching cutscenes and visiting nearby places.
Palamena is eventually revealed as the Alm of Water, and will join your party once she learns that Niccolo has been unjustly framed. Your goal is to head to the Luka Ruins to prove his innocence. The Luka Ruins are located north of Pritta Ridge, right next to the Ancient Ruins Meridian in the area.
Before you leave, make sure you are well-prepared with enough items and updated equipment. The merchant sisters and Palamena’s brother Iain will gift you the Undine Flask, unlocking the Water Classes for you. Palamena is particularly great with it at this point, so I recommend using it on her. With all set and done, teleport to the Meridian to reach the Ruins quickly.
Luka Ruins
Enemies here tend to use a bit more status effects, but nothing that you can’t handle, especially now that you have the Undine Flask. Its effect conjures a bubble around its targets, and dealing enough damage to them pops the bubble, causing huge damage in a small area. Perfect for dealing with packs of enemies.

You’ll learn to use the bubbles to travel through the area. While you’re inside of them, try only moving upwards and avoid other objects so you won’t pop it early. Jump through each bubble in succession to reach the top. Remember to grab the Ultraflog from the chest after you jump down the hole, even if you’re not using a Flail class for Palamena right now.

Once you arrive in the Elevator Gauntlet, you’ll have to fight various consecutive waves of enemies to reach the top. Pop the bubble in the center whenever you can to deal massive damage to them, as this will be your main method of fending off your opponents. If you have learned a few spells with Palamena, they’ll be your best friends here alongside Class Strikes and constant Undine Flask attacks.
Once the gauntlet is done, you arrive on the second floor of the Ruins. Grab the Dark Saber hidden in the chest nearby, equip it to one of your characters and get ready for the next battle. As Val is the only character with an expanded Elemental Plot for now, teach him the Moon Elemental Break and set his Class as Aegis for this fight.
Fullmetal Hugger (Boss)
This oversized crab is blocking your path, but you can abuse its Darkness weakness by using the Dark Saber skill you just got, just like you did with the Kraken back then. You can hit its eyes (its weak point) to make it blind and deal some extra damage, which is even better if you have the Darkness enchant active.
Its claw attacks are easy to dodge, but can be deadly if you’re not fast enough. Whenever it loses enough health, it’ll start climbing the walls and summoning bubbles, so dodge these and his following leap to the ground. It may also summon smaller crabs to the fight, so make a quick deal of these.

Whenever the yellow gauge next to the characters’ portraits is full, hold the Moon Elemental Vessel button with Val to unleash the Elemental Break, which completely stops time for a few seconds. Use this to unleash a flurry of attacks on the crab, while always remembering to use your Class Strike as soon as it’s available.
Defeating the Fullmetal Hugger will reward you with the Radiant Knight Tonic, which you can use to expand Morley’s Elemental Plot. Return to Illystana to immediately trigger a cutscene where Niccolo will be revealed to be safe and well. This marks the end of Chapter 2!
Chapter 3
Chapter 3 has no actual gameplay, and it’s mostly revolving around cutscenes. Once you get to control Val in his room, go visit Hinna in the Palace for some cutscenes. Keep following the main objective until you reach the harbor, where Eoren will take you to a new area (Reignus Shrine) with his boat. There’s only one objective here, so keep climbing to the top. Once you reach it, get ready for a heartbreaking cutscene that marks the end of Chapter 3 and a turning point in the narrative.

Chapter 4
You’ll be back in Illystana, and Niccolo is determined to help you find Eoren. You’ll get access to his shop, where you can finally exchange all of the Niccolo Coins you obtained throughout the journey. You also get access to the Ability Seed shop, which can be accessed through various merchants around the game. The Niccolo Coins can only be used here, though. Once you leave the store, visit the harbor once again to have another talk with Niccolo.

Niccolo will gift you the Jaque Seed, which will be used to continue your travels. The journey is not over, so stock up on items and prepare for your next objectives. There are some new Side Quests available in the city, so grab them now if you want some more content. Ledgas Bay will also have some new ones, so remember to pay it a visit. Once you’re ready, visit Illystana’s exit and head to Ahrvet’s Pasture.
Ahrvet’s Pasture
Bigger areas with hundreds of opponents will be common, so it’s time to get used to this. Using your Pikul will be almost mandatory, especially if you’re going for all of the treasures here. I recommend picking up the Reaper Greaves on the Luna Globe treasure. Aside from it, there’s also Resist Moogle, which can be found to the south of the map and will be useful in certain fights.


There’s a Nemeses to fight on the bridge, and I recommend fighting it if you feel strong enough about your physical fighters. Don’t forget to grab any Elementites you can on your way, as your Elemental Plot needs a lot of points. Try to reach at least Level 16 before heading out for Dura Gorge, which is located to the west of the Pasture.
Dura Gorge
Once you enter the area, use the Wind elemental to start up the wind currents and reach the first treasure, containing a Chalice of Hope. This item lets Val equip two extra Ability Seeds. Further, you’ll find the Obsidian Katana for Morley, which will be useful if you’re not using any of his Dagger classes.
Once you defeat the Kid Dragon monster pack, head through the maw-like entrance in the cavern and use the floating bubbles to grab some Grizzly Syrup and other loose Elementite around. Keep going forward until you start walking straight through the bone road.

You’ll reach the Meridian soon, so prepare for another boss fight. Learn the Holy Saber skill with Val (Rune Knight class) if you haven’t already and equip it before going forward. Also, make sure you have someone with a Water Class equipped.
Du’Inke (Boss)
Another big but slow boss. He’ll definitely hit you hard, though, so keep your distance whenever he’s using his club to smash enemies around. Du’Inke is weak to Light, so enchanting your whole party with Holy Saber will make the battle very quick. Remember to debuff him with Careena too if you brought her.
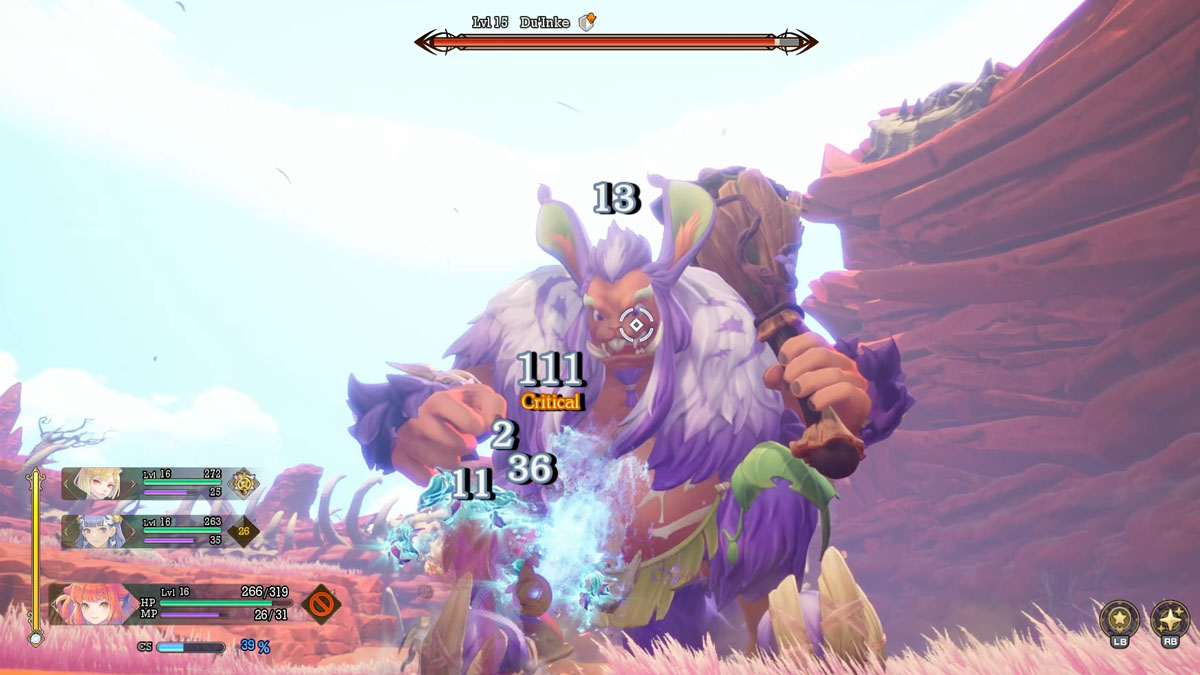
Use the Undine Flask nonstop, as this is another very efficient method of dealing with him. He’s very slow, so it’s easy to shower him with water while walking backward. Follow up with some normal attacks to recharge its cooldown faster, as he gives you a lot of room to attack. The Moon Elemental Vessel is also very useful here, especially if you can use its Elemental Break.
Aside from his regular smashes, Du’Inke occasionally summons dark magic bolts from the sky to hit you and your party. Dodge them as necessary, and be careful with his big leap in your direction that comes right after. He’ll be very vulnerable after this, so don’t lose your chances. Once he’s down, he’ll reward you with the Wind Oracle Tonic, which lets you expand Careena’s Elemental Plot. To the next area!
Deade Cliffs
Despite looking huge at first, Deade Cliffs is a somewhat small zone. After grabbing some of the scattered treasures, visit the small settlement in the south to encounter the Beast Watchers, which will help you with the Jaque Seed that Niccolo gifted you. However, the seed doesn’t seem to grow, and you’ll need to search for Gnome back in Gudju to see if he can help.
Before heading out, stock up on some items and gear before you leave. Your next goal is to return to Ahrvet’s Pasture and use the other exit previously unavailable, which will take you to the Entwine Bridgepass.
Entwine Bridgepass
This is a very straightforward area with nothing to do, except for learning some lore tidbits and finding Lil’ Cactus. After the quick cutscenes, cross the bridge to reach another big area.
Khaswia Moors
Following the same trend of big areas, Khawsia Moors is huge and has lots of treasures to find. I recommend going at least for the Princess Heels and the Bone Armor, which can be found at these locations.

While searching for these, you’ll certainly come across hundreds of enemies and Nemeses, which are very worth your time. One of the Nemeses will later be the target for a Side Quest, so you might want to take care of it while you’re already here. Speaking of Side Quest, this map also has some of them available, so don’t sleep on them.
If you can’t deal with the Elemental Aerie challenge on the beach, just wait a bit as you’re about to unlock a new Class that will make it easier. Remember to unlock all Meridians available in the zone, and don’t worry about some of the chests that look unreachable (such as one on the cliffs next to the beach). They’ll be available at a later point. After you’re done exploring, head south to enter Tsataa.
Free City of Tsataa
You’ll be greeted here as soon as you enter. This city has plenty of treasures to find, and some of them are great for magic users, such as Intellect Sigil + and Blade and Scepter Sigil. The Dudbear Shop was also updated with new items, so grab them during your visit. You also have another chance to update your gear if you haven’t already.
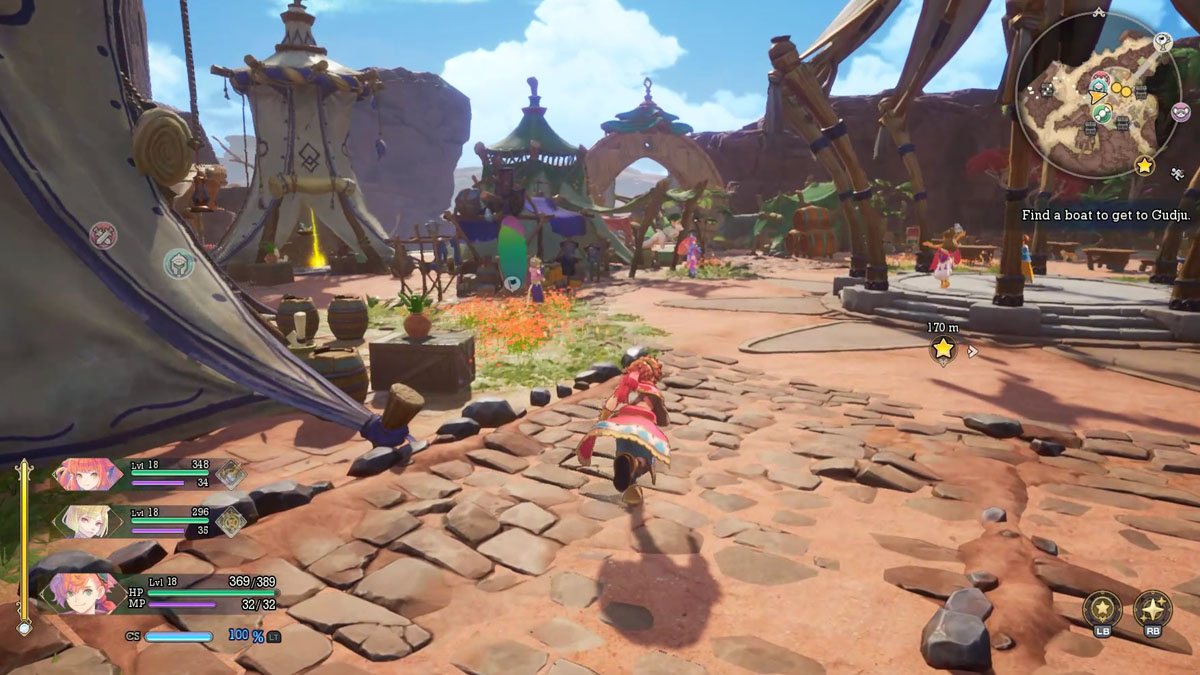
Once you’re done exploring, visit the harbor to learn that something in the waters has been stopping boats from traveling the ocean for a while, and you’ll need to find another way to reach Gudju. Once you give the convoy the bad news, Palamena will feel unwell, so follow her to the cape. Once you’re there, you’ll save her from a deadly fall. Return to the square once again.
Palamena shares what has happened to her, and you all decide to visit Tatoh Temple to clear up this whole situation. But before you exit, you get the Salamando Candle, which unlocks the Fire Classes for your team. Now everyone can always have an active Class! Its Elemental Vessel also deals some good damage with a short cooldown.

The Fire Classes will make the Water Elemental Aerie challenge much easier, so you can try it again now. Also grab whichever Fire Elementites you couldn’t grab before on your way to the Tatoh Temple, located west of Khawsia Moors.
Tatoh Temple
Once you enter the temple and approach the central room, some cutscenes will play out. Go down the stairs to your left and use the Fire Elemental Vessel to activate a rocket, which sends you directly to your objective.

Approach the stone tablet to learn more about the story Palamena has been telling, but it isn’t over just yet. Now head for the middle room, where some monsters will be guarding the next tablet. Defeat them and interact with the tablet to continue the story. One stone tablet left, and you can find it directly east of the middle room.

Go through the hole in the wall to reach the final enemy pack. Try to save some CS bar during this fight. Interact with the tablet, then return to the central room. The statue will start crying, and will eventually come back to life. However, Vuscav is angry with you and starts attacking.
Vuscavalanche (Boss)
This is more of an extended random encounter than a boss fight, as you cannot hit Vuscav directly. Instead, beating the monster packs will sap away his HP. Defeating three packs will give you victory, so focus on defeating all the monsters you see. Vuscav is constantly throwing some rocks in your direction, but this isn’t as bad as it seems.

A Class Strike is usually able to instantly clear a pack, so use them if you can. Elemental Breaks (especially Water and Fire) are also great here with their AoE damage potentials, so use them whenever your gauge is full. These enemies aren’t hard at all, and Vuscav will come to his senses once you’re able to beat them all.
Vuscav wants to express his gratitude for freeing him, but don’t follow him just yet. Instead, return to the temple and grab its chests. One of them has the Chalice of Loyalty, which unlocks two extra ability slots for Careena.
With the area properly explored, return to the beach in Khawsia Moors. Vuscav will take you through the seas and finally be reunited with his princess. And on top of that, he leaves you on the exact continent you had to go to!
Zawhak Desert
Once you reach Zawhak, you’ll also receive the Ferry Flute, which can be used on any chores to summon Vuscav. It is automatically placed on your quick slot inventory next to the bell used to summon the Pikuls.
Vuscav can take you through the whole game by traveling through the seas, including the Chapter 1 areas. They are all filled with side quests and Elementites you can now grab, so you might want to pay them a visit.
I recommend doing so if you haven’t found all of the Lil’ Cactus in these areas just yet, as finding 20 of them unlocks a permanent Experience bonus, and finding 20 of them is already possible at this point. The Reignus Temple you visited back in Chapter 3 is also available, and it has a Lil’ Cactus hiding in there, so remember to check it whenever you can.
Once you’re done with your side activities, return to Zawhak and prepare for some more faraway treasures. Null Petrify, Gust Pelisse and Silverine Happi Coat are the most important here, so look out for them before setting out to Gudju. They’re all next to the south exits, so it shouldn’t be a problem.


Aside from that, you have the usual stuff in here. Fight a few Nemeses, collect other treasures and grind up a few levels. Being around Level 19 ~ 20 should be enough at this point. Once you’re ready, head southeast to enter Gudju.
Gudju, the Earth Village
Back to the tutorial area, finally. After meeting Watts and grabbing some treasures, head to where Lysa is to learn what happened to her. Watts reveals that Gnome is possibly located in the Gamurda Mines, and sends you off after giving you the Gnome Shovel. Earth Classes are now available, and you have access to the first defense-focused Vessel! Once you’re done with the preparations, head to the other exit in Zawhak Desert.
Gamurda Mines
The mines have a special mechanic where you can control golems to operate certain mechanisms and break walls/wooden structures. Golems will be deactivated if entering battle, but they’re usually far away from monsters. The very first golem is right in front of you, so use it to move the first totem, opening the door to the right.

Head through the opened door, using the Golems to break the wooden barricades along the way. Once you reach the third golem, walk up the stairs in front of it to push the totem, opening the other closed door back in the entrance.


Now return to the entrance, grabbing any treasures and Elementites you find along the way. Remember to use the Golems whenever you have the chance to reach some of the treasures. Repeat the same did you just did on the new side, ending once again with pushing a totem upstairs.

The main entrance will open, with another totem to push to the front. Use a golem to push it and you’ll get access to the lower floor of the Mines, where you must do the same thing you just did on two separate sides.

One of the sides has a rocky formation hiding a treasure inside. Use the Golem to break it and reveal a chest containing the Chalice of Heirdoom, which will increase Palamena’s Ability Slots. Lil’ Cactus is also here!

With all chests found and the totems pushed it’s time to go fight this dungeon’s boss. Equip a Wind class on any character and head for the battle.
Jewel Eater (Boss)
While immune to Earth, this huge mole attacks with powerful lunges and rockslides targeted at your characters. The rocks can occasionally drop glowing icons on the ground, which will heal the boss if it gets to them. You can grab them instead, taking the healing for yourself.

Its weakness is Wind, so spamming the Sylphid Boomerang is very useful here. A Wind Elemental Break can also be huge, especially if you have Val with Thunder Saber. Palamena’s Thunder spells will also take a huge chunk of its life, so make sure to spam these. As long as you don’t let it heal much, you shouldn’t have much trouble with this fight.
After winning the battle, Gnome will be freed and offer his help so you can grow the Jaque Seed. Return all the way to Deade Cliffs (this time by sea!) and speak with the Beast Watchers to attempt the ritual once again. It’ll finally work out, and you can advance to the next area once you’re ready.
Mylos Woods
This zone is very quick. In order to progress further, you’ll need to beat the monsters around the big flowers marked around the map. This will make them disappear and open up your way. They are all simple regular encounters, so deal with them in any way you can.
Remember to grab the treasures you find along the way, especially Extra HP (found on a cliff close to one of the flowers) and the Chalice of Tomorrow (next to the exit). There are three flowers to dispose of, and you’ll be able to progress once you’re done with them.

Verdeus Borough
Once you enter the Borough, you’ll meet the sproutling Julei, who announces that there’s no Alm of Wood elected just yet. Keep following him around to try to convince him not to give up just yet, but he’ll eventually run off to somewhere else. Take this opportunity to grab the treasure chests around and explore the area a bit better.

If you try to keep heading toward your objective, the Merchant Sisters will appear and you’ll hear a strange noise. Get ready for a battle, and make sure to equip a Fire Class on someone. Flame Saber will be useful once again, but you may now have already learned it for Val. Head to your objective and get ready.
Grapplavine (Boss)
Aside from the very obvious weakness to Fire, the Grapplavine is also weak to Slash attacks. Palamena can go crazy with her Fire spells, and the good ‘n old Fire enchantment on weapons will not let you down either. The boss uses its vines to hit you from different directions, and you can defeat them to stun it for a few seconds. Be careful with the seeds it spits, as they can inflict you with poison.

Overall, this battle won’t be much more difficult than the previous boss, especially if you have someone with the Fire Elemental Break. The Undine Flask is, once again, very powerful here too, so use it alongside the Salamando Candle to quickly beat it.
Defeating it will gift you the Wood Sprite Tonic, which serves to expand Julei’s Elemental Plot. He joins you as soon as you defeat Grapplavine, being named the Alm of Wood. He acts as a healer, and can be very useful for boss fights. You also get the Dryad Sprig, gaining full access to the Wood Classes. After making some adjustments to your new character, keep heading deeper into the next Mylos Woods section.
Mylos Woods
This area is quite annoying. Using the Dryad Sprig to sprout vines to take you to your goal will be an important mechanic here. Use some of your Cookies to get some extra experience, as the next boss battle can be a bit rough. The small portion southwest of the map cannot be accessed right now, so leave it for a revisit later.
The path is very clear until you reach the middle portion of the map, where you have plenty of small “islands” you have to go through. These are very annoying to travel through, but keep pushing forward. You don’t need to visit each island, but it’s worth doing so for the experience/treasure chests. Make sure to visit this one in particular, as there’s a Chalice of Change for Julei in there.


Once you’re done with the treasures, use the Dryad Sprig next to that same chest to reach the final portion of the map. After a few more enemies, you’ll find another Meridian, Take this final chance to rest and change up some of your classes. I recommend equipping Dark Saber once again, as it’ll be very helpful in the next battle. Let’s head for the next area.
Sanctuary Entrance
Another very straightforward area. There’s nothing big to do here, so keep heading forward. You’ll finally meet Eoren at the end of the road, but his actions bring someone else to the conversation, and that someone isn’t very fond of talking.
Daelophos (Boss)
Daelophos is a legendary hero, and you’re almost no match for him. He’s very difficult to deal with because of his quick movements (much like Nemeses), sudden teleports and very powerful hits. Whenever his sword glows, he’ll teleport at some point of his combo, so stay ready to dodge. Avoid Light attacks as he’s resistant to those. His patterns are simple, but deadly.

He’s weak to Darkness, so Dark Saber will be huge in dealing some damage to him. If you manage to do a full combo string while he’s not doing his own attacks, he’ll be temporarily stunned. Use these chances to build up some Elemental/CS Gauge, which will be your best way of dealing with him. You only need to bring him down to 50% to finish the conflict.

Once you reach this threshold, the party will run for their safety, leaving Daelophos and Eoren behind. A bit anticlimactic, but Chapter 4 is finally done!
Chapter 5
Chapter 5 can be very quick or very lengthy, depending on your pace. Many Side Quests have been unlocked around the world, and they can extend much of your playthrough time. Some of these include more Behind the Scenery quests, and a quest line in Niccolo’s shop that rewards some powerful weapons, so I would give those a check.
Regardless of your choice, your next goal will be to visit Gudju once again. Call Vuscav from the Deade Cliffs (or wherever you end up after completing some side quests). Note that you won’t be able to teleport, so it’s another walk through the desert until there.
Gudju, the Earth Village

Once you reach the village, speaking with Watts will reveal that Daelophos is still chasing Eoren, so head to Lysa’s to find them. After a few cutscenes, the Benevodons have been set loose, and it’s up to you to stop them. Equip a character with any Wind Class before heading out of the village. Run back to Zawhak and approach the boat in the middle of the desert to encounter the first of these beasts, which will be a very different battle from the usual.
Garethe, Benevodon of Earth
Instead of directly fighting up the boss, you’ll have to shoot it down with a cannon. Always aim for the weak spots (the glowing holes in its body) to deal maximum damage. If your character is equipped with the Sylphid Boomerang, the cannon’s cooldown will be reduced, so stick to whoever is the Wind character right now.

Garethe will always be sending out his minions to attack you, but they aren’t much different from other monsters you’ve already faced around the area. He’ll send meteors crashing down on you, though, so be careful with those. After hitting all of his weak spots, he’ll start dancing around the skies, so wait until he’s back and the cannons are up once again.
Once he’s below 50% health, he’ll start marking a specific area to crash down on the ship, so run away from it as soon as possible. These will be more frequent as he gets lower, so be careful. Wood Classes are a good call here, as you can heal for free during his downtime. It might take a while, but eventually, you’ll bring down the first of the eight Benevodons.
After winning the battle, you get the Lumina Lantern as a reward, gaining access to the Light Classes. The lantern itself is also very useful against regular monsters, so use it often. Your goal now is to travel to the Log’grattzo Dark Archives, located on a faraway island. You can tackle a few new side quests around the world too, so once you’re done with those, head straight for the Archives.

Log’grattzo Dark Archives
There should be a few Side Quests available as soon as you get here, as well as the usual stuff with shops. The Dudbear has also updated its stock, so take a look if you have some extra Syrup. Enter the Archives to meet the next big character in the story.
Archives
You’ll meet Aesh as you enter, and he asks you to follow him outside. But before that, go for the chest behind the pile of books to find a Chalice of Heirdom. You can also explore the insides to find some other treasures, but this is the most valuable one.

Once you’re outside, you’ll be immediately demanded to go back inside and find a replacement support for the building. Follow your goal and speak with the scribe, who’ll tell you to take a look at the lower floor. You have various objectives here, but you only need to speak with the small man with a green hat, Von Boyage.

Von Boyage will hand you a replacement, so return outside and speak with Aesh once again, who will gift you the previous support: the Shade Sight. This is the final Elemental Vessel you were missing, which means that you now have access to all of the game’s Classes! These will definitely be useful, as you’ll soon face enemies weak to the element. But for now, let’s head for the Passagean Tomespire.
Passagean Tomespire
Your goal is to find a hidden tome in the depths of this huge library. Interact with the cube at the center to begin, and you’ll be thrown into a straight corridor. You’ll learn about how to use the Shade Sight for movement, and this will be the key to exploration around here. There will be a mandatory fight at the end of the corridor, which opens up more places for you to use the Vessel.

Light classes will usually have an advantage here, so use one of them in any suitable character. Keep heading forward until you reach the inverted shelves room, where you must use the Vessel to reach the other side. Remember to stop for this specific treasure, as it contains an Alexandrite, a fan for Careena.

After a few more jumps and mandatory battles, you should reach a Meridian. It means you’re done with the dungeon, but also means another boss fight.
Zehnoa (Boss)
Zehnoa likes to spit fireballs at you, which can be dodged if timed correctly. The boss itself isn’t a big issue, but the various minions it summons can be annoying. Use Class Strikes to dispose of them quickly. But once you do, it might start using gravity alteration on the whole room. Jump on the elevating cubes quickly and hop on the safe sides whenever the room starts spinning to avoid falling down, or you might have a very dead character once the spikes go up. Once the room stops spinning, you’re free to hit it once again.

Zehnoa is weak to Strike and Water attacks, so once again the Undine Flask is useful here, as well as any Knuckle classes for Careena. Avoid Fire attacks, though, as these won’t do you any good. The boss doesn’t have very difficult patterns, with the spinning room being the most annoying part of the whole fight.
You’ll find the Tome once you beat the living door, and once you return to Log’grattzo, Aesh will send you to another fetch quest. Speak with the three NPCs in the area to gather them, then head back inside the Archives. Speak with Von Boyage on the lowest floor, and he’ll complete the potion made to weaken Daelophos.
However, things go very wrong once he storms into the Archives and unleashes the Benevodon of Darkness. The potion did work slightly, though, so he retreats. But now you have a Benevodon to deal with, so return to the Archives to face it.
You can travel directly to the Meridian. There will be a chest behind where Zehnoa was, and it contains a Chalice of Tomorrow for Morley. There’s another Meridian right in front of it, and after some more platforming, you’ll have to activate a device using the Darkness Vessel on two different sides, just like in the Gamurda Mines.

Once both sides (and their mandatory battles) are done, return to the center and get ready for another long fight.
Zable Fahr, Benevodon of Darkness (Boss)
The Benevodon of Darkness is technically a double boss, with some similarities to Zahnoa. Both faces can be targeted, and using the Lumina Lantern will link them together. You should definitely do it, as well as use some Light and Strike attacks to deal extra damage. The left head uses its Alien-like tongue to attack you, while the right head spits a dark breath on the ground. They can also create a dark orb area on the ground, damaging characters who stand on it.

Focus the right head first, then bring the other down. Once you do, a third, final head will appear and heal the others. This final head combines the moves from the others, and it should be your main target. Use the Elemental Vessel to create a platform beneath the heads to make your attacks connect easier.
You can try to bring down the other two heads again with Class Strikes and Elemental Breaks, as this will greatly help with the battle. I recommend the Light or the Water Elemental Breaks. They can return, but the main head should be weak enough for you to dispose of it by then. Once it’s down, defeat the other two heads once again (if they’re back) to finish the battle. This is a long, but not very difficult fight.

Back in Log’grattzo, Aesh is appointed as the Alm of Darkness, and will follow you through the journey. Your next stop is in the Radiant Playhouse Terratio, where the Alm of Light awaits you. As usual, new quests have appeared not only in Log’grattzo but also in other maps, so you can also try to complete them first.
Radiant Playhouse Terratio
Once you arrive in Terratio, you’ll learn that the actors for their traditional play of Daelophos and Cerulia have all suddenly forgotten their lines, so it’s time to check on them. Grab the treasures you find around the area, as none of them are particularly hard to find.
Once you’re inside the playhouse, speak with the Daelophos actor, and then head down to see the Cerulia and Faerie actresses on the stage. The supporting actors can now be spoken with. As you talk with each of them, they’ll slowly tell you about the play as you use the Lumina Lantern on them. Return to the stage to learn that the Troupe Leader is missing.

Leave the playhouse to meet Aesh once again, then head up for the village at the center of the map to find her wandering to the Temple of Wendel. But before heading to the dungeon, you might want to equip yourself with new gear, as well as restocking on healing items. Use a Fire Class on any of your characters, and a Darkness Class can also be useful in the long run.
Temple of Wendel
The cavern shows you a new puzzle where you can use the Lumina Lantern to channel light into the mirrors, and then redirect them to another side to reveal a new passage. Sometimes, you can also use it for teleportation.

Be careful when fighting enemies here, as the slippery ground can make things a bit difficult. They also tend to freeze you a lot, but there’s a Null Freeze hiding in a chest that you can get later in the stage. Other notable treasures include a Sword of Fate for Val and a Chalice of Loyalty for Careena.
When you reach the room with two mirrors, simply activate both of them, then interact twice with the second one to open the closed door. In the following room, interact with both mirrors until they’re telegraphed as in the image below.

After this puzzle, the path becomes very straightforward. But after teleporting upward twice, you’ll find yourself in yet another room with mirrors. To solve it, interact with each of them until they’re exact as shown below.


After completing these mirrors, grab the chest nearby to find the aforementioned Null Freeze. There’s a Meridian up ahead, and you probably know what it means. Get ready, and remember to bring a Fire Class here.
Frost Gigas (Boss)
You probably know how to deal with these bosses by now. Flame Saber will be amazing here, especially if used on a Strike character. The Salamando Candle takes priority for the Elemental Break too, as you can literally burn through the boss’ HP in seconds with it. Frost Gigas tends to only hit in front of him when not using his icicle rain attack, so it’s not very hard to dodge it either.

Frost Gigas can surprise you by disappearing suddenly, but you can track it by looking at the ice particles around it. It does a 3-hit combo once it appears, but it should be easy to dodge if you know where to look. If you somehow need some extra defense, apply Ice Shields to the party, but avoid Water moves completely.
With the mid-dungeon boss defeated, keep heading forward. Be careful with the Bluster Gas enemies, as they can free you solid. The Null Freeze you got before will be very useful here, so give it to your favorite character. You’ll find the Sword of Fate for Val and the Chalice of Loyalty for Careena on the way.
As a side note, the invisible platform close to the area’s end is still tangible even if the light isn’t pointed at it, so you can safely jump on it to grab that Grizzly Syrup you see over there.

Once you complete the inside area of the cave, use the Vessel at the top of it to reach another Meridian. Equip a Darkness Class, and make sure that Val has Dark Saber and Lucent Shield equipped if you’re bringing him. And you probably should.
Selpahia, Benevodon of Light (Boss)
Darkness is the Benevodon’s clear weakness, and you can make most of her attacks useless by using the proper elemental shield too. When she starts channeling a red circle around her, you can just jump to keep pressing the attack. She can also use a freezing wind in front of her, so try to stay on her sides to attack.

As long as you maintain the shields up, you can ignore most of her light orb attacks. Dealing enough damage will make her fall to her knees eventually, so take this chance to charge up your Elemental Vessel. Darkness Elemental Break is preferable, but others like Fire can also work well. Thanks to Val’s many buffs, this fight ends up being much easier.
With the Benevodon defeated, return to the city and speak with the actors back in the playhouse. They will now remember the whole story and finish telling you about Daelophos and Cerulia. They will also enact the play, which ends up with Val being chosen as the Alm of Light. That’s it for Chapter 5.
Chapter 6
As usual with each new chapter, tons and tons of side quests have now appeared. You can spend a few hours backtracking for those, but I would suggest postponing them just a bit. With all Alms decided, all that’s left is to visit the Goddess of Mana, so go all the way back to the Sanctuary Entrance, where you first met Daelophos. You’ll be allowed to go in, finally arriving in the Sanctuary of Mana.
Sanctuary of Mana

Despite looking very large, the Sanctuary isn’t as big as it seems. There’s no Lil’ Cactus in here, so don’t bother looking for it. Instead, just keep following your pace normally until you reach the Meridian in front of the altar. There are plenty of powerful monsters here, so this is a perfect chance for leveling up a bit.
Once you find the Meridian, take the route east of it to find the few remaining chests in here. They contain the Dragoon Knife for Morley, the Chalice of Change for Julei and the Consecutive Casting: Non-Elemental Ability Seed, perfect for the Summoning-focused classes of Julei and Palamena.

Once you’re ready, step into the altar in front of the Meridian to meet Vadise, the guardian of the Sanctuary. Her duty is to impose a final trial upon you, so you’ll have to endure it.
Vadise (Boss)
This fight works pretty much as the Vuscavalanche fight, with Vadise only summoning minor enemies to fight you. However, she adds small riddles to the fight, where you must destroy the correct Elementite to proceed.

During the first riddle, destroy the Fire Elementite (to the left). During the second one, focus on the Darkness Elementite (to the right). The final riddle asks for the Light Elementite, which ends up in the center even after she changes its position. Destroying the final Elementite finishes the battle for good.
Vadise allows you to proceed, so head straight for the Mana Tree.
Mana Tree
Approach the tree to trigger the cutscenes here, where you’ll learn more about the Goddess and the truth behind the Pilgrimage. The Benevodons will attack, but they’re unable to surpass the protection of the tree. As you go to slay them, Khoda will give you a small parting gift: the Flammie Drum, which lets you ride on Ramcoh to reach different parts of the world. Chapter 6 is done!

Chapter 7
Now with the Flammie Drum, you have even easier access to all areas in the game, making backtracking much easier than ever. This is the perfect chance to start working on your Side Quests, get those Elementites you couldn’t get before and also leveling up a bit. You might consider starting searching for the Ultimate Weapons too, which will take quite a bit of time.
Once you choose a starting Benevodon, you’re forced to defeat it before chasing another one. Beating them will also unlock new Side Quests related to the area they attacked, so there’s even more backtracking. Also, the Dudbear shop will update once again once you visit one of the attacked cities, this time including Goddess Scales to reset your Elemental Plot.
Regardless of your choice, it’s time to chase down some Benevodons. You can choose any of them to face first, and the next ones will scale their level accordingly. The order presented here is the suggested order by the game, but you’re free to do it in your own order. For now, let’s head for the Wind Benevodon.
Longren, the Vale of Wind
Landing on Longren will lock you in chasing the Benevodon of Wind first, so be warned. Once you’re here, speak with the Chief to warn him about the Benevodon, but the path to the Wind Sanctum is blocked. Speak with the other villagers to try to convince them to help open the path, but none of them will help you. Not until the cutscene, at least, when everyone makes a final effort to move the boulder. Stock up as needed and get ready for another stage.
Wind Sanctum
This area is huge, but its structure is very straightforward. You’ll be using the Sylphid Boomerang to create air currents to travel to the next small “islands” frequently, and most of the chests will be easy to spot. Enemies here will scale according to how many Benevodons you’ve defeated before, so their levels might be slightly different for each player.

There are various treasures around here, so keep your eyes open for the Chalice of Loyalty, the Soulblade and the Winged Happi Coat, which are found in the chests displayed below. You can easily revisit the area later, but it’ll be great if you could grab those right now.

You’ll be walking in circles with the wind currents before reaching the first Meridian, but this is just the regular path. Once you touch it, prepare yourself with an Earth Class on your team. If Palamena has a few Earth spells such as Earthquake, these will be very welcome too in the upcoming battle.
Aello & Ocypete (Boss)
A duo boss was to be expected by now. The two harpies attack mostly with synchronized lunges and wind gusts, but these are easy to dodge with enough distance. They’re both weak to Earth, so the Earth Elemental Break and Palamena’s spells will take a huge chunk of their health. Both are very similar in how they attack, so it doesn’t really matter which one you take down first.

Once they lose some health, the twins will gather at the center of the room and start channeling a heart attack together. Use everything you have to break it before it explodes to leave Aello stunned for a while. Aside from other moves like feather rains across the ground, they don’t have anything special to look out for, and you should be able to beat them easily, especially if you have a few extra levels from Side Quests.
The next portions of the Sanctum will be much more of the same, with you using the Elemental Vessel to create wind currents or platforms to travel through the zone. Sometimes the currents are already there, so all you have to do is jump on them.

Once you step into the Meridian, get ready with the same preparations you did for the previous boss.
Besseroth, Benevodon of Wind (Boss)
Besseroth isn’t very much different from the twin harpies regarding its weaknesses. It’s also vulnerable to Earth, so the same things that worked for them should do just fine here. His attacks are much fiercer, though. It pounces directly in your direction, as well as slamming the ground whenever you’re too close to it, while also constantly unleashing wind and lightning waves at you.

The Gnome Shovel can protect you from these hits, and the Dryad Sprig is also a good option for healing all the damage you’re constantly receiving. Hit its legs to knock it down, then unleash everything you have to bring it down quickly. While the attacks can be scary, Besseroth isn’t as difficult as it seems, and you’ll be quick to beat him.
With another Benevodon down, you get another Wind Oracle Tonic for Careena. Longren is finally safe, and you’ll be back on Flammie for the next Benevodon fight. As usual, new Side Quests have appeared not only in Longren, but in other locations too, so go for those if you’re interested. After you’re done, head directly to Etaern.
Etaern, the Moonlit Parish
People have returned to Etaern, but there’s something odd about them. Once you’re down in the city, look for Meelpa for some info. You’ll learn that the whole city has been acting weird lately, and it even started affecting the Alms. Head for the inn to give them some rest, and Luna will explain the situation. You’ll need to defeat the Benevodon to make things right, and they’re hiding in Castle Cresceno, north of the Parish.

Castle Cresceno
Using the Moon Elemental Vessel in this area will be necessary to walk between the past and the present, allowing you to reach new zones and find certain treasures. You’ll have to use right at the start to jump down the hole that appears. Do it again once you’re down there, then climb up through the debris to keep following the main objective.


After leaving the castle and entering again through the library, use the vessel again to remove the rubble from the entrance to your left, then use it once again in the new room that opened. Go up the stairs until you reach the room with the cogwheels. On its left portion, there’s a section where you can climb up some cogwheels that lead you to a treasure chest. It contains a Chalice of Tomorrow for Morley, so grab it.

Now back for the main path, head to the right portion of the room, and climb up the cogwheels to reach the stairs. Climb up to the top of the castle and follow the path, only to find more stairs, so climb down those as well. There are some treasures to be found on the way. Keep heading forward until you see another hourglass. Turn back time to the past so the castle can be reconstructed, allowing you to finally reach your destination.


After the cutscene, use the vessel to send the gear (and yourself) to the top of the castle once again. From there, it’ll be a very straightforward walk until you find another Meridian. Save your game and make sure you have someone with the Lumina Lantern equipped. You’ll be attacked as soon as you leave the Meridian room.
Vampire (Boss)
The Vampire is quick, summons various extra enemies and can drain your life if he manages to grab you, so keep dodging at all times. He’s weak to Light attacks, so any Light class takes priority when using the Elemental Break/Class Strike. His slashes and lunges are very well-telegraphed, so it won’t be as troublesome to dodge. However, he can also put your whole party to Sleep, so use Ability Seeds to nullify the status effect.

Be careful when casting Light spells right before he jumps, or he’ll completely dodge your attack. Focusing on a Light Saber strategy might be better thanks to that. Once he’s below 50% health, he can turn the whole screen dark, making it even harder to see where he’s coming from. But hitting it with the Lumina Lantern will temporarily stun him, making for the perfect chance of a counter attack. Use everything you can during this time, and finish it with a Light Class Strike if it doesn’t go down from that.
The fight can be difficult, but if you manage to avoid getting grabbed a lot, you should be able to defeat it as soon as you stun it for the first time. Keep heading forward until you reach a straight corridor. After using the Elemental Vessel, you’ll be able to reconstruct the area and reach the top of the clock tower through the platforms, but grab the treasure at the end of the corridor before doing so. Once you reach the Meridian, get ready for the final conflict.

Tor Marne, Benevodon of Moon (Boss)
Completely immune to Moon attacks, Tor Marne will instead take extra damage from simple Slash attacks, so there’s no need to enchant your hits. Aside from the regular attacks, watch out for the many moon globes around the room, which will slow you down while you’re inside them. The main threat will be the rushing attack, where it’ll run in a straight direction with no way to stop it. If you’re quick enough, you can pull out its tongue with the Darkness Elemental Vessel when it uses it slap you, stunning the Benevodon for a few seconds.

Once it starts expanding and glowing at the center of the room, start focusing it down before it actually explodes, and you’ll be able to briefly stun it once again. Focus on the tongue, as it is the weak spot for this fight. Fortunately, there aren’t many different attacks it can use aside from some leaps, and you should be able to bring it down after a few successful stuns.
The reward for defeating this Benevodon is a Radiant Knight Tonic for Morley, as well as unlocking more side quests in many areas. One of them in Fallow Steppe can give you a powerful weapon for Morley, so it might be worth checking out. Your next objective, canonically, would be returning to Illystana.
Illystana, the City of Water
Once you’re back in the city, visit the Royal Palace to the north to see Iain, who’s sick due to stress. After some quick talk, return to the fountain at the center of the city to talk with Niccolo and Faerie, then return once again to see Iain. With this final conversation done, you’ll finally have access to the Luka Ruins Undertemple, located at the end of the Luka Ruins.

Teleport to the Ruins and head through the entrance normally until you reach the Elevator Gauntlet. Once again, monsters will gang up on you, so defeat the multiple waves while touching the bubble to dispose of them quickly. Once you manage to do it, head through the cavern where you fought the Fullmetal Hugger to enter the Undertemple
Luka Ruins Undertemple
While much more lengthy, this area is simpler than the regular Ruins. Your exploration here is a direct line to the Benevodon. Just remember to take a few detours on the way for some chests, which will include the Dusk Dress (right by the entrance) and the Chalice of Heirdom (next to the dungeon’s end).

You’ll have to ride bubbles to reach faraway places once again, but sometimes you’ll also need to use the Vessel to change the water level. Once you do it, it’ll be permanently altered for the rest of the game, so don’t worry about it in future revisits.

As soon as you change the level for the first time, you’ll reach a Meridian, which means that another boss is nearby. Equip your Fire Class, Flame Saber, Ice Shield and get into the arena.
Shreegill (Boss)
With its weak point being its head, you’ll want to use the Salamando Candle and fire-infused combo attacks on it as much as possible, but hitting its tentacles isn’t a bad idea either, as it can stun it for a few seconds. The tentacles can reach quite a long distance, so be careful with those.

When you see it being involved in a water bubble, get away from it as quickly as you can, as it’s about to use a water tornado. It’ll try to reach you immediately, following up with a water stream from its mouth. This attack leaves its head exposed, so this is your chance to use the Vessel. Once it’s below half health, it starts summoning water bubbles (much like the Moon Benevodon), but these are easier to dodge. You shouldn’t have much trouble if you’re abusing its Fire weakness.
From this point onward, exploration will be simple, and your biggest challenge will be to change the water levels once more before finding the next Meridian (and the final chests). Once you reach it, get some rest and prepare the exact same setup you just used against Shreegill.
Gandoom, Benevodon of Water (Boss)
Alongside the regular Fire attacks, Slash is also highly efficient against Gandoom, so abuse it. The fight also features the water bubbles, but Gandoom is much more aggressive with his stomps in front of him. Try to be always on his side to avoid the attacks and simultaneously deal some nasty damage to him.

If you see him charging up a red circle around it, get back as it’s about to hit you with a spinning tail attack. This is a perfect moment to use the Salamando Candle to dash back to his range and deal some good damage. He deals a lot of damage, so keep the Ice Shields up at all times just to be sure. His HP is easily depleted when you use the Fire Elemental Break, though, so you shouldn’t have much trouble once the gauge is filled.
After finally finishing it down, you get the Water Queen Tonic for Palamena, and it’s time to head for the final Benevodon.
Once you’re all packed up, head for the Verdeus Borough (where you first met Julei) to trigger a cutscene. From there, enter the Sanctuary Entrance and speak with Trent, who’s too sick to be able to help you. Visit Aesh back inside the Archives in Log’grattzo, and he’ll be able to give you the medicine Trent needs. Return to the Sanctuary Entrance once again, and Trent will tell you that the Benevodon is hiding in the Floating Island of Ulul.

To reach the island, fly directly east of Illystana to find the island in the sky. Head down there and be ready for the most lengthy exploration in the whole game.

Floating Island of Ulul
Yeah, this zone is huge. More than huge. This is by far the largest area in the whole game, but navigating through here is surprisingly easy. However, take your time while exploring the areas and finding the treasures. Keep your eyes open for the treasures marked below, as they contain a Pinion Robe, a Chalice of Change and a Chalice of Hope.

But even with such a big exploration zone, there isn’t much to do aside from getting those chests and grinding a few more levels. Exploration here revolves around using the Dryad Sprig to summon vines that will carry you to the next zone. There are also a few bubbles next to the lake, but isn’t anything you haven’t seen just yet. Just keep following the main objective until you reach the Meridian. As usual, get ready with Wood Shield and prepare your strongest characters for the fight.
Floaret, Benevodon of Wood (Boss)
Floaret is weak to Slash, so your regular attacks with some characters such as Morley (with any Katana or Knifes Class) will already be enough to deal with him. Any non-Wood Class Strike is also great, but I’d suggest the Water or Moon Elemental Break, as Floaret will be affected by both of them. Its most deadly attack involves a rain of burning seeds, so dodge them accordingly. It can also summon a few minions to the fight, but the Class Strike/Elemental Break can deal with these. This is by far the chillest Benevodon you’ll face so far, especially if you have a few extra levels on your bag.

Defeating Floaret will give you a Wood Sprite Tonic for Julei, and there’s only one Benevodon left now. But before heading out to Tianeea, this is another reminder that there are plenty of Side Quests available around the world. You definitely don’t need to complete them, but it wouldn’t hurt to get some new Abilities. Once you’ve decided, head to the game’s first area once again.
Tianeea, the Fire Village
Once you arrive in the village, head for the port to speak with the Mayor. She’ll allow you to visit the Dorpher Volcano, but you must first pay a visit to Val’s parents. But before that, you can also stop and speak a bit with Master Fiugo for some extra lore bits. Once you’re done with all the talking, it’s time to head for the final Benevodon’s lair.

Charred Passage (2)
Head for the north Meridian to finally access that final bit of the Charred Passage. There are some Elemental Aeries, treasures and some other stuff to find here, but the path will be very straightforward. The Side Quest in front of Dorpher can be completed inside the volcano itself, so no harm done if you grab it now. Let’s head for the Volcano itself.

Dorpher Volcano
The Volcano is a somewhat big zone, but with few objectives to complete. As soon as you enter, grab the Gold Armor for Val on the first chest you see to your left, but be careful with the lava.

The path ahead leading to the Benevodon is covered in it, but you can tune it down by using the Undine Flask on both sides of the volcano. Pick the left path first, as one of the treasures there contains another Chalice of Hope for Val.

Be careful with the lava and the stepping platforms while completing both sides, but don’t worry. You cannot die from burns, but you’ll still have to heal yourself before facing any enemies. Julei can make this easier if you learn Cure Water, so I suggest bringing him here. After reaching your objective on both sides, always return using the rocket from the Fire Elemental Vessel.
The road ahead is finally open, and after riding another rocket, you’ll stop right in front of a Meridian. Yup, it’s time for another big fight.
Axe Beak (Boss)
Despite its big size, this isn’t a very difficult fight for you at this point. Pointing the Undine Flask at the boss for a few seconds will chip away its health in seconds. Try to hit the crest in his head first to stun it, but the Flask should do enough damage even if you can’t. It’ll often fly away and start sending down meteors in your direction, but once it gets back to the ground, it’s time to hit it with some water again.

Palamena should be casting as many Ice spells as possible, as they all have a good chance of freezing it. Ice Saber can also help, but the Flask itself should be enough If you manage to do so, the battle is pretty much over. A single Elemental Break plus a Class Strike should be enough to bring it down.
Once you’re done with the oversized fire chicken, keep heading forward to find two Elemental Vessel spots. Grab those two rockets to reach the final Meridian in the Volcano. The same setup should be enough, so it’s time to do it.
Vaulchibel, Benevodon of Fire (Boss)
The Fire Benevodon is also very vulnerable to the Undine Flask, but it’s even slower than the Axe Beak. This also makes it quite vulnerable to the Luna Globe. Try to use both at the same time, focusing down on his body instead of his arms. However, dealing enough damage to the arms can stun him for a second, so it might be worth the effort.
Aside from Water, Strike attacks will also be very efficient here, so skills and Classes with those hits are very desirable. Keep blowing each of the Flask’s bubbles to recharge it faster, then continue this loop until the final Benevodon is finished!

You get a Soul Guard Tonic for your effort, and you’ll be back to Tianeea. Visit Hinna’s parents to have a heartfelt moment with them, leading you to the final battle. You still have a single enemy standing. Visit Aesh back in the Log’gratzzo Dark Archives, and after some cutscenes, do some final preparations. Prepare both Lucent and Dark Shield, and you can also bring both a Light and a Darkness Class to the team.
You can also tackle all of the remaining Chapter 7 Side Quests right now, or just go for those that can give you something useful (such as weapons or powerful skills). If you haven’t collected all Elementites around the world, this is also your chance to do it. Once you’re ready, head straight for the Entwine Bridgepass, where your final enemy is waiting.
Daelophos (Boss)
Daelophos retains the same attributes from his first fight (resistant to Light, weak to Darkness). Go all out with Dark Saber here, as he mostly does the same moves as in his first encounter. Once again, be careful whenever it starts to blink, as it’ll quickly go for a fast lunge in front of you. After reaching around 70% HP, he’ll start summoning light pillars around him, so respect those instead of jumping forward. He can once again be stunned after a few combo sequences, so use these chances to go all out on him.

However, once you get past half his HP, the fight will suddenly stop. Daelophos will break the Mana Sword and absorb its powers, tapping into a new, Darkness-oriented form. His resistances are now reversed (Weak to Light, resistant to Darkness), and he’s even more aggressive now. Most of his attacks are based on the darkness orbs it summons, with the most dangerous being a wall of orbs that follows your characters.

To deal with those, you can always try to dodge at the last second or keep as much distance as you can, then dash all the way back in his direction. The second option is slower, but much safer, which can be good if your allies keep dying to the orb wall. The Light Class Strikes take priority now, and Dark Shields can help immensely, even if you have to constantly reapply them. But once his HP is over, there won’t be any surprise transformations. Chapter 7 is finally done!
Chapter 8
Before heading to the Sanctuary, make sure you complete your personal checklist. Try exploring the Ancient Ruins at the very minimum to get some extra experience and powerful weapons. Some of the other Ultimate Weapons are locked behind side quests, which you can do right now. Don’t bother getting new gear, though, as you’re about to find the best one available soon.
Visit the Dudbears, stock up on healing items, complete Elemental Aeries and grind as much as you want. Once you feel like you’re ready, head straight for the Sanctuary Entrance. The scenery has vastly changed, but you still need to keep following through. The Distorted Sanctuary has a total of six different rooms, each with rare treasures, powerful enemies and even some bosses. You’ll need to go through all of them to reach Daelophos, so let’s get going.
Distorted Sanctuary (1)
The first area is based on the Sanctuary itself. None of the areas have anything special, aside from the fact that each of them has a rare treasure containing the best Armor for each of the characters. The first room has Julei’s Arboreal Robe next to its exit. If you’ve been collecting all Lil’ Cactus, this is also where you can find the final one, so grab it before heading out to the next zone.
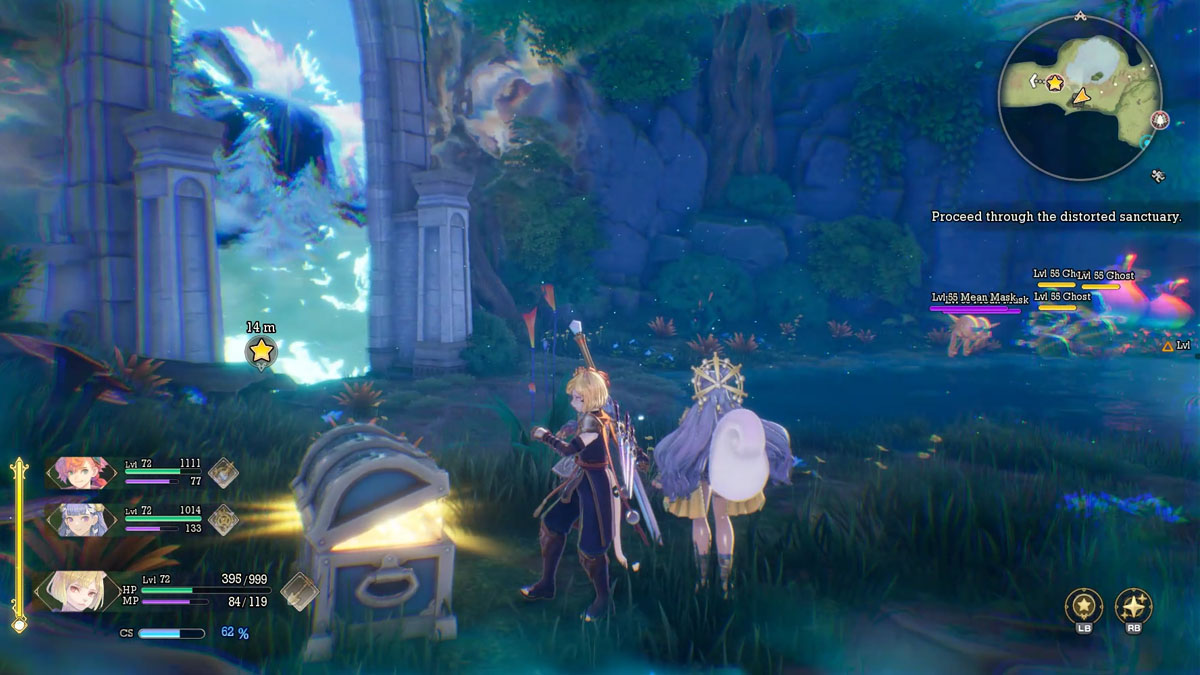
Distorted Sanctuary (2)
Based on the Rime Falls, this is another very linear zone. Just remember to stop to get the Ethereal Pelisse for Morley next to the exit, and you should be good to go.

Distorted Sanctuary (3)
The Mystic Garment for Careena is located next to the tower. The zone is based on Mt. Gala, and it’s a bit longer than the two that came before. Enemies are getting a bit tougher, so be careful.

Once you get past the doors, you’ll find yourself in a blank room. The Savage Grapplavine will attack you, but it’s exactly the same as the regular version. As long as you have a Fire character with you, it won’t be around for much longer. This is only the first of the many bosses looking for a rematch, so be careful.
Distorted Sanctuary (4)
Once you arrive in the Deade Cliffs, you’ll find the Mortal Plate in the first chest you see. Defeat all of the enemies around the zone, but be careful with the Petrify status. Equip your characters with resistances just to be sure.

Once you’re done with the minor monsters, the Savage Mantis Ant will attack you. But as one of the first bosses of the game, it’s still quite weak to be a threat. Use Wind attacks to dispose of it quickly, and be careful with the poison.
Distorted Sanctuary (5)
The Luka Ruins Undertemple will give you a save point, as well as a rematch with Shreegill. He’s still as simple as before, so a quick Fire Elemental Break should be enough to deal with him. The Spirit Coat for Palamena can be found at the end of the area, so keep going forward and defeating as many monsters as you can, as any extra experience points can be very useful.

Distorted Sanctuary (6)
You’ll reach the Entwine Bridgepass, where you’ll finally learn about Daelophos’ complete past, and why he changed so much. But before you can reach the final zone, you’ll have to face the tutorial boss once again, but with some extras.
Boreal Gorg & Gaian Gorg (Boss)
The Gorgs fight very similarly to their regular enemy counterparts, except that they are much slower with their attacks and have their heads as a weak point. The Boreal Gord (blue one) is weak to Strike attacks, but nulls Wind hits and resists all other elements. Gaian Gord is weak to Strike and Wind, but nulls Earth damage and resists all of the others. Both are neutral against Slash hits. While they’re both slow, be careful with the laser beams, which will hit for a lot in higher difficulties.

The best way to deal with them is to try to use AoE attacks to burn them down together, even if they resist the attacks. If you brought a Wind Class, focus down the Boreal first, always aiming at his head with the Boomerang. Avoid using the Wind Class Strike, though, as it’ll do no damage to the other Gorg. A good option here is the Moon Elemental Vessel, as it can slow both of them a bit more. The battle gets much easier once the first Gorg is down, as all that’s left is to bring the other one to its knees.
Distorted Sanctuary (7)
You’ll finally return to the entrance, but the Trent you see is not the real one, but an illusion that sees you as enemies. It’s time to cut down a huge tree.
Trent (Boss)
Much like the Grapplavine, Trent is weak to Fire and Slash attacks, but also resists Water while being completely immune to Wood. It can also summon lesser enemies, but the most annoying part is the vines. You can destroy them to stun him, or just unleash a Fire Elemental Break to do the job. Most of his attacks are vines that come from the ground, or slams done by the static vines with health bars.

Trent uses a lot of poison, so Julei is valuable here with its skills to remove it. Trent can also trap a party member randomly. If that happens, swap to another character to free the ensnared one. Depending on how strong you are, it might be better to just ignore the vines and focus down on Trent himself, as the battle might end up quicker this way.
Once Trent is down, you can finally cross to the Sanctuary Entrance, putting an end to Chapter 8.
Chapter 9
You’re finally back to the true Sanctuary of Mana. Teleport directly to the Meridian and save the game, then make your final preparations. You can return to any city and stock up on items for a last time, or grind a few more levels if you feel the need to do so.
Once you cross the bridge to the Mana Tree, there’s no coming back, so make sure you’re prepared. Try to cover as many weaknesses as you can with your skills and Classes. Also equip as many skills that can help you generate CS Gauge as possible. The one you get from finding all Lil’ Cactus is quite useful, for example. With your best team deployed and confidence renewed, head to the final confrontation with Daelophos.
Daelophos (Boss)
Daelophos starts out in a very similar way to his previous fight, but in a giant form. He can do the usual kicks and slams, but also attacks constantly with the orbs he summons from his right arm. The orb’s element depends on the color of his arm. It starts out as Darkness, but he’ll quickly swap to Light after taking a few hits, for example. Daelophos circles through all elements during the fight, and his weaknesses change as he does it. Here’s a quick damage chart:
- Fire <-> Water, Wood
- Wind <-> Earth
- Light <-> Darkness

Moon will be neutral against all damage. Try to swap elements on the run to deal some extra damage to him, but it isn’t mandatory. Avoid his laser attacks by jumping, and try to focus down on his head whenever you have the chance. Daelophos has a huge health bar, and he’ll be cycling through the elements throughout the whole fight. The lasers and orbs are the most dangerous attacks here, so I really recommend bringing Julei if you’re uncertain about the fight. His heals can be a deciding factor here.

Once you push Daelophos down to 50% health, a cutscene plays out and he gets (yet another) power-up, with two new arms at his disposal. In this form, Daelophos teleports more aggressively, and his ground pounds are also much more frequent. Fortunately, this means more chances to hit him while he’s kneeled. But as he uses multiple elements at once, he’s now harder to defend against. He also does meteor-style attacks from time to time, although he’s relying more on the lasers than anything.

The main new attack to worry about is the explosion around himself, which will also pull you to him. Keep dashing away until you’re out of the circle. Darkness pillars will appear and slowly enclose the center, just like the light pillars in his previous fights. These are easy to dodge, but Daelophos will also be teleporting and trying to hit you during this time, so be careful. A Dark Shield will completely negate their damage, though.

Spamming Class Strikes is your most reliable way to damage him, so use them as soon as possible whenever you have the chance. There are some pots that will refill the gauge around the room, so try to break them once you see them. The cycle repeats for a few minutes, but after a lengthy battle, Daelophos will finally go down. Congratulations, you completed Visions of Mana!

After the credits roll, you’re able to save your data for Chapter 10, which adds a bit of post-story content, including new bosses and some extra side quests. You can also start a New Game +, which includes features like an even harder difficulty. You can also take this time to clean up any other content that’s left, so enjoy yourself!
Visions of Mana is available for PC, Xbox and Playstation.


Published: Sep 2, 2024 11:40 am